1.8 t timing belt diy. ECS News 2019-01-23
Audi A4 B6 Timing Belt Replacement (1.8T 2002

Audi A4 timing belt failure on these engines will results in catastrophic engine damage i. Phil The cambelt interval was changed retrospectively to 5 years or 75000 miles for 1. To remove the serpentine belt, use a crescent wrench or locking pliers to lever the tensioner clockwise to loosen. The mark on the cam gear will either be aligned with the mark on the valve cover, or 180 degrees opposite. Everything is cleaned up ready to put new parts on belt, water pump, both tensioners, idler pulley, but can't find torque specs for the Beetle 1. Turning a valve on the tool connects it to a container with fresh coolant that is then sucked into the system. Lay it on the floor, out of the way.
Audi TT MK1 1.8T & VW MK4 1.8T Timing Belt Installation

Check spark, fuel injector pulse and fuel pressure, volume, quality and engine compression. I'm also interested in this reply, my car also has the Votex bumper. Remove the 10mm nut holding the main pulley. Underdrive kits available in five colors. Installation Note: After double checking the timing marks, remove the nut, washer, and stud.
Audi A4 B6 1.8T AMB Timing Belt Replacement

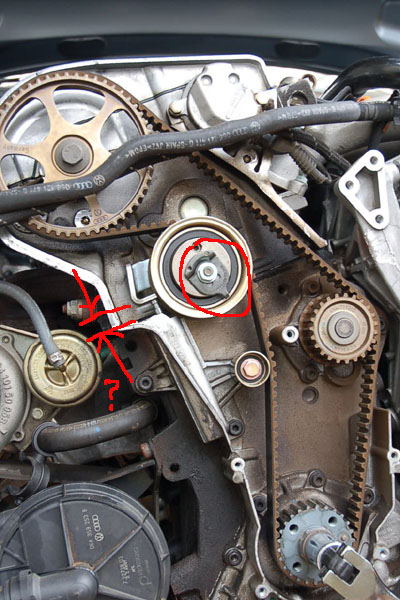
Those wishing to forego this step should at least remove the keys from the ignition and hide them until the job is complete. After that remove the three bolts that hold the belt tensioner and take it out. Care and patience are the key ingredients to doing this job right the first time. Step 23 Install the roller and torque to specs. Figure 2 There are two lines connected to the top of the upper valve cover, a coolant line from the turbo red arrow and a vacuum line yellow arrow. Step 6 Suction as much power steering as possible from the fluid reservoir.
Audi TT MK1 1.8T & VW MK4 1.8T Timing Belt Installation

Owners will need to confirm their engine code. Refer only to the cam and flywheel marks after turning the engine over by hand. Follow these instructions at your own risk. There should be two clips that need to be released; one left and one right. On the underside of the bumper in each empty grill space there will be a long 6mm hex bolt as seen in the picture that must be removed.
A4 1.8T B6 Timing Belt Change

Audi recommends changing your timing belt every 100,000 miles. Using the paint marks on the old belt for reference, add matching paint marks on the new belt, including the direction-of-rotation mark. Its threaded rods and attachment chains let you safely raise and lower either side of the powertrain from above. Remove the two 10mm bolts holding the cooler loop to the condenser. But if you wish to do so for a flush, etc this is how you do it. August 26, 2016 Followup from the Pelican Staff: We don't currently have that tech article.
Audi A4 B6 Timing Belt Replacement (1.8T 2002
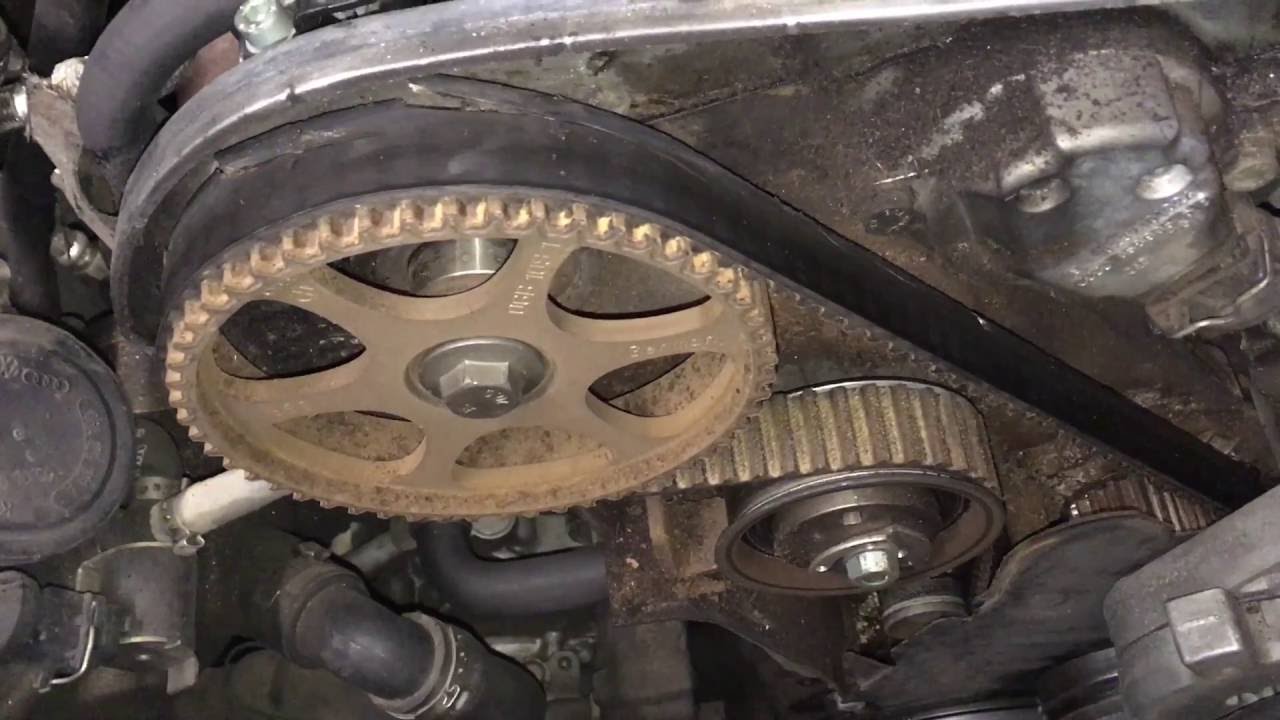
This shot gives a good look at the crank sprocket. Removing the radiator involves releasing the two plastic pins on the top. I would grab a repair manual. It takes 720 degrees of crankshaft rotation to complete a complete engine combustion cycle. If you choose to use a hydraulic floor jack, locate it under the engine in a spot where it cannot slip. I did follow all the steps and noticed at the end of job, one end of the braided vacuum hose was disconnected and cannot locate where it should be connected to. Take a touch up pen and mark the positions on the sprockets and belt while the old belt is still on.
Audi A4 B6 Timing Belt Replacement (1.8T 2002

Like many engines, the 1. If it is less, you can loosen the nut and use your needle nose pliers to add gap and then retighten the nut. Even if the tensioner is not giving you trouble, there is a tremendous amount of work to get to this point. February 17, 2018 Followup from the Pelican Staff: You are correct. I attempted to do this by referencing a mark on the crankshaft gear relative to the engine block, but it turned out that something had already moved. . Step 20 Remove the three bolts from the water pump.
1.8T Timing Belt DIY
The car was new to me and was on 80K and the last documented change was 5 years previous at 38Kish, I had a look at the belt a couple of times and it looked a bit tired but not split or perished anywhere I could see but it wasn't so tight anymore that's for sure. Comments and Suggestions: Drummer boy Comments: Great write up as always chaps , quick question please? Figure 7 The coolant hose can be pushed up and over the valve cover to keep it out of the way while you work. I'd not heard about the bearing seals leaking, but certainly the item I got looked like a quality item. The mark is a little hard to see, but it is there. Figure 27 At this stage I recommend installing the lower timing belt cover and the crankshaft pulley. Step 1 Under the hood, unscrew the threaded retainer upper arrow and remove the right side beauty cover.
Audi A4 1.8T Volkswagen Timing Belt Replacement

More coolant will drain from this area. The belt will stretch over time and eventually fail, which is not a good thing since the 1. Have a friend hold it while you remove the bolts, or do it yourself somehow I managed to. Shame its the first 4cylinder car I've owned and I was quite impressed, poor little thing, and how much of a prick is it to do in the engine bay? Give our parts specialists a call at 1-888-280-7799. I did remove mine after taking ages to find a socket deep enough but not to long to get the middle bolt out! When I checked the timing again after installing the crank pulley, it was off by one tooth.