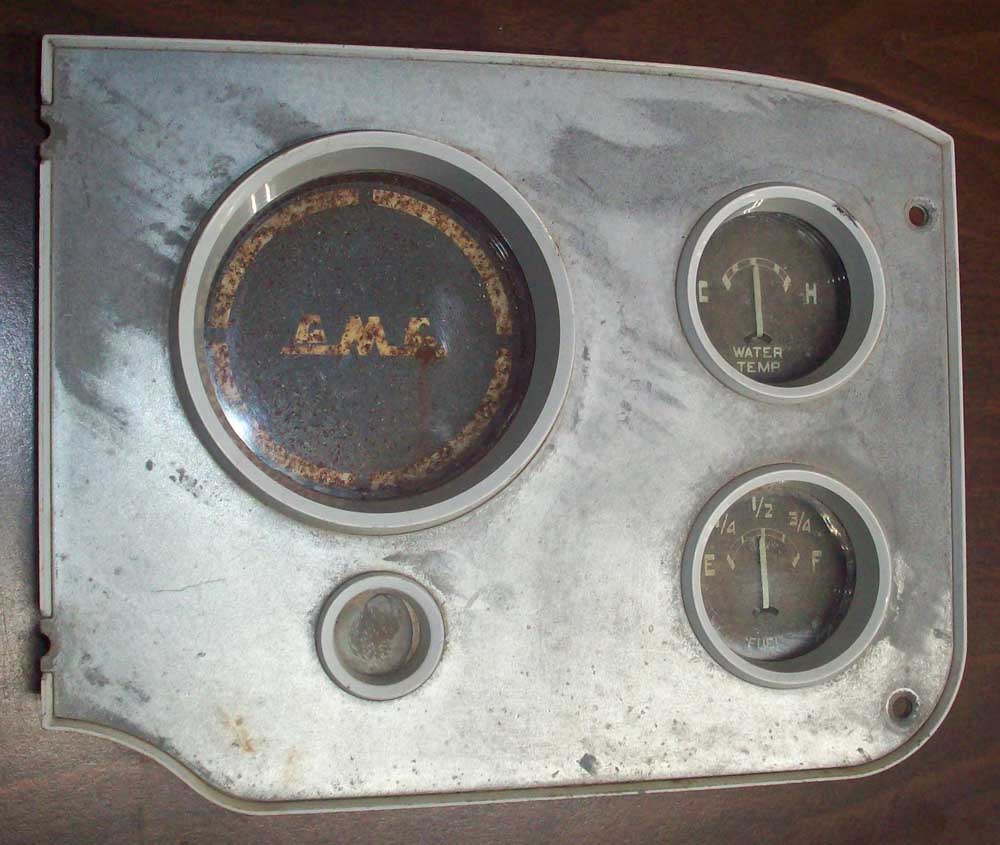
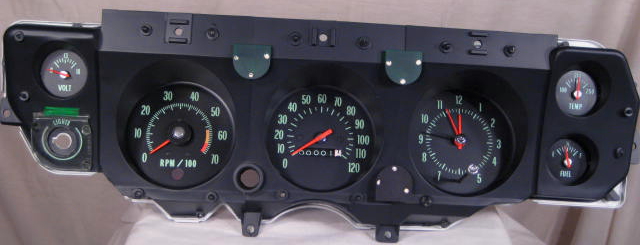
1973 monte carlo instrument cluster. 1973 Chevy Monte Carlo Instrument Cluster (Used/OEM) 2019-04-03
1978
This face plate is blue in color and does tend to darken with time. Will be defiantly ready by the end of next weekend Arthur are you using the stock location for your turn signals, high beam, and brake light? If when you get done, you still want more illumination, this is an option to you. I bought the sockets from the Parts Place. Our large network of salvage yards ensures that you'll be able to find used Chevrolet Monte Carlo instrument clusters quickly, all from the comfort and convenience of your home or office. Turn your turn signal in each direction to ensure the indicator lamps are working. To get to these 3 lamps, the speedometer would have to be removed, which requires disconnection of the speedometer cable. Using a light tester, check to see if that stray wire you show in your pic is hot.
The Part Guy
One side goes to the regulator and the other side goes to the battery. One is the way Doug suggested, by following it back to the source at the fuse box. Only thing I need to set up is the Speed and Oil pressure gauge but she is ready and running I do admit I was excited so photos are blurry Stock steering wheel looks out of place to me now, so that will be the next change to Letty. A few swipes on each side of each clip is sufficient to remove any oxidation that can cause erratic gauge readings. You can fix 90% of the dim gauge problem by just replacing the 5 easy to get to lamps.
DASH PAD AND DASH REMOVAL FOR 1973

Another suggestion offered up by Brian McMillan is to adhere aluminum foil to the reflective portions of the dash with 3M Super Trim Adhesive. Shortly after, you will receive price quotes directly from the sellers that stock the Instrument Cluster. If it does, remove the lamp and clean the contacts of the lamp socket, then replace the lamp. I have never moved a wire in the harness so I'm no help there. Doug If you touched that wire terminal to a ground point and it sparked then that wire is live all the time if the key was not turned to On or Acc.
Monte Carlo SS Dash Light Upgrade

Ensure they are seated all the way in each socket. To have a step-by-step instructions would be awesome. Replace non operable bulbs, install new circuit board? Where did you get your gauges and did you get a complete conversion kit? The most difficult part of this project, at least for me, was working under the driver's side of the dash with the seat in place. Another way would be to post the wire description and maybe someone with their 72 partially disassembled can look at theirs and assist that way. If so you can tie the signal + to the stock turn signal and then the grounds together. Install was supper easy and just have to put it in the dash in the morning The color is Black Alloy and will light up Blue. The '70 gauges have a light green tint to all the numerals and markings where the '71 and '72 both had white numerals and markings, but that may not matter in your case.
Tachometer Repair Restoration for Chevelle Classic Cars
If you buy the complete kit from someone like sonnie24 on eBay, you'll have everything you need. As mentioned earlier, since plastic parts can be extremely britle after many years of heated operation, use extreme care when handling and soldering the contacts. Used Instrument Clusters for the Chevrolet Monte Carlo for Sale Get a great deal! Make sure you mask off the lamp socket contacts while you paint. You could use white or a very light blue. There are a total of 8 lamps that are used to provide illumination to the gauge cluster. You are a much younger man so it may not be a challenge for you, but if I were to do that upgrade again I would temporarily remove the driver's seat to get better access to the fuse panel which required some detailed re-wiring.
DASH PAD AND DASH REMOVAL FOR 1973
One step further would be to also paint the cluster sections around each lamp with the same reflective paint. Use an open pin and use the same pin on the other side. Would anyone have instructions for the installment of the gauges? You will need to trace it to its source and using wiring diagram, follow it to it's connection point if cant be identified by anyone reading your post. We'll do our best to help you find top-quality instrument clusters at the best prices possible. . This will take some time to do and needs to be done in order to get this correct if not and you try to just ground out wires that are now live instead you can either have a dash harness fire or melt the whole lot together, there are two members on here that had just that and it took me 8 hours to rewire the whole under hood and dash itself which means the whole full dash has to come out. Check your fuse block to see if any are blown.
Dash Lights

By soldering the connections to the board with a 25 watt soldering iron and rosin core solder, the lights will be even brighter and the gauges particuarly the voltmeter will no longer behave erratically. You will want to turn down your brightness control that's right. Turning the cluster housing over reveals the printed circuit board. Like Kyle already mentioned there are 2 bolts on each side one going up one going out. Where did you get your gauges and did you get a complete conversion kit? The stock lamps 8 type 168 bulbs are rated at 3 candlepower.
Conversion to gauges/tach.....

Thanks for all the help everyone, I am now one happy camper! To reassemble everything, just reverse the order of the disassembly instructions listed above. Here's a Before and After shot of my project. Yes, Bryan, I have a set of step-by-step illustrated instructions and also a photo journal of the process on Photobucket. In addition the gauges are not directly lit by the lamps. The rear of the faceplate is a bluish color that darkens with age. Email Address: Postal Code Required Street Address Complete, verifiable Street or other address required Hidden City Your city or town State or Province Required Location area within State Which selection best describes the area of the State that you live in.