1984 chevy truck torque specs. Chevy Truck Front and Rear Suspension Specifications 2019-01-15
Torque Specifications for the Main Caps on a 1984 Chevy 305
When you get it within specs, make sure everything is tight and greased. Slide the rotor onto the spindle and grease the outside bearings and slide it in. Some people have had to cut a notch into the cross member to get the pitman arm off without the designated puller: 7. After you are done with this part start unscrewing each end one at a time. The torque is important because it sets the preload on the bearing balls and races.
Torque specs front spindle nut 84 chevy g30
With the floor jack under the lower control arm to hold it up level, remove the cotter pin from the ball joint nut and loosen the nut a few threads. Install both u-bolts and while tightening make sure you get the holes aligned with the studs. Just clamp the arms in a vise and use your chisel to cut off the rivet heads and they will come right out. You can pull a string from rear to front along the tire sidewall. Clamp the upper control arm in the vise by the cross shaft. Next remove the cotter pin from the top ball joint nut and loosen a few threads. It was replaced by the Silverado series in 1998.
GM 5.7L
It should slide right in. Don't remove the nut all the way yet. A long piece of metal called a connecting rod connects to a long, thick bar of metal with lobs, or offset axles, called a crankshaft. Install the cross shaft and align the marks you made earlier. Torque the bolts to 25 ft.
Chevy Truck Engine Specifications, RPO Codes, Horsepower, Displacement, Torque Ratings,
It powered the Caprice, Impala, Malibu, El Camino and the Monte Carlo. While there are a number of high mileage examples, the 6. Type: Dim: Length: Head: Grade: Oil Pan To Engine Block 13. Bellhousing Transmission to Block Engine Oil 25 ft-lbs. Make sure you have a new copper washer on top and bottom of hose fitting block. Use the J29107-A or J6632-01 in order to remove the pitman arm from the steering gear pitman shaft. Engine and TransmissionThe gasoline engines available on the 1984 Chevy K20 included a 4.
Small Block Chevrolet V8 Engine Specs

With the engine on top dead center the ignition rotor should be pointing to the number one mark or notch that is on the distributor housing, if it is not then loosen up the distributor and turn the distributor until the ignition rotor is pointing to the mark or notch on the distributor housing and then tighten down the distributor, the engine should now be static timed. Loosen it just enough to align it for the cotter pin. Now you can lower the floor jack and remove the safety chain. When one bushing is out, do the same to the other one. Work around the insert while using the air chisel or chisel and hammer and it should come out fairly easy. Control Arm Bushing Removal: This is a real pain in the butt the first time you try this. The bolt needs to be threaded all the way up.
Small Block Chevrolet V8 Engine Specs
The lower control arm bushings are installed a little different. When the drivers side is right, tighten the adjustment clamps. Three bigger engines were offered as options in 1984. It is attached with four brackets, two on the frame, and one at each lower control arm. Remove the two nuts and cotter pins from ends on relay rod center link and use tie rod pickle fork to remove the inner ends. This will give a general idea of how far it needs to be screwed back in when you install them. Verify your engine specs with a service manual for your year and model.
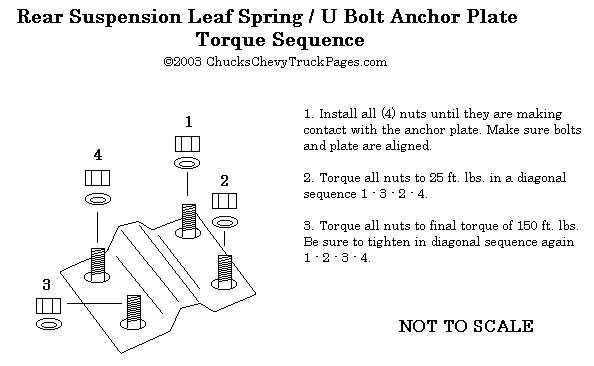
Suspension Torque Specs

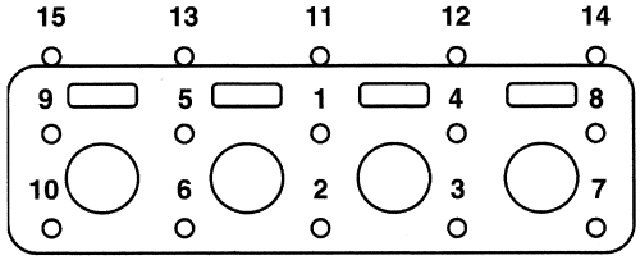
Cylinder HeadTighten each cylinder head bolt to 68 ft-lbs. Chevrolet manufactured these C30 series of pickup trucks with a regular cab and an extended crew cab. Make sure they are the same as before you dismantled them. Do this for both upper control arms. After you are satisfied with your handiwork, take it to a front end alignment shop of your choice.
1984 torque specs
If you notice the shims have a square shim which goes on last and it is curved on the outside. The cross shaft needs to be installed with the side away from the ball joint having the curved in areas where it bolts up to the frame. Control Arm Removal: The top control arm is mounted to the frame with two lock nuts. The ones going on the sway bar ends need to have the split toward the wheel. Start an insert and place the piece of pipe on the receiving end and clamp it in the vise.
1984 Chevy C30 Specifications

Keep the washers and nuts for upper and lower control arms separated because they are different. By 1984 the firm had acquired a loyal customer following, and Chevy trucks became an integral part of the American automotive landscape. Place the engine at top dead center. A 250 cubic-inch in-line six engine was offered with 130 horsepower hp and 210 foot-pounds of torque. . This is the only point in the engine where the cylinder head is attached to another component; but other components can be attached to the cylinder head. Put the flat washer and then the nut onto the bolt.