2002 ford focus zts alternator. 2002 Ford Focus Alternator Failure: 4 Complaints 2019-04-11
How do you change an alternator on a 2002 Ford Focus and where is it
I was getting power only at setting 4 and none at other settings. Also had clear instructions for wiring including speakers. Unscrew the other retaining bolt until it is fully disengaged from the threads will not be possible to remove bolt from alternator until after alternator has been removed. It doesn't take a lot of force. The charging system is controlled by the vehicle's computer.
Alternator

If it doesn't, it needs to be replaced, not cleaned. The frequency range is determined by the temperature of the voltage regulator, where 97% indicates full load, and below 6% indicates no load. Don't forget to remove the negative battery terminal before starting. At least someone is trying to help me. Advance Auto Parts has 32 different Alternator for your vehicle, ready for shipping or in-store pick up. The sizes of the fasteners to remove are three 15mm bolts on the body, and two 18mm nuts on the engine. Fortunately the local store worked with me to get me a deal on the Bosch reman alternator this time.
2002 Ford Focus

So why the hell does this keep happening to us and other people? After that, just go nuts and start taking things apart until you can see the cds held by individual black plastic trays. . Remove the plastic cover, unscrew the nut and disconnect the wiring from the back of the alternator. Labor rates can include an electrical diagnostic fee and the actuallabor for installation. Installation is reverse of removal procedure Don't forget to carefully bend ground bracket back to original position. Take it to a shop that does alignments.
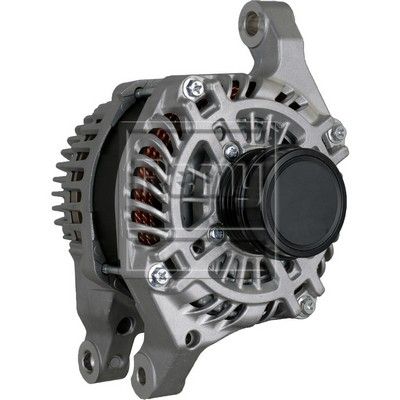
www.littleboyblu.com: DB Electrical AFD0091 New Alternator For Ford Focus 2.0L 2.0 00 01 02 03 04 2000 2001 2002 2003 2004 Dohc 8260 334

This Channel provides videos for informational purposes only and cannot be held liable for injury, damage, problems that arise when trying to duplicate steps shown in videos. Take out the two retaining mount bolts at the front of the alternator and you should now have proper clearance. Verify the battery voltage is 14. The book he has on the car isn't any help. The alternator has to sets of wires going to it on on the side and one on the back.
Ford Focus Alternator

Is there a history of alternator problems with these cars? Akright I hope that this answers the question and is not vague like the the first one. Tried to contact the product maker dB about the warranty and they told me to contact amazon. Unscrew securing bolt from wiring loom bracket and move to one side disconnect multi-plug. I even tried modifying the stock harness to fit with no luck. So anyway, lately it's had trouble with lights randomly flashing and clicking on and off, shuttering really bad when I hit the brakes and just stopping in general.
2002 Ford Focus Charging Problems: Changed Battery, Alternator, ...

This pushes the internal retaining clips out of the way and allows the radio to move out of the dash. Hopefully will have better luck with this one. On other models you will have to loosen the adjusting bolt on the alternator bracket. In this article, I'll show you how to do an alternator test using just a multimeter and in three easy steps. Not sure of the size. As long as your engine looks like the one in the video, this should work for your year car. Every Motorcraft part is recommended by Ford Motor Company and features the trusted Ford Parts or Motorcraft® brand name.
2002 Ford Focus Starter

Today is March 20th and a diode has failed leaving me with a parasitic draw on the battery. Put the alternator in the engine compartment. Now if you havent already done so remove neg on battery put car on jacks and remove the drivebelt. A Ford radio usually will become 'locked' after 10 invalid codes have been entered. I don't know if the wire harness is the same for an auto to a manual. We cannot show pictures, however replacing the alternator on most models and years of Taurus is very easy.
2002 Ford Focus Charging Problems: Changed Battery, Alternator, ...

Remove the two retaining bolts from the canister purge valve and move to one side. Second alternator seemed to work fine, though a bad pin connector on the back of the alternator meant that my alternator light was on all the time, in spite of the alternator functioning. If it doesn't keep the old nut. Remove the bolt from power steering reservoir bracket to release ground cable --- Carefully bend the ground bracket down aid in removal of alternator. Slide the two U's into the holes on either side of the radio then simultaneously pull both U's sideways-out i.
www.littleboyblu.com: DB Electrical AFD0091 New Alternator For Ford Focus 2.0L 2.0 00 01 02 03 04 2000 2001 2002 2003 2004 Dohc 8260 334

He said Ford finally decided to fix this in 2007 when people were buying aftermarket metal parts and having them put into the transmissions. Unscrew securing bolt from wiring loom bracket and move to one side disconnect multi-plug. I spent the better part of a day searching for the power draw and it led me back to the alternator. Unscrew secur … ing bolt from wiring loom bracket and move to one side disconnect multi-plug. So we got it replaced-crap, that was expensive- and lo and behold, it's still having problems. Zetec-E engine: located passenge side of engine compartment, below power steering reservoir Remove securing bolt for coolant expansion tank, lift expansion tank out of clip and move to side. You need to jack the car up and crawl under it to do it, if you don't … have access to a rack.