2003 ford f150 stereo. 2003 ford f150 truck radio problem 2019-02-18
2003 Ford F150 Truck
Installing a camera will make backing up in a crowded parking lot a whole lot easier. The click tells you that you're in there, so spread the tools apart slightly and pull the radio out of the dash. Obviously, some offer more space than others, but you can usually find some room for a subwoofer box. This is a superDuty console that I did not too long ago. This fitaudio site seems the best set of images fo … r my make and model. Carefully pull out around the edges of the radio's trim panel to release the retaining snaps.
How to Install New Car Audio Gear in Your 2001

It's actually pretty easy: 1 Always disconnect the negative batt. Neither of those things will be hard to do, and the rest of the speaker replacement process is about the same, really. I removed mine by first removing the bezel around the Air Conditioning controls. You have to ahve a special tool that goes into the holes to release the radio. Finally, in front of the instrument cluster, on the top, there are two more small screws, undo them as well. It was that experience writing about cars that drew Crutchfield's attention.
Used Radio / CD Player / GPSs for 2003 Ford F

One of the most time consuming tasks with installing an after market car stereo, car radio, car speakers, car subwoofer, car amplifier, mobile amp, car amplifier, mp3 player, ipod, tweeters, crossovers, audio equalizer, satellite radio or any car audio electronics is identifying the correct color car audio wires for a 2003 Ford F150 Truck. A resistor will certainly be represented with a series of squiggles signifying the restriction of present flow. Then pry up t … he inner trim from the outer console on the opposite side. Just how is a Wiring Diagram Different from a Pictorial Diagram? Y … ou don't have to disconnect all the connectors. As you work your way towards the passenger side, the bezel around the ignition will pop out, that's okay! If you would like to help the Modified Life community by adding a car audio wire diagram, car stereo wire diagram or car radio wire diagram to our resource, please feel free to post any additional car audio or car electronics wiring information about the 2003 Ford F150 Truck on this page. Now get a wide, thin bladed flat screw driver and pry up the inner trim from the outer console. Once these are loose and the two plastic clips nearby are squished inwards the whole wrap-around fascia + radio assembly can be removed together.
2003 ford f150 truck radio problem

Just as before with the lower trim. All you need is your truck key and a 7 mm socket. There is some work involved, because there's a sub-dash brace you'll have to remove to create the necessary space. Automotive wiring in Ford vehicles are becoming increasing more difficult to identify due to the installation of more advanced factory electronics. An antenna is a straight line with 3 little lines branching off at its end, just like a real antenna. You will have to place the truck in neutral and in 4wd high to get it out far enough to remove the upper trim.
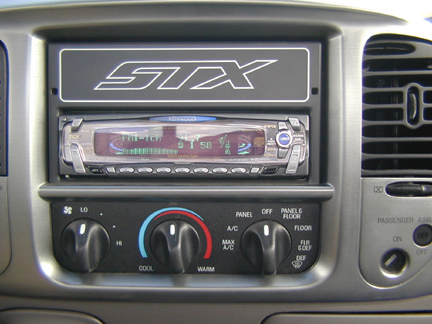
Factory Radio Removal
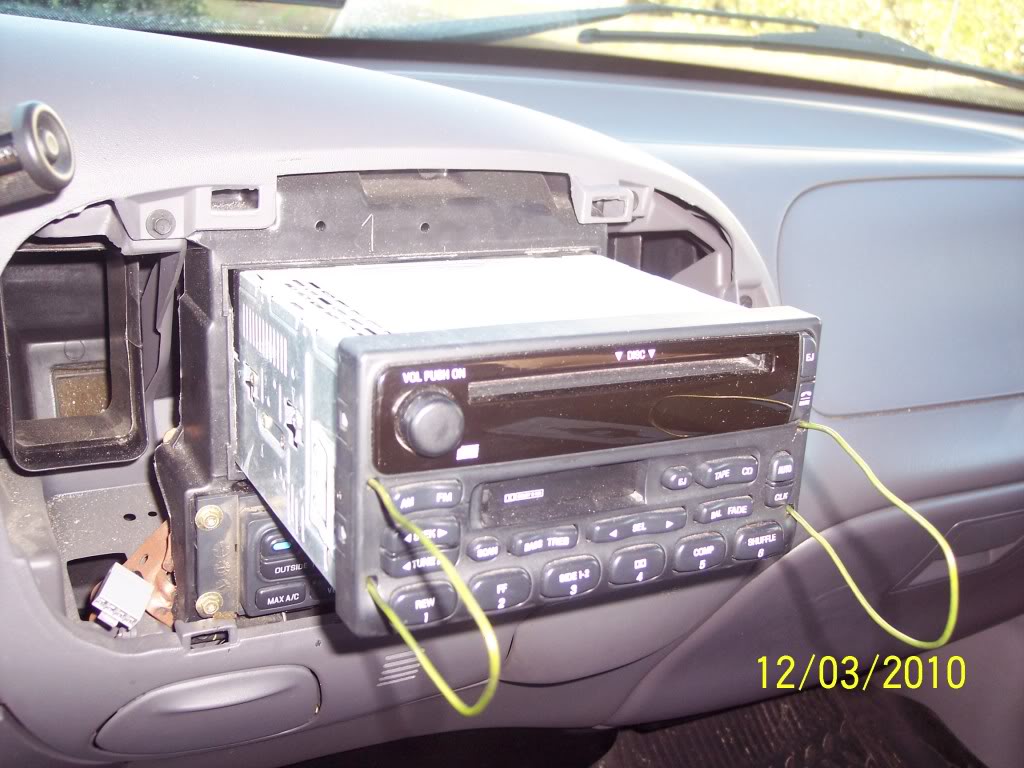
Typical Wiring Diagram Signs If a line touching another line has a black dot, it means the lines are linked. There are clips all around the perimeter. Unlike a pictorial diagram, a wiring diagram utilizes abstract or streamlined shapes as well as lines to reveal components. Your dash kit and wiring harness will include installation instructions. Once this front part of your dash is off, look on either side of the stereo and you'll see a tab one on each side that you can press down. The difference is location, location, location. Assortment of 2003 ford f150 radio wiring diagram.
2003 ford f150 truck radio problem

They will not do it for free. First thing I did was open the door to the storage compartment below the Air controls. Now, to remove the loose bezel out from around the steering wheel, you will then have to tilt the wheel all the way down. Kick panel pods If you want to add better sound and, more importantly, better sound staging to your truck, install a set of. Next, there will be four screws holding the radio in the dash.
Factory Radio Removal

There are no major hiccups to worry about with any of the factory gear, but there are some things to think about when you're choosing aftermarket stereo equipment. We're not saying you'd want to, but you should know either way, right? Use to find the gear that will fit your truck. They'll probably know or have the tool to take it out, if one is needed, and most likely they'll do it free of charge, Ford does. The dash bezel is held in be snap clips. Next remove the little drawer, cigarrette lighter, and ashtray. You may need a flathead screwdriver to help push the harness plug out of the back of the radio.
How to remove stereo in 2003 F150

Working faster or pulling harder won't make the job any easier or better. Unplug antenna and wiring harness. Click on the image to enlarge, and then save it to your computer by right clicking on the image. Replacing the old receiver is the first, best thing you can do with your F-150. Removing the factory radio is very simple.
How to remove stereo in 2003 F150

Just how is a Wiring Diagram Different from a Schematic? A schematic reveals the strategy and feature for an electric circuit, yet is not interested in the physical layout of the wires. There are no screws holding that on. Take out those screws and the radio will come right out. The driver's side speaker is in a panel behind the front seat, while the passenger's side speaker is in the third door. We'll cover all three of them below. If you have a thin enough screwdriver you can slide it through the holes, however you may need two to get it to release. Add an amplifier for better sound No matter what else you do to your audio system, to further improve the sound quality, consider installing a for your speakers.