2003 vw beetle dash removal. What Volkswagen Dashboard Lights Mean 2019-01-17
3 Ways to Remove Beetle Headlights

Relatively easy thing to do. I'll be able to fix the squeak that has been driven' me crazy over the last couple of weeks. Disconnect the oil level sensor wires. Just cut it in the shape of the tool shown on the picture. Locate and remove the screws that hold your interior door handles in place they may be hidden by snap in, or snap on clips. When topping up you should check for leaks under the car or coming out of the tubing leading to the expansion tank.
Letter From CEO

Unscrew nut size 32 from the shaft. Posted on Mar 31, 2009 Sedona-Car-Truck. Components of dust and pollen filter: 1 - Frame 3 - Filter element 4 - Plastic nut, 2. You can diagnose the fault by using the kit. Very easy to do - just be patient. I have had no luck for several years. I think the pollen filter is underneath here.
VW New Beetle Dash Warning Lights
You should be able toremove the tray without resistance. Your panel is held in place by snap in clips; use a small pry bar to pull them from the door try to get as close to, or directly under the clips to prevent them from tearing out of the door panel. The battery is encased in a plastic cover; this case has two sides left and right. I was even semi forgiving about the balance shaft issue, but this is nuts! And that 5 hours x 2 assumes that you're good at it. To create this article, volunteer authors worked to edit and improve it over time. The problem is that when it leaks, you have to pull the dash to replace it.
How do you remove the radio on 2003 vw beetle

I had an appointment scheduled with MrChill, back in November, to have my dash ripped up due to a pinhole leak in the heater core no liquid but I was getting some fogging on the windows. The fault can be very complex or quite simple. You need sockets, because drivers are too long and the glass gets in the way. Place each item back in the reverseorder. You will find the Cabin air filter under this panel after removing screws. The lens-retaining springs are held with heavy tension, and unless you are careful, you might accidentally damage the components.
dash removal

Once the problem is fixed you can reset the fault codes and turn off the steering wheel warning light on your New Beetle. If you look down to the center, front of the base of the battery closest to the bumper you will see a 13mm bolt that holds the battery down, remove this and the small plate. It's the best place to get your beetle's questions answered. Or, take it and get it pressure tested at a minimum. You will notice a crease where the actual part containing vents meets the center hump that is just one piece itself. To be exactly sure where the fault is, you should use the kit.
What Volkswagen Dashboard Lights Mean
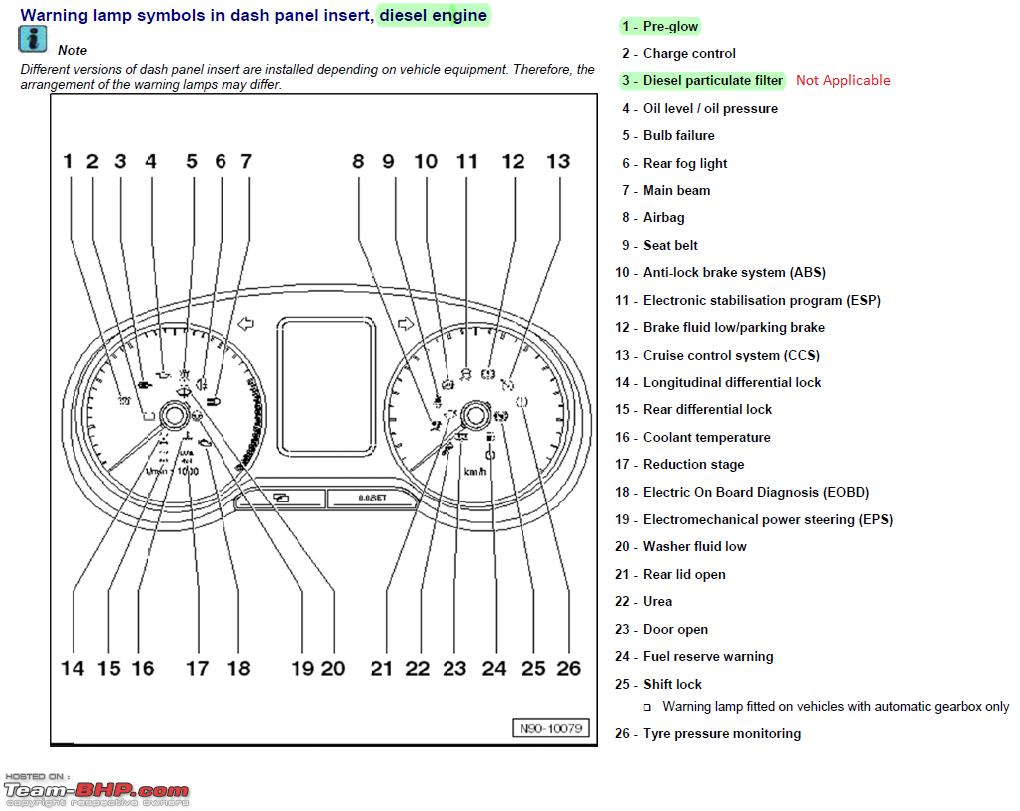
There's 20 or so pugs so slow and easy. Luckily, they hole sealed itself so I used the time to get my Konis installed. I'm not convinced it's worth having in the first place. I have a 1970 beetle that needs a radio. Locatethe positive cable, then do the same thing. Under the front deck lid, there is a panel behind where the dashboard is. This will only be seen in diesel vehicles.
3 Ways to Remove Beetle Headlights

You can do this yourself by using a. I removed the airbox, tightened the bolts, reassembled and end of squeak. A creeper that moves on wheelsis required to hold the motor whenÃt … akingÃout the bolts that holdthe starter to the block. This is one of the easiest sumps to remove with the engine in the car. This article has also been viewed 17,892 times.
How to remove center dash console on 2004 beetle

Sign the form cut off the address label and secure to the front of the box. Buy sockets with the bits glued or welded into the sockets! If the other screws are put in first, the panel can shift so that this screw will miss and the panel will remain loose on that side. Undo the 3 bolts on the bell-housing that holds unto the sump, you will need a 5mm ball-end allen socket. I even had the service tech. Really, the only dash part that comes off is the speedometer. It should open up giving you access to the right side passenger side dash panel that has 5 or 6 screws they are hex that need to be removed.
How do you remove the radio on 2003 vw beetle

The panel is just a fibre wood type so it doesn't take much to rip open the slots that the plugs are attached to. I drove the car for a day with the dash pieces removed and the squeak was loud and clear. Use the paper towels to clean up any adhesive remover from your hands or the paint of the Beetle. Remove the instrument cluster from your vehicle. You can use the kit which will give you a unique airbag trouble code, and a fault desfription to tell you where the fault is. Make sure the attach the positive cable first on thebattery.
How to Replace a VW Beetle Glove Box

Remove the driver's-side under-dash flat plastic panel with a Torx screwdriver 20-bit head - you only need to remove the three screws at the front edge. The be sure of the fault, you should use the kit to find the exact location. With the car idling and the dash pieces removed, I was able to tell that the squeak wasn't from inside the dash as I originally thought, but appeared to be on the other side of the firewall. Use a Phillips-head screwdriver to tighten the screw to the left of the glove box first, to help seat the panel. It is a good idea to have the code for your radio handy which is sometimes needed when the battery is disconnected, although mine did not. There are many reasons why the dashboard shows warning lights and below is a list of the lights on the dashboard. The wiring is still under the bonnet.