2005 mazda 3 belt tensioner pulley. How to: Install new Belt Tensioner, Accessory Belt and AC belt 2019-05-14
Belts & Pulleys for 2005 Mazda 3
Tighten the cylinder cover bolts in the order shown in the figure. In that case, take both belts to the place of purchase to match up the old belt with a proper new one. The alternator belt is the inside belt that travels back toward the firewall. Using a screwdriver wrapped in a cloth, peel the sealant away a little at a time, and remove the engine front cover. Remove the bolt used for locking the water pump pulley against rotation. For the record, my 99 S has 110,000 on the original belt. Tighten the crankshaft pulley lock bolt in the order shown in the following two steps.
How to: Install new Belt Tensioner, Accessory Belt and AC belt
Install in the reverse order of removal. Our online parts catalog uses real-time inventory, so you can be assured the parts you buy are in stock at the time of ordering. On second thought, if you stripped this bolt trying to loosen the belt your tensioner may be plenty strong still. I mean that's the way I did it. If the jack doesn't fit, you will have to use two jacks. Timing Chain Removal Note 1.
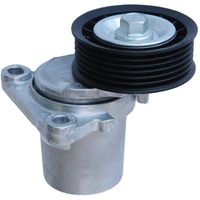
Mazda 3 Accessory Belt Idler Pulley

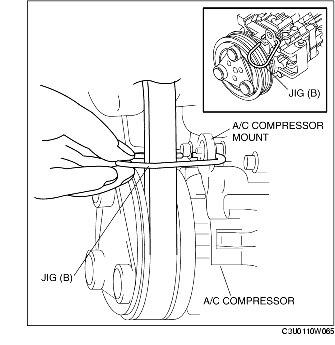
Remove the nut shown in the figure and set the power steering pipe component aside. See Engine Front Cover Installation Note. That helped for about 600 miles. Engine Front Cover Removal Note 1. Remove the coolant reserve tank with the hose still connected and set it out of the way. Important: as you tighten or loosen the top tensioning screw the angle changes accordingly, you must also loosen the bolt that holds the tensioning screw's receiving block as to not bend the screw. AutoTrust Platinum provides a growing selection of low-priced accessory belt hardware.
How to Replace a Mazda 3 Serpentine Belt

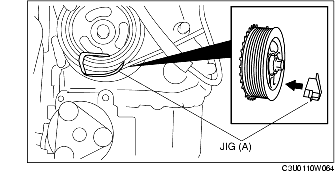
Turn off the engine and wait until it is cool before servicing. This system replaced the old fan-belt system, replacing several belts with one long belt that winds its way through the engine accessories like a serpent--hence the name. You then remove the upper right engine mount. Install the water pump pulley to the water pump and temporarily tighten the bolt. Engage the joint on the end of the electric variable valve timing motor with the joint groove on the electric variable valve timing actuator side. Temporarily assemble the crankshaft pulley lock bolt, and lock the oil pump against rotation as shown in the figure.
2005 MAZDA 3 2.0L L4 Tensioner Pulley
Move the new belt over the tensioner pulley with your other hand. Mazda 3 Replacement Accessory Belt Idler Pulley Information Search our online accessory belt idler pulley catalog and find the lowest priced discount auto parts on the web. All Replacement brand items are backed by 1-year, unlimited-mileage warranty. Next replace the belt and if it still squeals, replace the tensioner. Install in the reverse order of removal. I'm new to car maintenance and I'm really enjoying it, so I'm hoping to find a solution I can do on my own.
Belts & Pulleys for 2005 Mazda 3

Install the timing chain while aligning the marks on each sprocket and the timing chain as shown in the figure. Remove the water pump pulley. Reconnect the belt-tensioner tool to the serpentine-belt tensioner. If the engine front cover is newly replaced, tap the positioning pins in the two locations to the seal surface side. Apply silicone sealant to the areas shown in the figure. See Timing Chain Installation Note.
Mazda 3 Accessory Belt Idler Pulley

Tightening torque Installation position Tightening torque 1 9—12 N·m {92—122 kgf·cm, 80—106 in·lbf} 2, 3 8. If you do not time it properly you will damage the engine. Old vs New 4- Installing new Belts 4A- Accessory belt - Start from the bottom, crank shaft pulley, align the belt onto the inner half of the crank shaft pulley then work your way up over to the free pulley then around the alternator and position it upward toward the tensioner pulley. You can replace the belt in less than 30 minutes if you have some basic mechanical aptitude and the right tools. Insert a wire with an approx. Carefully using a flat screwdriver pry the belt out of the pulleyas you rotate the it.
How to Replace a Mazda 3 Serpentine Belt

Stretch one end of the old and new belts from the ground upward with your hand. Available as of 2010 in a four-door coupe or five-door hatchback, the 3 also offered different drive-train options for potential owners as well. The old belt can be up to three-quarters inch longer than the new one due to stretching. See Cylinder Head Cover Installation Note. Tightening torque 39—59 N·m {4. A clamp will not work.