2009 hhr headlight bulb replacement. SOLVED: Hhr headlight bulb replacement 2019-03-17
SOLVED: Hhr headlight bulb replacement

I'm just breaking them down pretty easy. It may also be some effect on the headlight relays. Unlike many vehicles, no extraneous parts need to be removed, and no special tools are needed. Once you have those out, I think there might be one more here, then boom. Make sure you're up and around this clip. We hope this helps you out, brought to you by www.
Headlight Change 2006

That's how you do it. No matter the situation, Advance Auto Parts has the Headlight Lamp Assembly product you desperately need. Definately put the lamp in first not attached to socket and harness, trust me. Then I'll put the rest of the pushpins back in. You put the pins in first and then you put the bolts on afterwards. Then I'm going to remove this one as well. I'm press it with the pliers and then pull out.
2009 Chevrolet HHR Car Light Bulb Size Chart

We only sell parts from trusted brands like so that you can find quality parts you can count on. I've got an old t-shirt here that's going to kind of wrap around there. Just a quick note while I'm putting these bolts back in. Like this is the retainer for the bumper guard and then it kind of clips back on. Okay, going to use a little fast motion. Follow along and you'll see it's not that hard.
Chevy HHR Headlight Bulb

Headlights grow dimmer by up to 20% over time and eventually burn out - for this reason, we recommend changing your headlights in pairs. Probably some factory guy out there is laughing at me a little bit because there's probably some somewhat easier way to do this. Cover it with the rubber weather shroud. Mike Apr 18, 2011 The procedure is in the owners manual, but it is not easy. You've got to try and be careful not to scratch your paint.
Headlight Change 2006

Remove top 7mm hex screw. Then disconnect your headlight bulb, take out your other bulb and they're free. Here is a link to the factory dealer-installed instructions. Twist clockwise just a bit to lock. We've got the bumper cover back on.
2009 Chevrolet HHR Change Headlights
Just a hint, make sure that the gasket comes out with the bulb and that you only use one when you reinstall the new bulb. If our prices don't convince you, we also want to make sure that you can hear from car part experts, so we have reviews you can browse through on our sites to get you peace of mind. I want to help you save time and money repairing and maintaining your vehicle. Some Chevrolets have high intensity discharge headlights, sometimes referred to as xenon lights. Adding More Information If you would like to help the Modified Life community by adding any missing information or adding a new light bulb size information to our resource, please feel free to or post it at the bottom of this page. I'm going to reconnect my fog light and reconnect my marker light.
How to Replace Headlight 06

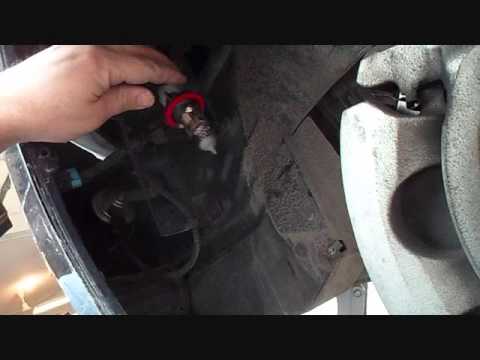
Tools you'll need are a seven-millimeter socket, 10-millimeter socket, needle nose pliers, flat blade screwdriver, and a rag to protect your paint. Outfitting your vehicle with Pure halogen headlights by Putco not only sheds new light on the road but offers you the opportunity to customize your ride a bit, with several white bulb options available as well as blue and yellow bulbs. These reviews are from anyone who purchased those parts, in this case a Headlight Bulb, so you can feel confident that you know what you are buying. Moving up to the top of the car there are two seven-millimeter there. I didn't want to start pulling panels off until I knew where I was going. Established in 1997, Vision X engineers and manufactures advanced lighting products for the automotive aftermarket. Then you will need to loosen the inside front wheel well, which is plastic, until you can bend it out of the way enough to reach inside to the bulb.
2009 Chevrolet HHR Headlight Bulb

At this point, we've removed the upper one and the lower one. I didn't show you that one on the other side. You have two on here. If you're just looking to remove the headlight bulb and replace it, you can just pull that back like that and right up in here, you basically put your hand up in here, and you can feel the bulb. Thread the headlight socket through the hole in the shroud. Now it's a matter of two bolts, one here, one here, they're 10 millimeter. As far as these bolts, they don't have to be incredibly tightened.