2010 gl1800 service manual. Honda Goldwing GL1800 Manual 2019-05-09
HONDA GL1800 SERVICE MANUAL Pdf Download.

Haynes writes every book based on a complete teardown of the vehicle. Wheel Pulser Air Gap Inspection Check the area around the rear wheel speed sensor. Step by step instructions, illustrations, diagrams, Testing and Adjusting, Disassembly and Assembly, Remove and Install, Specifications, Operations, Schematic and much more for machine service and repair. Remove the three bolts and footrest under cover. Modulator Inspection by Replacing the Front and Rear Modulators Connect the control unit 12P connector 8.
Honda GL1800 Gold Wing Repair Manual 2001

Hold the fork damper and screw the fork cap onto it. Manual Height Switch Harness Short Circuit Inspection Remove the combination meter page 20-17. Check that the engine can be started by cranking it with the starter motor for 10 seconds or more. Hold the steering bearing adjustment nut and fur- ther tighten the lock nut, within 90 degrees, to align its grooves with the tabs of the lock washer. All pages are printable, so print off what you need and take it with you to your vehicle or workshop.
Honda GL1800 Goldwing Service & Repair Manual 2001
Install the boots into the caliper and bracket. The clearance should be at least 0. Smoking or allowing flames or sparks in the work area or where gasoline is stored can cause a fire or explosion. The bearings should turn smoothly and quietly. Reset the self-diagnostic memory page 5-9. Disconnect the engine sub-wire harness 6P gray connector. Replace the brake disc if the bearings are normal.
HONDA GL1800 SERVICE MANUAL Pdf Download.
Remove the O-ring from the water pump. Step-by-step procedures and illustrations guide you through every job, from maintenance and troubleshooting, to complete teardown and rebuild. Mainshaft bearing lock nut 186 N·m 19. Remove the two trim clips and setting bolts. Disconnect the control motor 2P black and crank angle sensor 3P gray connectors from each modulator. Install new pulser ring bolts and tighten them in a crisscross pattern in two or three steps.
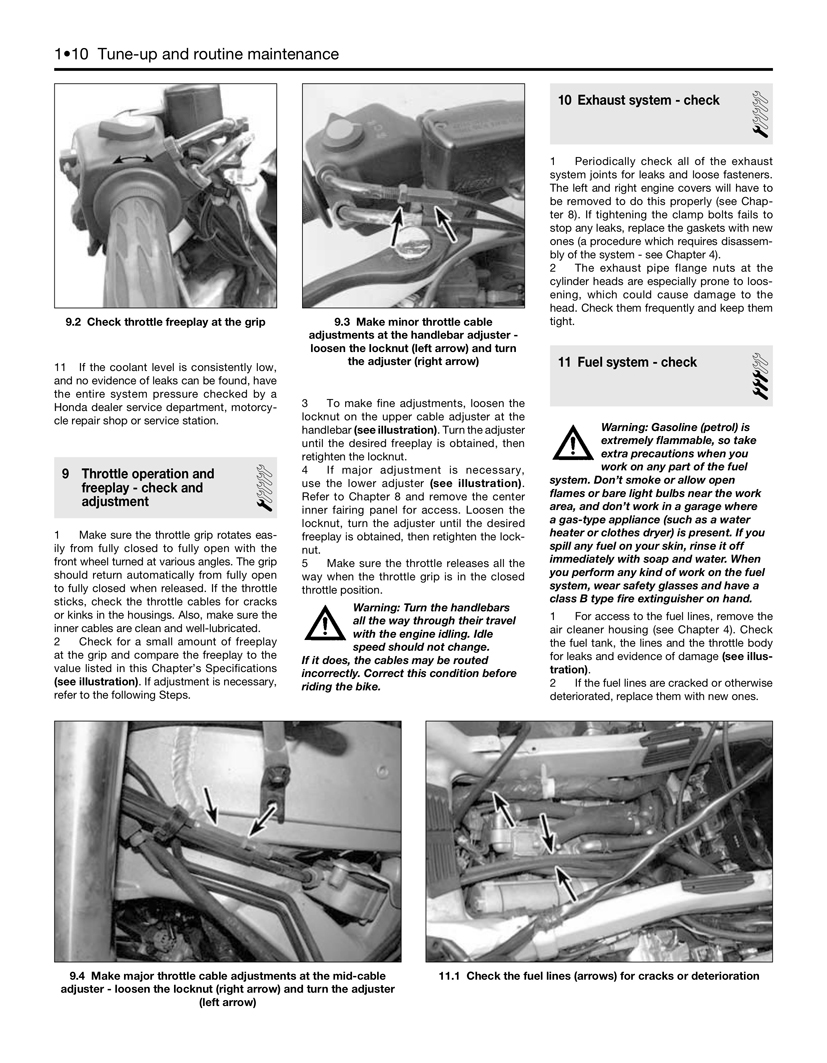
HONDA GL1800 SERVICE MANUAL Pdf Download.

Install the brake disc onto the stud bolts. Refer to section 7 for engine removal and installation. Connect the 5 and 4 connectors to the front modulator, and the 2 and 3 connectors to the rear modulator con- versely. Check the needle bearings for damage or loose fit. This manual has detailed illustrations as well as step by step instructions.
2006

Install the camshaft position sensor into the left cyl- inder head and tighten the bolt securely. Then, while rotating the pinion gear, tighten the bolts to the specified torque in a crisscross pattern in several steps. Rotate the camshafts by rotating the crankshaft counterclockwise several times. Remove the drive shaft from the swingarm. This problem code will light up to indicate battery discharge.
HONDA GL1800 SERVICE MANUAL Pdf Download.

Do not clamp the gear case too tight or it could get damaged. Hold the fork damper lock nut and remove the fork cap from the fork damper. Pack grease into the oil seal lip cavity and install the bearing holder, being careful not to damage the seal lips. Remove the two screws and remove the relay box. Left O Sensor Connection Inspection Remove the top shelter page 2-12. Remove both exhaust pipe joint nuts. Release the four bosses from the grommets, discon- nect the multi-display control switch 4P connector and remove the meter panel.
Honda GL1800 Gold Wing Motorcycle (2001

Install the camshaft while installing the cam chain Be careful not to onto the cam sprocket in its proper location so that damage the the timing marks on the sprocket are flush with the cylinder head and cylinder head surface. Lower the right crankcase and place it onto the left crankcase. Clean the mating surfaces of the rear wheel and brake disc, and remove any foreign material. Disconnect the bank angle sensor and open air tem- perature sensor connectors, and remove the front fairing. Memory Switch 1 and 2 Operation Inspection Remove the left fairing pocket page 2-11.
Honda Goldwing GL1800 Manual

Each Service Manual contains easy to read text sections supported by top quality photography and illustrations. Disassemble the relief valve by removing the snap ring. Make sure the pin groove in the shift drum joint faces down transmission is in neutral. If the contact area is too low on the valve, the seat must be raised using a 60° interior cutter. Bleed air from the system as follows: 1. Connect the timing light to the No.