2012 toyota camry fog light assembly. 2012 Toyota Camry (L/LE/XLE) Fog Light Bezel 12 Right Passenger Side Fog Lamp Bezel; w/Fog Lamp 2019-04-29
Toyota Camry How to Install Fog Lights
All Replacement brand items are backed by 1-year, unlimited-mileage warranty. So browse around our great selection of car parts and let's help with that auto repair or car upgrade! Peel back the front of the trim to access the back of the bumper. You'll find that there's a black cover where the fog lights need to go. There should be a grounding point available underneath the battery tray. If the fog lights don't turn on, it's probably a wiring problem.
2012 Toyota Camry (L/LE/XLE) Fog Light Bezel 12 Right Passenger Side Fog Lamp Bezel; w/Fog Lamp

Now route your wiring harnesses through the engine compartment towards the firewall on the driver's side. Be safe and replace your worn out or broken lights with these Replacement Fog Lights! If you are having any trouble with the wiring, drive over to an aftermarket stereo shop. If you're planning to replace both at one time, consider replacing your headlights first and then replacing your fog lights. The choice for the enthusiast accessory buyer, StyleLine guarantees the latest styles with the most competitive prices. Not all kits are equal, so be sure to double check before purchasing. .
2012 Toyota Camry Fog Light
You'll need to find a kit online that's designed to fit your model Camry. Take the ground cable with the ring terminal and find a place where you can bolt it to the chassis. You can't go wrong with Kool Vue parts! There is a piece of the lower dash panel that you can remove and install the switch to. It is crafted from durable materials for long lasting service. Return the lower dash panel and the kick panel.
2012 Toyota Camry Fog Light

Since 1918, Dorman Products has supplied the automotive aftermarket with high-quality replacement parts, hardware and fasteners. Shop for brand new fog lights for a safer journey! Step 4 — Remove Lower Dash Panel The panels should only be held up by one or two screws. It is crafted from durable materials for long lasting service. Then return the lower trim at the front of the car. Go around the edges of the panels and pry them loose. Step 5 — Install the Switch Connect the appropriate wires in your wiring harness to the pins in your 15-amp relay and plug the relay into the driver's side fuse box.
Toyota Camry How to Install Fog Lights

The choice for the enthusiast accessory buyer, StyleLine guarantees the latest styles with the most competitive prices. Once the two panels are removed, pull your wiring harnesses through the firewall. Set your new fog light with those fittings and then screw it to the bumper. Shop for brand new fog lights for a safer journey! All Replacement brand items are backed by 1-year, unlimited-mileage warranty. Are you worried about not being able to drive your Camry in the mist and fog because of decreased visibility? Then connect the wiring harness to your fog light switch. Worry no more because Toyota has actually already considered this and has made it possible to install fog lights on your vehicle.
2012 Toyota Camry (L/LE/XLE) Fog Light Bezel 12 Right Passenger Side Fog Lamp Bezel; w/Fog Lamp
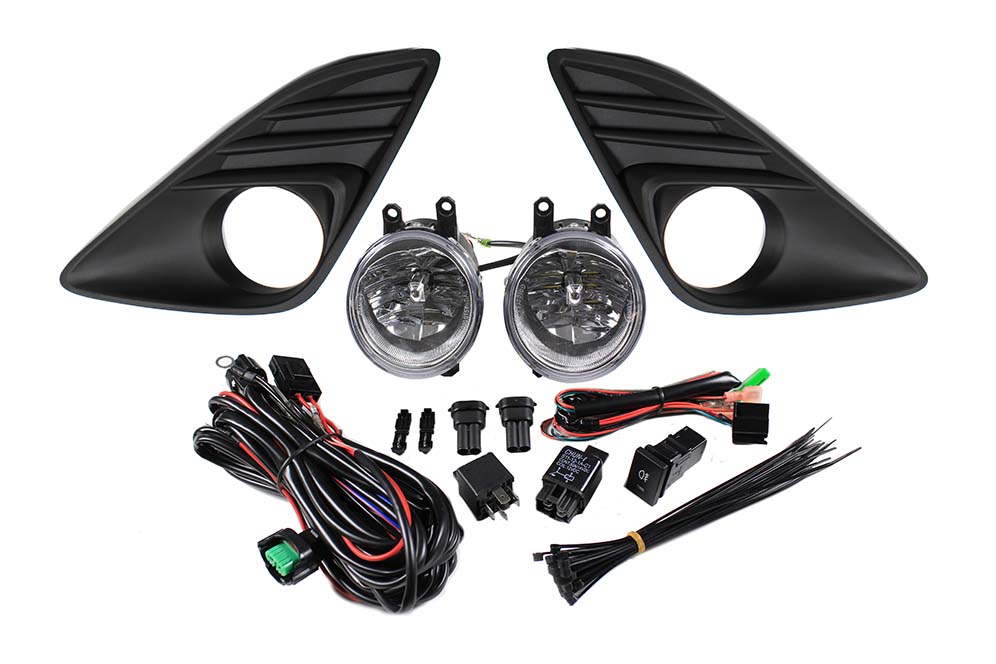
Then repeat for the other side. Step 2 — Install the Fog Lights There should be four fittings around the back of the bumper. Valeo is a global company that engineers thermal, powertrain and other automotive systems with emission reduction and intuitive driving in mind. Pop on the plastic fog light cover that came with your kit. Do the same for the other cover. For more information go to. Push out the cover from inside the bumper and it should pop out.
2012 Toyota Camry (L/LE/XLE) Fog Light Bezel 12 Right Passenger Side Fog Lamp Bezel; w/Fog Lamp

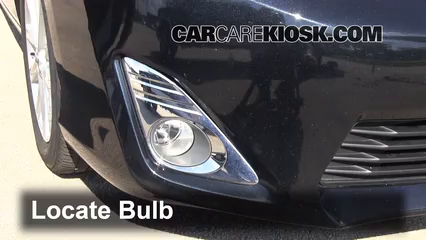
From restoration to performance products, Kool Vue has got you covered! Installing the fog lights on the Camry can take anywhere from one to two hours to do. For a complete guide on installing fog lights in your Toyota Camry, please visit. Step 1 — Remove Fog Light Covers Remove the trim underneath the bumper. Start the car and push the switch. Replacing your headlights and fog lights is a fairly simple task, even for a novice car owner. Tighten it down until the fog light is securely attached to the bumper. Comes in clear plastic lens.
2012 Toyota Camry Fog Light

For more information go to. It's held up by five bolts and three plastic clips. Be safe and replace your worn out or broken lights with these Replacement Fog Lights! Step 3 — Connect the Wiring Harness Plug your wiring harness to the back of the fog lights. . . .
2012 Toyota Camry Fog Light

. . . . .
2012 Toyota Camry (L/LE/XLE) Fog Light Bezel 12 Right Passenger Side Fog Lamp Bezel; w/Fog Lamp

. . . . . .