62te transmission fluid level check. Transmission Fluid Level Check Dodge Grand Caravan (2008 2019-05-12
62TE Transmission Fluid Change

I was wondering if that was the axle nut that he was talking about. . I believe there are aftermarket dipsticks plus temperature sensitive dipsticks discussed on here years ago available. Depending on the vehicle, transmission fluid replacement may be recommended every 30,000, 60,000, or 100,000 miles — some have no recommended interval. Be sure that every last bit is removed, you want the pan to go back on as flat as possible. A piece of rubber hose cut to allow the full mark on the oil dip stick serve as a the full mark in the transmission. After doing that, the famous 1-2,2-3 shifting problem become less noticeable, maybe it is illusion, but I am happy with the results.
Transmission Fluid Level Check Chrysler 200 (2011

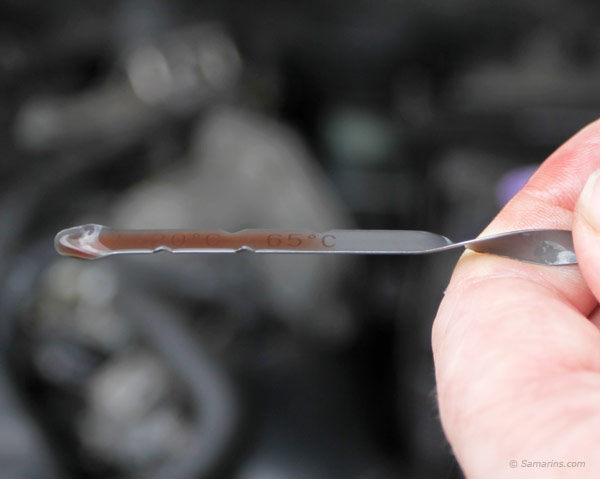
Its evolved to where I can hear a creaking now when I move the shifter from P to R. Over the time it becomes brownish, as in the photo below. Remove the crossmember through bolt 1 Fig. When sat overnight the absolute cold, non running level correlated with hot and cold readings based on the chart and temp readings. Do you have any recommendations for my situation. Was exactly in divot of dipstick.
62TE transmission troubleshooting help, 62TE rebuilding tips, 62TE technical service bulletins, and 62TE diagnostics from TRNW
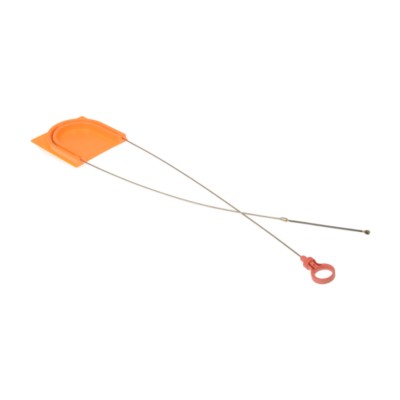
Remove the bolts 1 at the transfer plate 2 and remove the transfer plate. Its evolved to where I can hear a creaking now when I move the shifter from P to R. Below is a post from Imperial Crown a very good Chrysler tech : You should still have a dipstick tube plugged with a plastic cap on top. Verify that the vehicle is parked on a level surface. Verify that the vehicle is parked on a level surface. Taxi, Police or Towing should be considered 'severe' duty and the scheduled maintenance performed accordingly. Fluid level looks good, but does anyone know how well the temperature at the bottom of the fill tube corresponds to what the scan tool would tell you? Remove the inner and outer spline frictions 2, 3.
DIY: Dipstick for your 62TE transmission
Remove rear carrier assembly 1 from transaxle 2. Install the transmission in the vehicle. Remove the valve body cover 1. It was used in many Chrysler products, including the, the , the Town and Country, and the. Any thoughts on any of these? Don't overfill Sep 30, 2013 Finding where to put transmission fluid can be a bit of a challenge on some cars.
62TE transmission troubleshooting help, 62TE rebuilding tips, 62TE technical service bulletins, and 62TE diagnostics from TRNW

See this photo: Could very well be, unless things have have changed over the model years. Install the park pawl shaft 1. Install the valve body oil pan bolts and tighten to 6 N. Install compressor 8250 2 over the direct clutch balance piston 3 and place onto a press 1. This can only be done properly by removing the transmission pan.
SOLVED: How much transmission fluid does a 62te take

If your vehicle hesitates when your automatic transmission shifts gears, check the transmission fluid level before you let any mechanic start talking about servicing or adjusting your transmission or selling you a new one. Then, I will put the dipstick in, note the fluid level, and scribe a mark on it. Find fluid level temp chart for 62te online. If your fluid looks very dark or dirty, check your owner's manual, maybe it's time to change it. Install the differential, bearing cups, shim, seals and oil slinger into case. Dealership mentioned that it's axle nuts or something that requires tightening? Very close to vehicle computer reading. No aftermarket 'additives' are recommended.
No Transmission Dipstick is Becoming More Common
Install the left side inner wheel splash shield screws 1. Transmission fluid should be checked and, if required, fluid should be added by a qualified technician. I will assume that your shop is different, and, if you are a smart businessman, you would check transmission fluid levels on these types of vehicles for no charge. Press the lock tab 2 on the gearshift cable 1 and pull the cable out of the shifter. The reverse clutch drives the front sun gear.
Measuring transmission fluid level 62TE (2008 Town & Country ) [Archive]

Maybe and inch or so off the bottom of the pan. Using Gear Puller L-4407A 1 and Thrust Button 6055 3 remove output shaft transfer gear 2 and select shim. Remove transfer gear cover-to-case bolts 2. If you look at the picture in post 7 of the thread I posted a link to, it shows the transmission fill tube and what it looks like. Aug 23, 2012 This is in the owners manual pages 269 and 270.
Measuring transmission fluid level 62TE (2008 Town & Country ) [Archive]

On most cars the new transmission fluid comes red photo on the left. Make sure that the valve body retainer bolts are properly torqued, as I have found these loose before. That's a 4% volume increase for a 100F to 200F temperature change. Remove transfer gear cover 1. Install the left side transaxle mount bracket and bolts tighten to 75 N.