72 c10 short bed conversion. 1960 2019-05-11
1972 Chevrolet Truck Parts
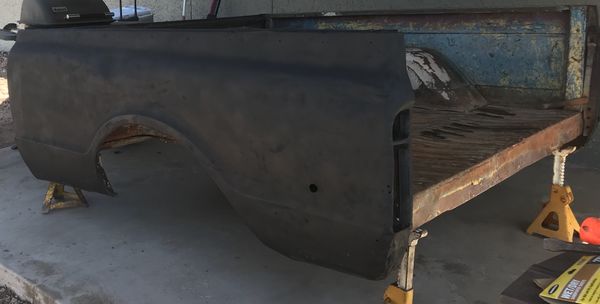
Here Tylor starts to assemble the bed by laying out the bed floor and taking some measures to get both pieces of the floor as square as possible before bolting on the bedsides. Because the bedsides are double walled, this makes cutting and splicing the bed back together a lot of work. Before the bed is set in place, we slid the new, shorter brake line between the rails and snugged up the fittings. How to Repair and Shorten Longbed Chevy C10 Bedsides When it comes to classic trucks short beds rule the coop for desirability and resale value. So what about converting a long bed to a short bed? Note that the crossmember has been welded into place and that the boxing plates will mate to it as well as spanning the entire length of the seam, providing a super strong structure.
1967
Before we make a single spark, the truck is set on jackstands so that when the rear half of the chassis is removed, the rest of the truck remains stable. It still has to be alot easier to find one than it is to cut up a perfect long bed. The result is an invisible weld seam that is as straight as it left the factory. The best part about using this combo is the difference in initial cost to purchase a rust free long bed, covert the frame to a short bed, and buy the reproduction sheet metal can save you some money and or end up with a cleaner truck in the long run if you were to look for a clean factory short bed. Product Description This 1967-1972 Chevy C10 Short Bed Kit comes complete with: Bedsides included in this kit do not have sidemarker light openings. Shifting gears, we decided to take the section out from between the cab mount and what will become the front bed mount, right in front of the rear kick.
Long Bed to Short Bed Conversion Kit For 1968 Chevrolet C10 Trucks

Before we set the cab and the front end back on the truck, we installed a new set of Energy suspension frame mount bushings. With the rails off the truck slide each cross member in place on bolt them up. Refuse the package and please notify us at. Run in the fasteners in to ensure that you get in tight fit then remove the rails to install the cross-members off the truck. Originally, that was our plan when we teamed up with Brothers Trucks to do this story. This has made short bed models worth more later on based by their limited production, and the desire to use them as daily transportation.
C10 Rear Frame Rail Kit (1967

Once he had the major dents roughed-out he came back and used the to smooth out any minor small dents or imperfections. Plus, the advantages of using Classic Industries sheet metal is no rust repair which means less body work that will save you so major time and a ton of money. Classic Industries makes things easy to ship, and or repair stock bed floors by manufacturing the steel bed floor in two pieces. I had a great teacher that would have the young shop guys work next to an old timer. Sean first located and marked all the dents and worked them out by hammering off-dolly hammering directly next to the dolly to release the damage. I made the promise not to immediately cut it up as I wanted to get it to a somewhat finished level before doing so.
How to Shorten Truck Bedsides

That is, however, unless the cab and front sheetmetal need to stay in place. That basically covers the frame,all thats left is the reassembly details. Before I tacked the front and rear portion of the chassis together, I installed a fish plate to the front portion, that way I had something to clamp the rear half to while I made my finite adjustments. Car clubs do the same thing with members helping other members. From here he delicately uses the to bring up those low spots and repeats the process with the abrasive disc to check his work.
1972 Chevrolet Truck Parts

If you take your time and do stitch welds and jump around the panel you will minimize the warpage. Simply hack out the 12-inch section, along with the cab mount and slide everything forward. Flush with the back of the framerail the template is used to transfer the location of the rear bed mount hole as well as to scribe the cutline. Once the rivets are out and the crossmember free, move it forward to the other set of holes in the frame. Once the panel was fully welded Sean came back with a flat faced hammer and dolly to planish the weld flats and relax the panel to cure the shrunken areas around the welds.
Long Bed to Short Bed Conversion Kit For 1968 Chevrolet C10 Trucks

From here Sean hits the repair area with an 80 grit abrasive disc to reveal any low spots in the repair area. After we prepped the seam to accept the wire, we tacked the seam together first followed by a pass over the tacks to ensure a strong seam. This prevents any overcutting and gives the blade and the plasma cutter room to stop without cutting needlessly into the surrounding material. A pair of straight edges bed cross sills work great spanning the marks on either side of the truck can then be measured to give us different parameters. Our friend Sean Ramáge of Empire Fabrication recently took on the big job of taking an original-paint set of long bedsides and repairing the damage and shortening them, all while keeping as much of the original finish as possible.
67

Using a torch heat the rivets glowing red hot and take a large chisel and 2lb. Please attach the pictures of the damage. Im also working on the long bed stepside mold, the 1967-68 cab mold, a better crewcab mold and a more detailed longbed frame like my shortbed frame. Holes will have to drilled in the side of the frame to mount the gas tank brackets. Here, the final welding of the two sections has begun. In planning your cut try to leave a little mettal that you can remove to make sure everything is square.