93 chevy 350 belt diagram. Chevy Truck Engine Diagram • www.littleboyblu.com 2019-04-06
Where can you find the belt diagram for an 86 Chevy S

To remove the compressor, you will have to put the front end on some jacks, and slide up under it. If you would like for any unique plan for your own engine diagram then the 5 7 350 chevy engine diagram picture should be on top of resource or else you may use it for an alternative concept. They are still available new from volvo, or used at auction sites online. Start by checking these to to see if they have power and the fuse is good. Make sure you get the information you are looking for. Use an adhesive gasket material that will hold it in place while you position the pan. Chevroletgmc diesel diagnostics oregon fuel injection.
Chevy Truck 1996

Then pull off the plug. Some vehicles have a routing diagram sticker under the hood. We thank you for your visit to our website. First, get the easy stuff out of the way, the accumulator. Get a wiring diagram and cut the wires going to each speaker and put a good set of 6 X 9 3-way speakers in boxes unde … r your rear seat. Select the specific year and make of your vehicle. Repair guides vacuum diagrams vacuum diagrams autozone.
Need a diagram for 1993 Chevrolet Silverado AC system

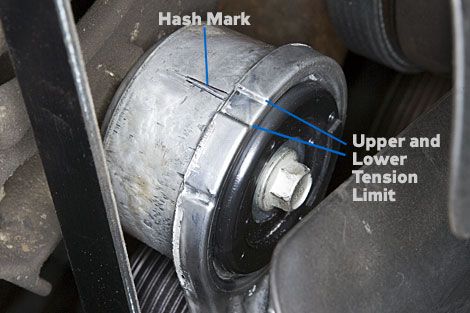
Repair guides firing orders firing orders autozone. Gm 57l v8 ls1 engine info power specs wiki gm authority sponsored links. Repair guides vacuum diagrams vacuum diagrams autozone. The local Chevy dealer tells me that the belt diagram sticker is no longer available. To replace the belt, route the belt according to the diagram posted above leaving the tensioner pulley for last. Tensioner The use of a serpentine belt requires a belt tensioner or idler pulley to apply the necessary tension to the belt. Then undo the bracket on the back of the compressor that connects to the manifold.
Chevy K1500 Serpentine Belt

Bando takes the latest technology to design state-of-the art, highly automated manufacturing systems. We know it from internet search engine records such as adwords or google trends. We have been looking for this image via net and it came from trustworthy source. The single belt is more efficient, easy to change and has a longer life span than the multiple belt systems used in earlier model vehicles. Once removed, you will see a whole bunch of hoses and junk that will be in your way. You might also leave your feedback,review or opinion why you love this image.
belt routing diagrams...

Part 1 how to test the gm ignition control module 19952005 how to test the gm ignition control module 19952005. After I removed this stuff, I could access the compressor rear connection and bottom 2 mounting bolts. Scroll down to find your vehicle manufacturer. Here you will find it easy to lift it up and out. Take out the battery and the battery mounting plate. Make sure you use gasket seal … er on the replacment pan to hold the new gasket into place. I found no other way around it, and spent too long trying to find another route.
How to Adjust the Tension on a Serpentine Belt in a Chevy 4.3 Engine

Take a deep breath, and proceed. You can also find other images like wiring diagram, sensor location, fuel pump location, starter location, control module location, parts diagram, replacement parts, electrical diagram, repair manuals, engine diagram, engine scheme, wiring harness, fuse box, vacuum diagram, timing belt, timing chain, brakes diagram, transmission diagram, and engine problems. The tensioner should take the slack out of the belt, but if it does not, the tensioner is faulty and replacement is the only fix. Crazy, I know, but this is how it is. Do not forget to share and love our reference to help further develop our website. This will open up to the index. This picture has been submitted by Alice Ferreira.
1993 Gmc 5 7 Engine Diagram • www.littleboyblu.com

What number websites have you browse to get more detail regarding 5 7 350 chevy engine diagram? We thank you for your visit to our website. Remove the high and low side connections. Post 1955 Chevy small blocks share the same old reliable F. Slowly rotate the tensioner clockwise, allowing it to tighten the belt. It efficiently supplies power to the steering system, water pump, air pump and alternator. I own a 95 silverado 5. Sometimes the bottom b … olts, have a notch cut out of the washer head, and that's the only way you can pull them out.
Need a diagram for 1993 Chevrolet Silverado AC system

Tell yourself that you can do it. So that we could bring more valuable information on next articles. Once you remove the two remaining mounting screws, the unit will be free to move. Some belt sleeves such as the GoodYear Gatorback come with diagrams of the engines that particular belt fits. This does not always mean that you have to replace the tensioner, although sometimes it may be the only way to fix the problem.
belt routing diagrams...

Repair guides firing orders firing orders autozone 3 198895 50l 57l and 74l engines firing order 18436572 distributor rotation clockwise. I lifted the hood and focused in on the horrible racket—it was the serpentine belt. You may also consider replacing the belt while you have it off. Make sure you get the information you are looking for. Now it's a constant reminder to replace the belt.
Chevy Truck Engine Diagram • www.littleboyblu.com
Chevy belt diagrams online wiring diagram chevy truck 1996 98 4 3l 5 0l and 5 7l chevy truck belt diagram chevy belt diagrams. You will have to recharge the system after you get it hooked up. If the adjustment works, reconnect the negative battery terminal to the battery and tighten the retaining bolt with a wrench. We hope you love it as we do. Undo the top bolts on the compressor first, and then undo the bottom bolts. And we also believe it could be the most well-known vote in google vote or event in facebook share. So look for the notch.