95 f150 4x4 wheel bearing torque. 95 1995 Ford F150 Wheel Bearing 2019-04-13
Ford Wheel Torque Specs

The parts they have are a very cheap version, which may work, but I wouldn't trust. Heating the inner race in an old toaster oven can ease installation of the separate inner races. Once you have the bracket out, you can move the alternator around and get to the electrical connections. The Ford F150 pickup truck has a combination rotor and hub. You can find wheel lug torque specifications in your owner's manual or from most mechanics.
95 1995 Ford F150 Wheel Bearing
This article applies to the F-150 2004-2014. Advance auto parts has this kit. Be careful the front M8 bolt may be rusted and break. Now to get enough play I went ahead and took out that bolt holding the swing arm to the vans frame. Front wheels should spin freely by hand. So I also replaced my battery and still saved money!! Figure out how to fix it here before you find yourself three-wheeling.
Spindle Lock socket
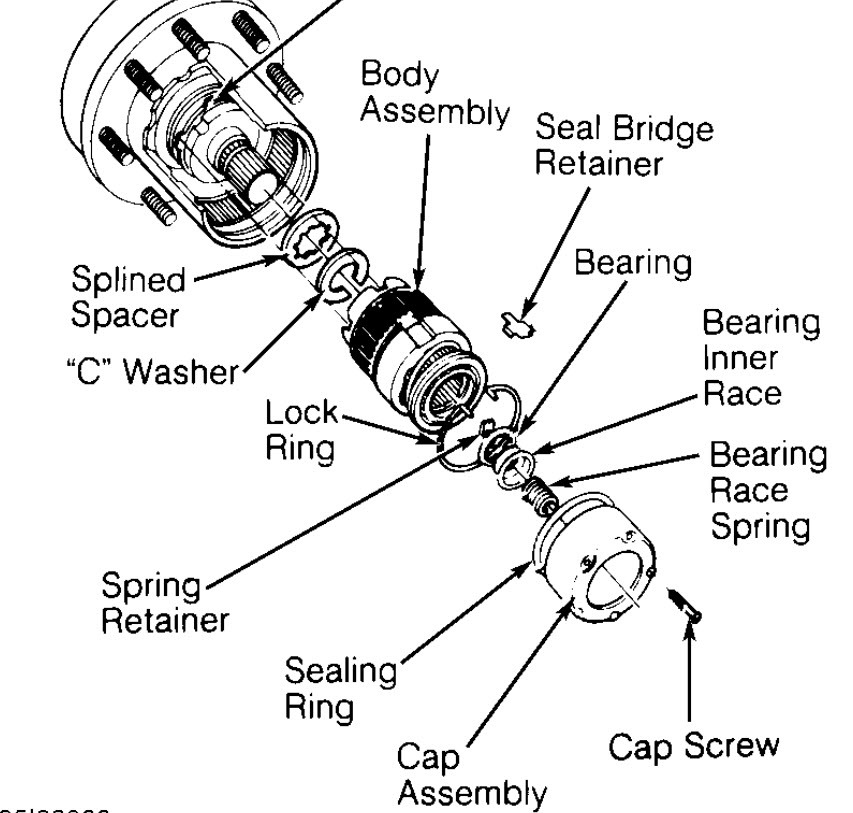
Front and rear wheels should rotate together. While rotating rotor and hub, retighten wheel bearing retainer nut to 68 Nm 50 lb-ft to seat wheel bearings. The firing order for 1994 5. Lay your parts out in order as you take them apart is my best advice. The links provided a great exploded view diagram.
How to Replace Ball Joints and Wheel Bearings on a 1996 F150

The next step is to take the 4wd lockout hub apart, first take out the six Allen bolts that hold the cap on. I used it many times but never knew its size. Remove the 3 torx 45 torx head bolts holding on your brake rotor, then remove the brake rotor and put off to the side. Separate your ball joints Take out the bolt in the bottom pivot joint that is under the knuckle. My hubs are not the Warns I loved and enjoyed in 4 previous Broncos.
How to Replace Ball Joints and Wheel Bearings on a 1996 F150

Use a lug wrench to properly torque wheels on your Ford. I'm replacing the front axle joints and in the process discovered what appears to be an incomplete auto-manual hub conversion as the single large bearing nut was not replaced with the double nut type inexpensive item at Ford, less than Napa. Install retaining key into the spindle keyway by inserting the short leg into the aligned slot in nut. Even with drum brakes, a wheel bearing must maintain the concentricity of the drum with that of the brake shoes. Be careful with the regulator connector, you need to push inn the tab that holds it in.
Torque specs for front wheel bearings. 1994 ford f150

Remove the front wheel and tire assembly. A spring should come out, then you will need to remove two snap rings. The following is the procedure for a 1999 - 2003 Windstar. I believe, and I could be wrong, that the upper bearing takes all of the abuse and the chances are you will not ever need to replace the bottom bearing unless you've been driving around with a wobbly steering shaft due to a disintegrated upper bearing. We can help you fix them! Remove these bolts and slide the alternator out of the way.
95 F150 4x4 Wheel bearing Torque

I think that I used a flat screw drive on the bottom of the tab to release the snap lock. You may have to before you can post: click the register link above to proceed. Tighten wheel retainer nut to 1. I believe there is 3 bolts you will have to remove and from there take yourself a mallet and hit from behind a few times should come loose. This is the second alternator on this car. The entire process took about 2 hours on the driveway, and it would have gone quicker, but I had not done one of these before.
95 1995 Ford F150 Wheel Bearing

Remove retainer ring holding the bearing in the knuckle. I don't know how many Warn hubs Ford used in 1996 but every one I've seen are Ford three screw and not the Warn 6 screw hubs. Spindle bearing and seal set. I hope this helps everyone who reads it and can save money. The inner bearing will need to be driven out with the seal.
95 1995 Ford F150 Wheel Bearing

Once you make sure the washer is in there correctly, tighen the second ring to the first one, which serves as a double nut principle which makes sure the first ring never comes off. The top center is the hub lock body. Thanks for the helpful replies. Once you have that 4th. The wheel barrel is one of the most important parts of your Ford.