A4ld rebuild video. A4LD Transmission For Sale 2019-02-12
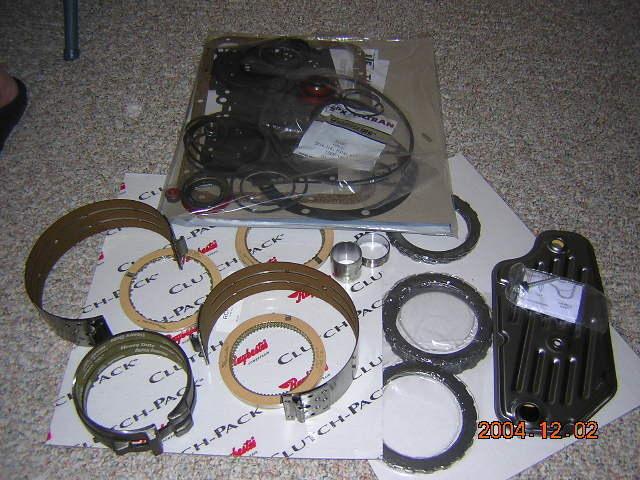
A4LD transmission, 1985 to 1994 Performance Combo Kit. Alto Power Pack & Band, Sonnax Valve, Transgo Shift Kit and more . . . . .

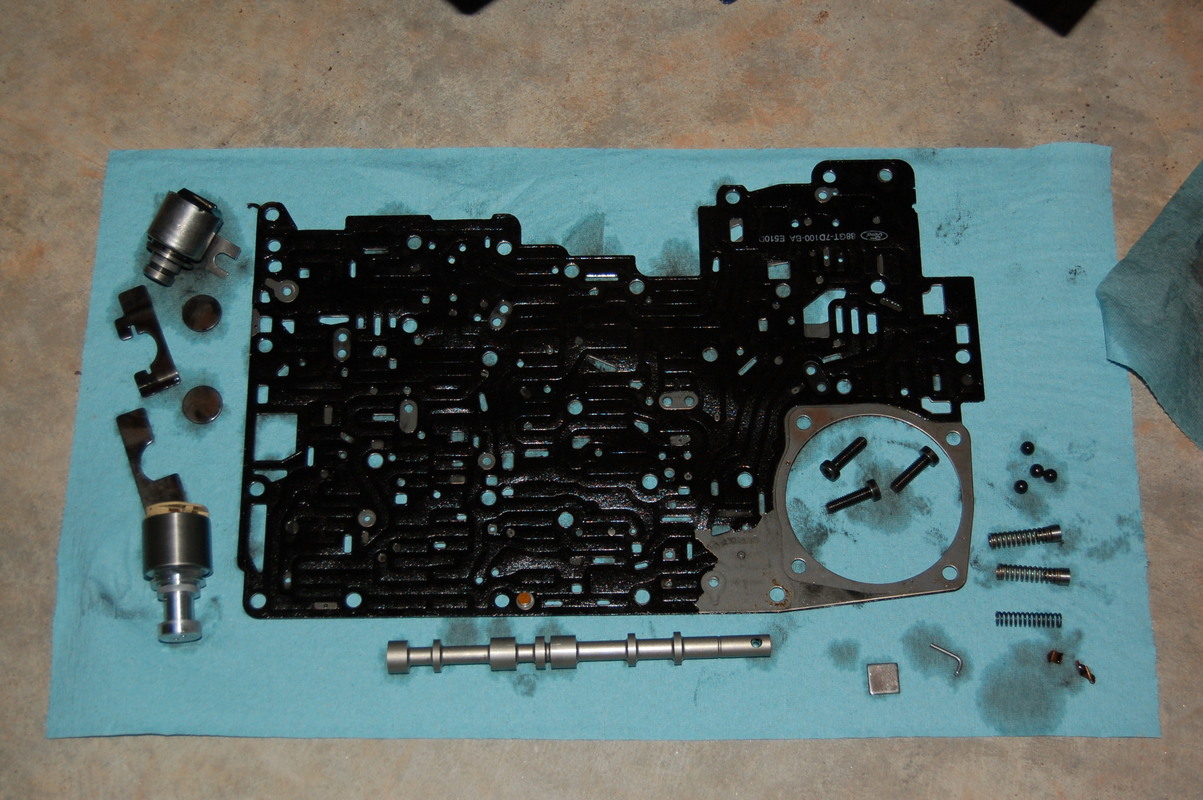
Usually you can work a valve out of the bore from on top of the valve body looking down into the bore - inch it along with a tiny screwdriver or popsicle stick until it's far enough out to get hold of. As I progress going to be a number of weeks anyway , I'll keep you posted, with pics and a shopping list with prices. This one gets springs from the Superior Kit. Something that more concisely detailed the operation. Debating adding a steel insert to a new center support mid section. Covers transmission assembly, dis-assembly, diagnosis, and troubleshooting. As always start with steel.
A4LD Transmission For Sale

I'll update the parts list in part 1 when I am done with part numbers, suppliers and costs. I recommend changing it every 20,000 miles or sooner. The main benefit of this is that it limits the outward travel of the valve. Look: Think of the marks you see on the retaining snap ring as being like like tan lines. I intend to list all the items that go into it, and openly solicit other ideas along the way. A parts list with numbers cross-referenced , tools needed, steps taken, outside resources, total costs, etc. Patience, lubricant and a gentle touch will do it.
Ford A4LD transmission rebuild diary

Simply drop them on the posts until they are all in place. I gauged mine, and found it a I did in every instance in this transmisson's clutches near the outer limits. Why not use both points of support? You want to install the filter on the line going to the radiator, not the one coming out of the radiator. I would get the new deep aluminum pan thats available- drain plug, you could tap it for a temp gauge and additional cooling. I guess I should tell you guys what my problem is. So from your list, it sounds like your changing some hard parts? Here are the two in my kit in my caliper. In addition, the transmission cooling systems are different between Generation 1 and 2 and cooler configuration can also be different depending on model.
A4LD Transmission For Sale

I heard there was an upgrade to it? I worry about the lack of front piloting of the output shaft in this situation. You put it over the center. Wonder how many front clutch plate burnouts might be blamed on something else? It includes a sleeve and valve. Excessive heat buildup is a quick way to destroy this transmission. This transmission is designed to run at 200 degrees max. So, let's say you want to get as may more mile as as possible and to heck with everything else. Note: There have been many engineering changes in this transmission since its introduction.
4R44E Transmission Teardown Inspection

We'll get this thread going again! After work, I drove from work to my parents house 5 miles. I need to look into the overdrive band, but I don't think this has been a problem child. Mine has 205K and has one. It is important for the rebuild technician to pay close attention to parts differences between Generation 1 and 2. There's no point in trying to buy time. The Sprag coming out looked more or less ok, with some minor wear marks.
Automatic transmission (rebuilding)

You might be able to gauge within + or -. Although the unit changes in name, they're virtually the same unit as I explain in the video. This should be fun, stay tuned. This one has 2 seals. Here is showing the lip flair aimed downward Next I place the lubricated piston with seals installed in the drum, over the center seal protector. I'm wondering if the old owner added it later. .
A4LD Transmission For Sale

I have a local outlet for Aceomatic, so plan to pick their brains along the way. Makes exact gapping tough, but also there was a running change in size that some may miss. Might make a good door stop. There are countless stories on the internet about premature failures and a long list of problems. The first page shows the locations. Squeeze the pliers and expand the ring Oddly enough, these are not all that easy to find. Over time the hole gets elongated.
Buy the Best Parts & Rebuild Kits for Your Ford A4LD Transmission
Sorry for the hiatus on this project. One goes over the inner snout. I put in the check balls and the hockey pucks, and I was done. See for yourself, no swelling. Most of the valves are aluminum. So it's where it belongs, and now I am waiting for some ordered parts to arrive to put this puppy back together. That's is about it for now.
Buy the Best Parts & Rebuild Kits for Your Ford A4LD Transmission
And yes I think Jim the 94 was as far as Ford took it, I also think the 4R55E came in in 95. The new style compleely surounds the snap ring to prevent it from disengaging. They are just a quick away from helping you out. You can get considerable rotational play just from the Z bracket that amounts to about 0. From the end that contacts the valve body casing to the closest end of the hole measured. I was driving down the highway until I came to a stop. I started with the inner, carefully working it into the groove.