Bootable usb for mac mojave. How to create a bootable macOS Mojave installer drive 2019-03-08
How to Create a Bootable USB Installer for macOS Mojave and High Serria

Read me Screen there are lots of information about Unibeast read carefully that. In addition, you will not lose or do any sort of loss or damage take my word. You can now unmount the disk and use it to perform an update or clean install on your Mac computers Figure D. Quit this installer so that you do not upgrade just yet, while at the same, you have the source file downloaded to your Mac. And you are near to the finish line. Let us know in the comments.
How to Create a Bootable macOS Mojave USB Installation Disk
Unconfortable with text commadns and prefer doing it in a simple way? Once you see the Startup manager window on the screen, let go of the button. Basically, Boot Camp is just a minimal prototype product. In any case, it will work just fine for our purposes. However, we have covered you up with these. So, Open Spotlight by press Windows + Space or simply click on the Search logo on the menu.
How to make your own bootable macOS 10.14 Mojave USB install drive

Just once and use it for any Windows 10 repair or recovery problems, including doing clean installs or reinstallations. Head over to the download page and hit Download. Instead, press Command-Q on your keyboard to quit the installer. No text will appear in Terminal when you enter the password. You can navigate to a different one if you want, and you can also pick from among all the storage devices and volumes currently connected to your Mac through the drop-down menu at the top of the window. If you downloaded from the App Store, these apps will be able to find the installers automatically. This procedure will erase all data on the stick and then back up the data.
Download MacOS Mojave .APP, DMG, ISO, Bootable USB image [Official Version] » MacBold

Select Connect to a virtual machine and from there, select the virtual machine whether its Mojave or High Sierra and click Ok. At here, drag and drop the config. The prompt will appear as what you want to do with it, press Replace button. This software application has been created for novice users as well as experts. DiskMaker X and Disk Creator are the most popular and reliable apps for this purpose.
How to Create Bootable USB for macOS Mojave on Windows with TransMac?
The Mojave installer app will be in your Applications folder, so you can go there and launch it later to upgrade your Mac to the new operating system. You'll be required to enter admin credentials when prompted for the password. If you got any questions leave in the comment box below I will get to you soon. Jeffery Snover the founder of PowerShell said that anyone can work on PowerShell based on their platform. The disk will be made bootable as the process completes successfully.
How to make your own bootable macOS 10.14 Mojave USB install drive

Boot Camp Assistant is one of the alternatives, but it's a tedious process and not very easy to execute if you don't have the right experience. At the time of installing, you may be asked various times for your password, so be calm and enter it when requires. When it is done successfully, you will receive a message shown in above screenshot. As well as, it includes a set of useful drivers and customization options. You can download the file from the above link. I keep it around for those time when I would rather use the drive than rely on booting in.
How to Create Windows 10/8/7 Bootable USB on Mac Mojave or Serria

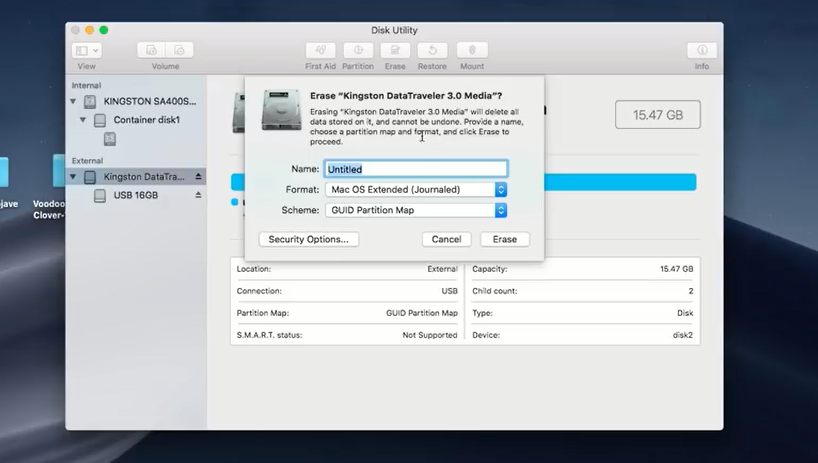
If you want a much simpler solution, then review the next method shown here. Names are case sensitive and can't have any spacing. But why we should not use the Terminal which is a built-in feature of mac. In addition, the burning process is extremely slow. Now connect an external flash drive with more than 16G free space. Systems that may be offline or air-gapped due to security concerns, or those that may be housed in remote locations and have poor connectivity yet must still be updated. .
Download MacOS Mojave .APP, DMG, ISO, Bootable USB image [Official Version] » MacBold
Also if you think this post worth for sharing, please share it with your friends and colleagues. Now that there are more than 700 million computers and mobile devices running Windows 10, a bootable disk will help a lot of system administrators save a lot of time when troubleshooting issues or doing reinstallations and clean installs. This is possible with or in Windows that works great. I hope you find this article useful. In my case I have selected Inject Navidia.
How to Create Bootable USB for macOS Mojave on Windows with Unibeast?
Make a bootable installer drive: The quick way I used a free app called to make the installation drive. If you're not sure, leave it in default. Yes, the same method I am offering you to use, I know it is lengthy but it gives you 100% Result in one try. Input the admin password when being prompted. If you have more than one external drive with the same name, you will need to rename the drive you are using as a bootable installer now.
How to Create a Bootable macOS Mojave USB Installation Disk

And wait for the booatable disk being created. Step 7: Drag createinstallmedia to the Terminal window from the Finder location in Step 4. This will allow you to connect a storage device that uses a connector. This procedure could take a few minutes, at the end click on Finish. Here are some of the instructions you can follow. The best part is, you will be able to create a customized thing that will work perfectly.