C3 corvette rear differential. Keen Corvette Parts Diagrams 2019-04-06
C3 Corvette Differential and Axle Codes 1977 to 1982

These companies may use information not including your name, address, email address, or telephone number about your visits to this and other websites in order to provide advertisements about goods and services of interest to you. Loose Gears Move the gears back and forth to check for looseness and play from side to side. Backlash occurs when you take your foot off the throttle; you hear a clunking noise coming from the rear of the car. Thinner pinion shim with good Backlash moves the Drive side to the top and to the Heel. Be careful to not over tighten them, as it damages the roller bearings. The rods mount under the differential and connect to the trailing arms on the same bracket as the lower shock mount. A brass drift or steel plate will also work.
C3 Corvette Restoration Guide: Suspension and Differential Reassembly
Once the spring is securely in both wells, slowly raise the jack to prevent the spring from popping out of the upper and lower spring wells. If one wheel loses traction the clutches engage and lock both wheels to provide added traction. April 25,2004 Revised October 26, 2005 1963-1979 Corvette Differential Rebuild Procedure By Gary Ramadei Tools Required: 1. Step-4: Install Driveshaft Yoke Install the washer. The antiroll bar end is attached to the lower control arm with a link.
C3 Corvette Restoration Guide: Suspension and Differential Reassembly

You might have to wait until the weight of the engine compresses the springs enough to install the links, or have some friends sit on the frame to help make the connection. There are a few ways the universal joints can be removed. First start stacking a side gear with a clutch disc that has two tabs or ears on it. It is vital to get the pinion centered on the ring gear during setup or gear noise or damage will result. If you over crush it then replace it with a new sleeve. Once the backlash is correct the 4 springs can be installed.
What's Up in the Forum: C6 Corvette Z06 Differential Fluid Change DIY
With the differential cross member removed, I moved on to removing the leaf spring which consists of the two bolts on the sides and four in the middle. Use Loctite red on the nut. Remove the housing and check it with the dial torque wrench. Worn Posi-Traction clutches often chatter at low speeds when making a sharp turn. Steering Knuckle Spindle The steering knuckle spindle plays a crucial role in front suspension dynamics. I decided to cut them first so as to put as little pressure as possible on the half shaft ears to prevent them from bending inward. Clean the carrier in solvent to remove oil.
C3 Corvette Restoration Guide: Suspension and Differential Reassembly
.jpg&h=180&w=180)
Note the bolt head markings. Front Suspension The front suspension is the perfect place to start reassembling the foundation of your C3. The design was so successful that it was carried over for the entire C3 production run with only minor changes. This is the perfect time to install the gas tank between the back frame rails. Use a large piece of pipe or something that is the same diameter as the seal. You start by removing the fill plug, at which some fluid might trickle out, so many sure to be ready with a catch pan. This is also a good time to steam clean the parts and repaint or powdercoat before reinstallation.
C3 Corvette Forum

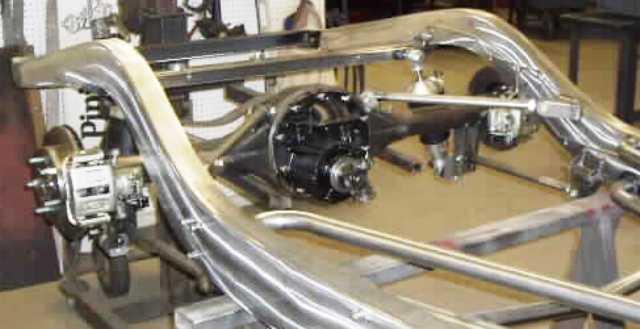
The relay rod connects to the steering box Pitman arm lower left. The seals tend to leak if they sit or have high mileage. Notice here that the shock absorbers have been mounted and the halfshafts are bolted to the trailing arms and differential. Step-2: Install Clutch Pack in Housing After the clutches and side gears are installed, insert a thrust washer on each side of the unit. Low fluid greatly increases the pressure it takes to turn the wheel and quickly burns out the power steering pump if oil is not added. By using and visiting www. The front trailing arm bushings have already been installed here.
1978 Chevrolet Corvette (C3)

The pin should slide in the holes without any resistance but not be sloppy. Use a file to radius the housing edges to remove any burrs or sharp edge. With the strut rod cleaned and ready for paint, I moved on to the differential cross member. These springs were installed on Corvettes built at the new Bowling Green assembly plant. Shims are used behind the side gear to obtain the specified backlash per side. Also, improper rear spring installation can break the stock cover mounting tab off or crack the cover. Insert the trailing arm bolt through the trailing arm.
1978 Chevrolet Corvette (C3)

Each bolt has a wedge near the head arrow that prevents it from moving once the suspension has been mounted. Once the car is in the air, you want to locate the rear differential and on it, you should see the fill plug mounted about halfway up the backside of the case, along with the drain plug on the bottom. Grease and pack the inner and outer bearings with wheel bearing grease. They spin it fifty times to the left and 50 times to the right. Other axle prefixes or codes are as follows, I'm sure this site will cover most.
C3 Corvette Differential and Axle Codes 1977 to 1982

Remove the old pinion bearing from the pinion. Place a long fl at bar onto the head of each bolt and hit the bar with enough force to push the head flush against the frame. In addition it houses the front wheel bearings, brake rotors, calipers, and brake lines. Five of these discs have tabs. This is a very easy do-it-yourself project… it took me less than an hour.