Cubase instrument track vs midi track. 5 Pro Tips For Audio And MIDI Routing In Cubase : www.littleboyblu.com 2019-02-14
How to use automation in Cubase

This makes it more difficult for me to tell them apart at a glance, and to tell which track is making which sound. You may also choose to include or not automation and effects. I have no external hardware synths, just vstis and occasionally a live audio track or two. Click Create on the window that will pop up. I didn't realize that I could disable tracks to save memory. Since the hardware synths record well and the procedure is working for other songs I suspect this is some cubase setting for this project that can't be found.
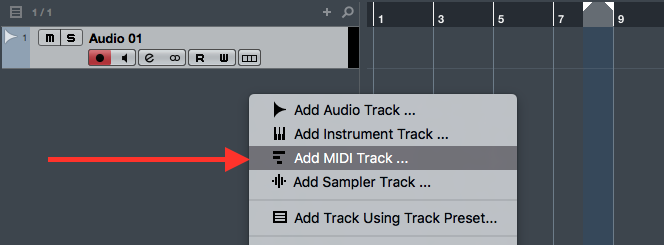
record from instrument track to audio track

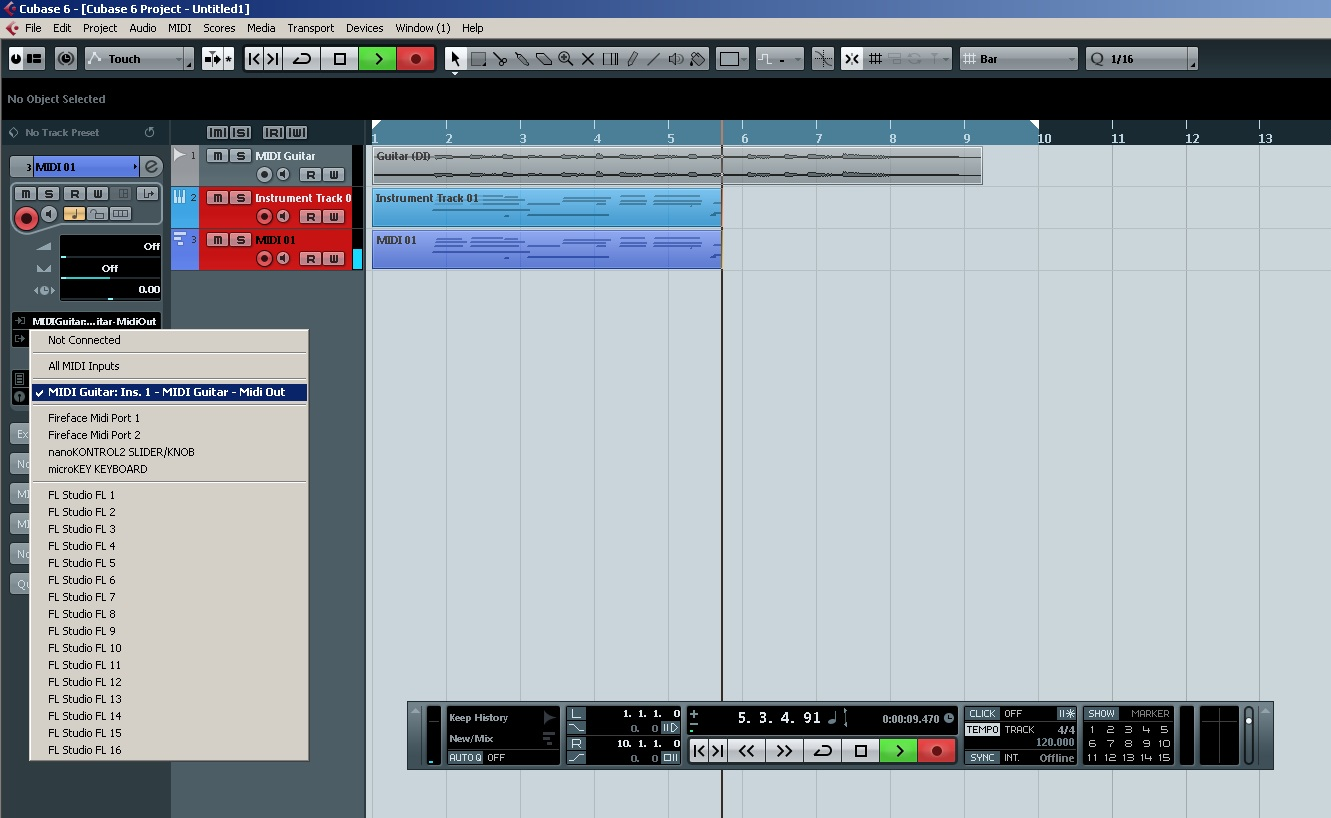
Do you have an idea why that happpens? Just click like in the image below to enable it. We need to make a quick journey to the Windows mixer, which the most famous studios in the world envy us! We can also choose different volumes for 1 Hi Pitch and for 2-3-4 Low Pitch. I'm pretty new to recording so I have a question. You can have multi out in instrument tracks btw. The new lane shows volume automation.
Recording MIDI to audio track in Cubase

Change from the pencil tool to the little arrow by clicking it or by just hitting 1 on your keyboard. We'll work only with Audio from now on. Zoom the timeline to get a closer view of some breakpoints. The specific topic was setting up tracks for mixing based on studio recordings protool wav files. When the new curve intersects the old, Cubase stops overwriting existing automation.
How to use automation in Cubase

The production quality of this podcast is great and the host is very good at engaging his listeners and inspiring them to be better in this field. With the set up above, i don't see any advantage in using Racks. You can Arm many channels depending on how many Inputs your sound card has. I started listening to his podcast months ago and learned so much I signed up to be a part of the TechMuze Academy. Choose the software of your liking.
record from instrument track to audio track
June 19, 2017 by Krypticjustis from United States I started listening to tech muze about a month or so ago and I enjoy it a lot. I'm using a plugin as an instrument on an instrument track. By selecting a box and hitting Ctrl + D Duplicate you create a duplicate box right next to the original one. If you can connect, for example, 3 instruments you are able to record all 3 at the same time, by arming all the 3 channels. Differences make it so there isn't really a clear-cut best option, depends on your workflow. A few years ago, I thought instrument tracks were completely pointless. If the entire track is in Write mode then any change to any parameter will create breakpoints for that parameter; if only placing specific parameters into Write mode, then automation will only be written for those parameters.
Instrument Track vs Midi Track + VST ...
Taken separately, these elements taste pretty good. Have a wonderful day and let me know if you want me to create more tutorials. Whoever posted that one is a genius. These benefits work best when you use one instrument per instrument track. It is a pretty simple plugin that works by loading a wav file into it and once cubase starts playing the sample is looped and butchered by random slices. You can stop recording by hitting Space on your keyboard.
5 Pro Tips For Audio And MIDI Routing In Cubase : www.littleboyblu.com

I would like to record the audio output from onto an audio track but not having any success. This gives you way more flexibility when working with these instruments and you have more mixing and processing opportunities this way in your productions. The handles drawn on the range selection can scale and tilt the curve; you can also drag the range around the timeline. You also can't batch export effectively when using racks. User Alert System provided by - Copyright © 2019 DragonByte Technologies Ltd.
Recording MIDI to audio track in Cubase
Also, when working with tracks that already contain automation, it becomes too easy to get muddled over which parameters are being automated, or to interfere with existing automation data unintentionally. Would be about the equivalent of mixing mayonnaise with strawberries. My feeling is that multi timbal instrument tracks are still a bit new and buggy, but it will get smoother as the versions go by. Let say for my pop template on my slave, i have 6 instances: Bass, Guit, Piano, Synth, Horns, Strings. Drag a selection box around a number of breakpoints — a range selection will also be created.
Midi Vs Instrument Tracks
Then I do an export and it works fine. Talk about running in circles, Steinberg. The place that I create the tutorials is at my home. . However, I do not see the gain to adjust it and I have looked everywhere I think.
record from instrument track to audio track
He offers another site with a free intro to mixing with tracks available for you to download and mix. You may have to before you can post: click the register link above to proceed. By clicking inside the bars you create new Tempos that you can adjust. Choose the following 2 x aux channels because this is going to be a stereo output it needs two outputs , and follow on and do the same for the rest of the instruments in your multi-timbral instrument. However, I seriously doubt it is significant and probably not even noticeable, if you are comparing a fully loaded instance of Kontakt in each scenario. Having used both ways, the latter is probably easier, if only because it is one less track being displayed which gives more room on the screen for other tracks! Even though it doesn't actually change the sound or the name of the programs as displayed in the instrument's slots view, I still find this incredibly annoying, because it appears to change them in the main project view. This is perfect because it gives you the opportunity to give yourself some time before you start recording.