Diy transmission rebuild 4l60e. Tips for DIY 4l60e Transmission Repair 2019-04-28
GM 4L60 4L60E (THM700R4) TRANSMISSION FULL WORKSHOP REBUILD OVERHAUL REPAIR & PARTS MANUAL
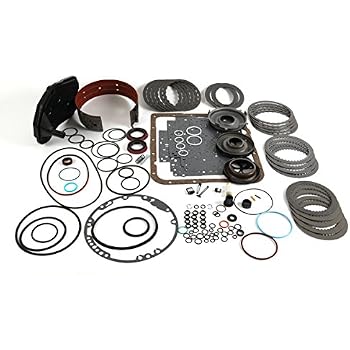
Install the friction and steel plates, alternating and ending up with a friction. Keep an open line of communication with your mechanic because you are going to need it. You may also be installing a Corvette or aftermarket servo. A transmission will include major internal modifications and upgrades designed to make it both stronger and more durable. Afterwards, check to see if your check engine light is blinking. Place it back on the pump.
DIY Performance Modifications For Your 4L60E Automatic Transmission Equipped Corvette

Use fine-grit auto-body sandpaper to gently remove any high spots, if present, before installing the new bushing. Also, cover any parts on the workbench that have been cleaned and are ready to build or install into the case. Notice that the overrunning clutch apply piston has matching posts for each spring in the spring cage. Once past the groove, push down firmly on the assembly to seat it against the 3-4 apply spacer return spring. Designed for longitudinal engine configurations, the series includes 4 forward gears. Continue until all of the sealing rings have been installed into the grooves.
TH700R4 through 4L70E tips and tricks

Make sure that the Teflon slide and rubber spacer are flush with the top edge of the pump slide. Work it up through the transmission until it protrudes far enough above the planetary to expose the groove for the snap ring. Check your Vehicle Owner's Manual for the code or contact the service department of any auto dealership that sells your make vehicle for assistance. However, the play on all pinions should be very close to the same measurement. Turn the inner section while holding the outer section stationary, to check for any roughness or tight spots. United States Army Drill Sergeant J. These restrictors are available through most transmission parts suppliers and come in many aftermarket shift kits.
How to Rebuild GM Automatic Overdrive Transmissions
The bolt you leave in should be one of bottom bolts that is easy to get too. They stack directly onto a waved plate that rests on top of the thick apply plate. Nicely sanded, used steel plates will not deliver acceptable performance. Continue wiggling the torque converter and rotating it back and forth while pushing in until it is fully engaged. The factory made numerous changes to the 3-4 clutch-pack assembly.
How difficult is it to rebuild a transmission?

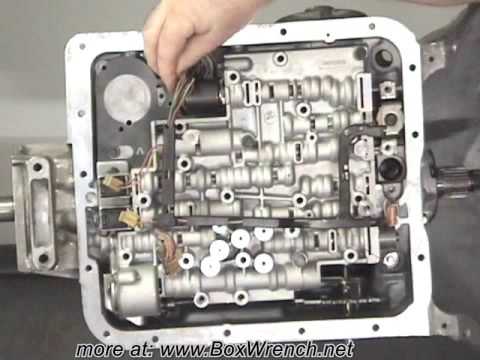
This is especially helpful if you are not equipped to deal with an automotive issue such as this. Once your case is stripped down, a quick trip to a local car wash is a good way to remove most of the heavy deposits. Written by Cliff Ruggles and Posted with Permission of CarTechBooks. When the speed sensor fails the speedometer stops working and shifts may become erratic. Remove the reaction carrier under the planetary, which contains the dogs big square-cut teeth that engage the parking pawl. Remove the manual valve and parking-pawl rod first to facilitate easy removal of the valve body as the spool valve rod connects the linkage to the valve body.
Ingredients For Building a Bullet Proof 4L80E Transmission

Install the upper pump ring. The 4L60E uses 4-pinion planetary carriers, these carriers are rated to 360 ft. Once the drum is clean, drive in a new upper and lower bushing. Using a torque wrench and a tightening in a star like pattern, torque the pan bolts to 98 — 108 lb-ft. Valve Body— The valve body is an important step in modifying the 4L60E for performance applications. If you are installing an aftermarket shift kit, follow the shift-kit directions exactly, as they may replace parts in the servo assembly, or deviate from the factory arrangement of the components. The housings were redesigned with a lip to retain the front bushing, a larger oil drain-back hole, and a retainer over the front seal.
How difficult is it to rebuild a transmission?

Apply TransGel to the seal before attempting to install the oil pump into the transmission case. This is highly recommended for high-performance applications. When the manual shaft is moved into the highest or Park position, the pawl should fully engage and the output shaft should be locked in position. When the switch fails, the engine may not crank or it may start in gear. Incorrect installation could cause catastrophic transmission failure. For shift kits follow the shift-kit directions exactly.
DIY Performance Modifications For Your 4L60E Automatic Transmission Equipped Corvette
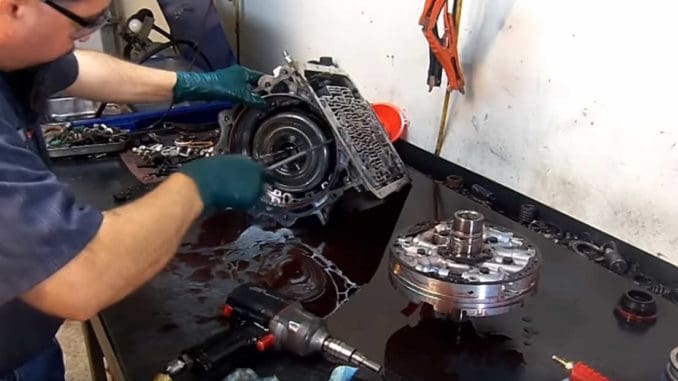
While turning the race clockwise, push down until it engages the front planetary—it will push easily into place and bottom out. The valve body will prevent removing the wiring harness on 4L60E models until it is removed, but it is still a good idea to unhook all the switches. These were already bench tested. The aftermarket kits also contain thin steels and frictions, which can be used in conjunction with stock parts, if you are building the drum from scratch, or do not have all of the correct factory components available. Install a band to line up the pump halves.
4L60E Monster

Fill out the form here to get an estimate via e-mail. Operate the manual shaft several times while turning the output shaft to make sure that the parking pawl fully engages. Keep your foot on the brake pedal. Note the position of the parking pawl bottom right photo. It goes from the center conductor of the cigarette lighter plug + all the way to pin E on the harness end. Remove the priming spring s , the outer pump slide, and the slide pin. It will have stretched out some from the installation process.