Filmora green screen tutorial. filmora green screen 2019-01-23
Filmora Video Editor Completed Tutorial
So to find a fram, lets use the scrubber at the bottom to find a frame. How to Convert a Normal Speed Video to Time-lapses Using Ensure that you have a very long video so that you can optimize your time-lapse video with Filmora. You can find us on our official facebook, twitter and google+ pages: Facebook:facebook. Tips: Divide 1 second by the fps amount, e. Begin by moving your cursor over the green screen clip and right clicking on it. The best type of day to film outside is during an overcast day.
Cara Mudah Edit Video Green Screen dengan Filmora
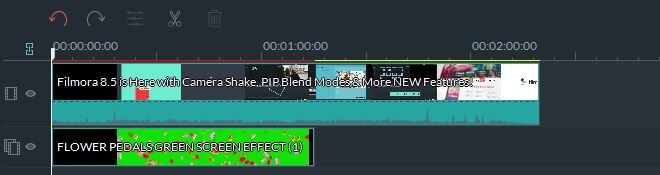
Step3: Setting up the Green Screen effect The first step is to select the foreground video or image that is, the green screen footage from the video timeline and drag and drop it on the overlay track which is above the main video track. Finally, amid my Wondershare Filmora review I found one very powerful advantage: Wondershare Filmora is purpose-built for mobile video and social media. You would not need to purchase and use any other equipment because your smartphone is powerful enough to let you take videos, even though it is as big as the palm of your hand. Naturally, you may wonder why does the screen have to be green or blue? You can preview audio and video tracks frame by frame for precision. Furthermore, the duration of the videos you can download is often limited to just five or ten seconds. Select Green Screen so that you can enter the video editing interface. Filmora was designed for allowing consumers to edit action camera footage, making viral videos for social media sites and creating tutorial videos, amongst others.
bagai mana si Edit Video Green Screen di (Chroma Key) dengan Filmora???? ~ recognize IT end software

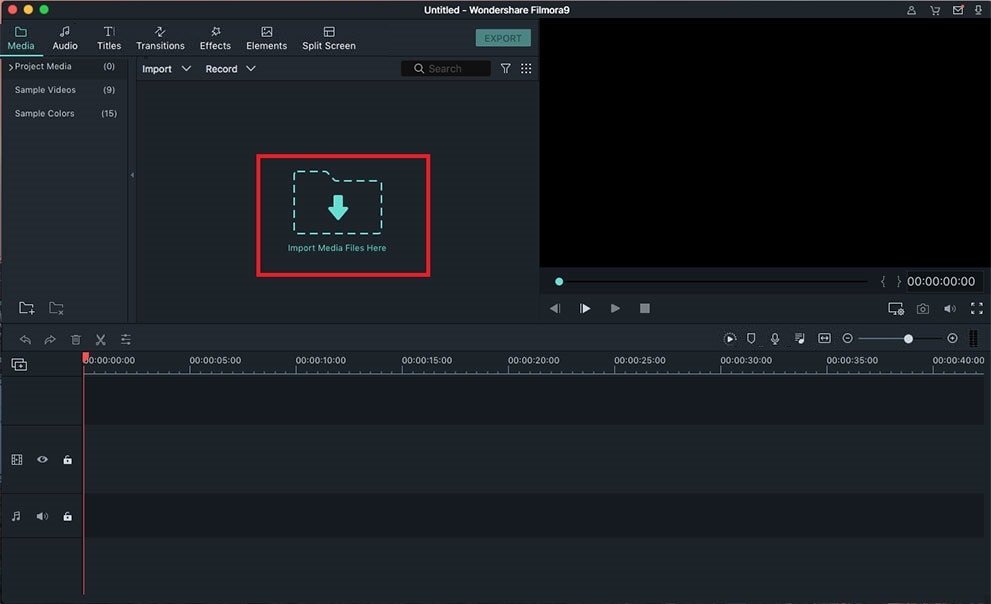
You can also rotate the green screen clip with the flipping option to create new effects. Bisa tampilan komputer atau ponsel yang sudah kita rekam sebelumnya. Filmora supports up to 5 layers of text. As you edit your videos, you will be able to preview them in real time. This technique works well for day-time videos rather than at night because of the lighting quality. Learn how to create time-lapse videos with Filmora by following the instructions within this article. Import the footage into the Filmora video editor If you already have Filmora installed on your computer, start the program and head to Full Feature Mode and then proceed to import the background videos and Green Screen footage to the media library.
How To Use a Green Screen

Untuk tingkat intesitas warna sobat bisa mengaturnya sesuai selera. The Easier Alternative Method to Create Green Green Screen in Premiere or green screen is the easier alternative to green screen in Premier, especially for beginners. Whether you are a professional filmmaker, or just starting out your video editing experience, you can easily create green screen video at the comfort of your home. Download Filmora and make your own green screen video now. Invert tools can also be very helpful for removing all colors except for one specific color that you removed. And since they also have one of the best mobile support and social media integration on the market, Filmora is also the best video maker for social media marketers. Filmora is built to make cinematic-like video effects and professional quality video available to the casual user.
Tutorial: How to Make a Green Screen Video with Wondershare Filmora on Vimeo
Terima kasih sudah berkenan mampir ya Soba. With this feature, you can be able to superimpose a superhero character on the virtual background. For example our and articles. Contohnya seperti ini : Bisa kita lihat bahwa di belakang video ledakan tersebut ada layar berwarna hijau, yang nantinya akan berfungsi mempermudah kita menggabungkan ledakan tersebut dengan video lainnya maka hasilnya akan lebih halus dibandingkan tidak menggunakan latyar hijau. Sobat bisa mencari dan mengunduhnya di mbah google, hehehe Langkah 1 Menyiapkan video yang berlatar belakang layar hijau. Step4: Lastly, after editing out the green part, you would need to import a new background clip on the media library.
Filmora Video Editor Completed Tutorial

With this technique, you would not have pre-plan but would still enable you to create good quality output. For still photographs, Adobe Photoshop has a built in Chroma key feature that allows users to manipulate photographs taken with a green background by changing it to whatever they would like. How to Do Green Screen in? Begin by installing the program and launching the Camtasia editor. And then drag and drop the background video and green screen video to the video track in the timeline respectively. How to export and share your video in Filmora Video Editor Once you have finished editing your video, you may want to export it to finish the production. Dan tentunya saya yakin banyak di antara sobat Archi yang lebih jago perihal tutorial ini.
How to Make a Time

This app even allows you to upload directly to YouTube and includes many features such as background music and frames. You can import green screen footage to Camtasia and then begin populating the timelines. Akan tampil menu PiP edit. Siapakan video rekaman anda yang green screen. Alternatively, you can click 2. The tools on board include the option for premade filters, animated titles, transitions and more. This technique also gives you greater flexibility and a higher quality of resolution since still images allow for zoom-in and zoom-out features.
In

Choose the green screen option from the drop-down menu and enter into the editing interface. Hal pertama yang harus dimiliki adalah aplikasi itu sendiri. Supaya saat proses pengeditan video mempermudah menghilangkan background hijau dari sebuah rekaman video yang kemudian nantinya bisa ditambahkan berbagai bentuk effect yang di inginkan. There is also a Flip option to rotate the green screen clip. If you would like to make your actor transparent using clothes that have similar tones as the background is completely justified.