Find snipping tool on pc. Where to find snipping tool in your windows computer 2019-04-01
Where to find the Snipping Tool in Windows 10
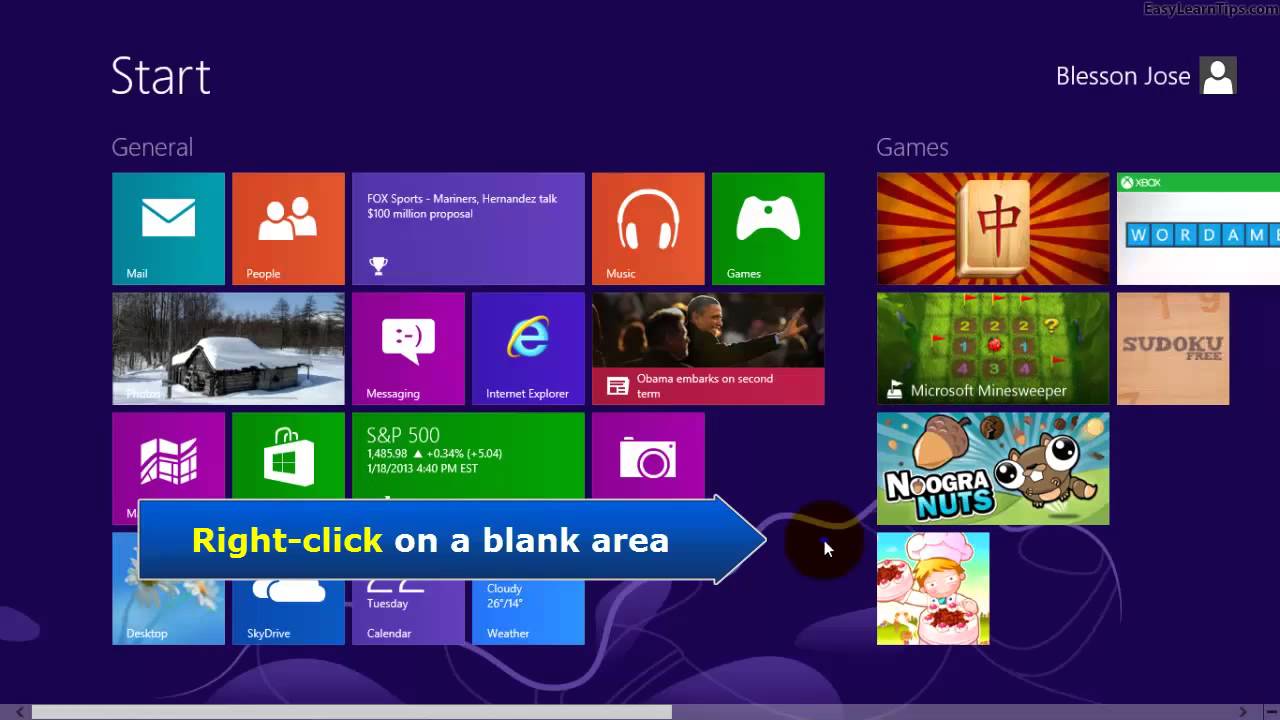
How to Use Snipping Tool for Windows 8. Last Updated on April 8th, 2018 By Where do I find the snipping tool on my computer? Now, follow the steps given in the previous section to access snipping tool in your Vista. Everything will work fine like in any other versions of the Windows. And you can choose to save the screenshot or pin the screenshot on computer. This brings up an alphabetical list of programs and folders. In fact all your usual Windows programs can be found in this area, like the Control Panel, Remote Desktop, etc. Microsoft says all the changes and improvements they have brought are based on user feedback about taking screenshots in Windows.
5 Ways to Open Snipping Tool in Windows 10
But after hovering it will take a couple of seconds to Open. If you right click on the tool you will be able to save it to your Start Menu or Taskbar. Click on the Window Snip mode button and the Snipping Tool will then let you select the window you want to capture. . As one suggestion before I start, you may want to check out the Tutorial section of this forum. The document looks good on the screen and it looks good in the print preview screen but when I print it the bottom portion and the right edge of the image.
How to Take Screenshots Using Snipping Tool in Windows 10
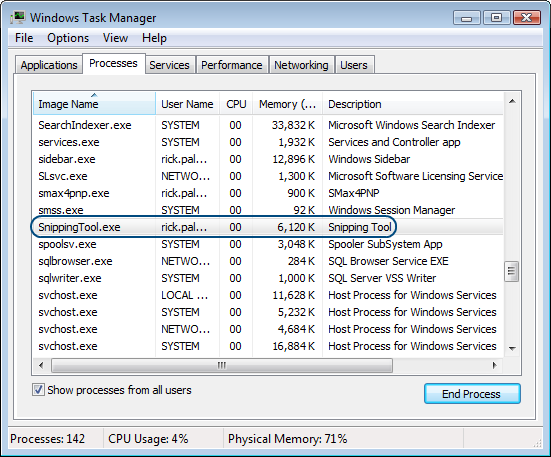
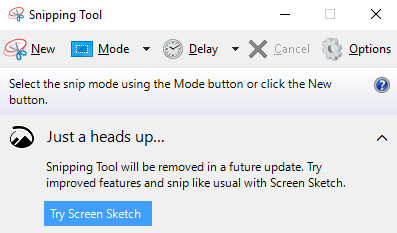
Open Snipping Tool in Windows 10 To open snipping tool in Windows 10, these are the steps. I checked System32 folder and it was not there. Would appreciate any help with these two questions. You can easily find all the screenshot files by clicking the media manager, the button at the top-right corner. Then you can share the pictures to your friends or to social media like YouTube or Facebook.
How to Take Screenshots Using Snipping Tool in Windows 10

Are you wondering, how to take screenshots in Windows 10? This is appeared in the picture underneath. Warning: Some websites may advice you to change the data in the Registry Editor, but it have to be emphasized that it can be dangerous to change the data of Registry. How to Use a Snipping Tool for Mac? As one suggestion before I start, you may want to check out the Tutorial section of this forum. We already went through all the features. Clicking on it straight away takes the screenshot of your screen and opens it up in the Snipping Tool itself. Notice the blank area above the snip, and where the highlighted mark is.
Where to find the Snipping Tool in Windows 8
Activate snipping tool in Vista Some Windows Vista versions such as basic will not have the snipping tool enabled by default. Make sure you click the download link at the bottom of the page to get the free version. In my precedent, I will utilize the image of the infants that you we utilized beforehand, however any image will work similarly too. Choose the area to capture 6. You can not print with the Microsoft Windows Snipping Tool.
Finding the windows snipping tool & how to make screenshots for free.
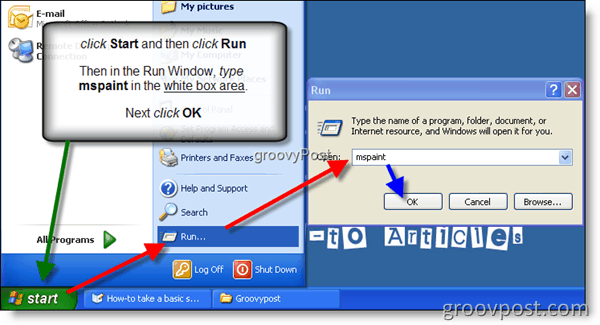
What is energetic to know, however, is that when you begin the Snipping Tool, it consequently goes into catch mode utilizing the last determination type that was chosen? Command Prompt is available in the Recovery screen, meaning, you can open Snipping Tool there as well. Snipping Tool is a utility coming with Windows Vista and later which allows. To save the screenshot, go to File and select Save. Or like Mickey said, drag and hold down on the Snipping Tool from the desktop, and drag it over to the Start Menu button, it takes a few seconds, then hover over over All Programs, then hover over Accessories. The Snipping Tool Options When you begin the Snipping Tool you can tap on the Options catch to set the inclinations on how you need the program to work. You can also change the ink color which is used to show the marked area while selecting an area to capture.
Where is the Snipping Tool in Windows 10?
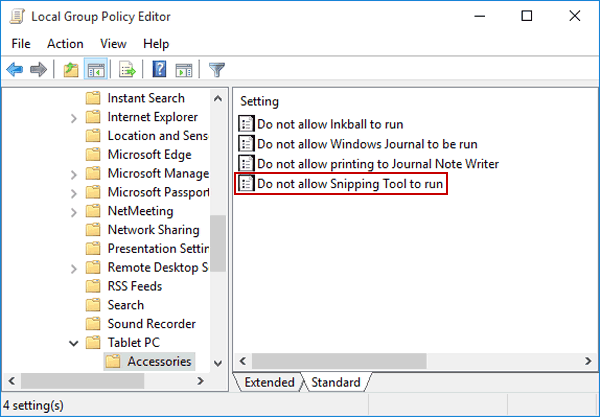
What do these buttons do? So in this post, I will share with you where to find snipping tool in Windows 10, Windows 7 and other windows. In addition, the snipping tool can be also used as an image editor for editing the captured screenshots. Still, a lot of improvement needs to be done, especially, in the user interface. You will find the option. How to access snipping tool in Windows Vista Getting into the snipping tool in Windows Vista is quite easy. Find out the Conflicting Software You may try to find if there is any software on your computer conflicting with Snipping Tool.
How do I find missing snipping tool? Solved

The snipping tool can be only considered as a basic solution to print your Windows screen. When Windows 10 was released, additional features were added to the Snipping tool. Choose a window—like a browser window or a dialog box. Like Windows and Mac, a wide collection of drivers and software are not available in chrome store. I am such a computer illiterate or worse! The snip is automatically copied to the Snipping Tool window. So, to start the Snipping Tool, click on the Start icon and then the All Apps option. Though the step is a bit different but its pretty similar.
Finding the windows snipping tool & how to make screenshots for free.

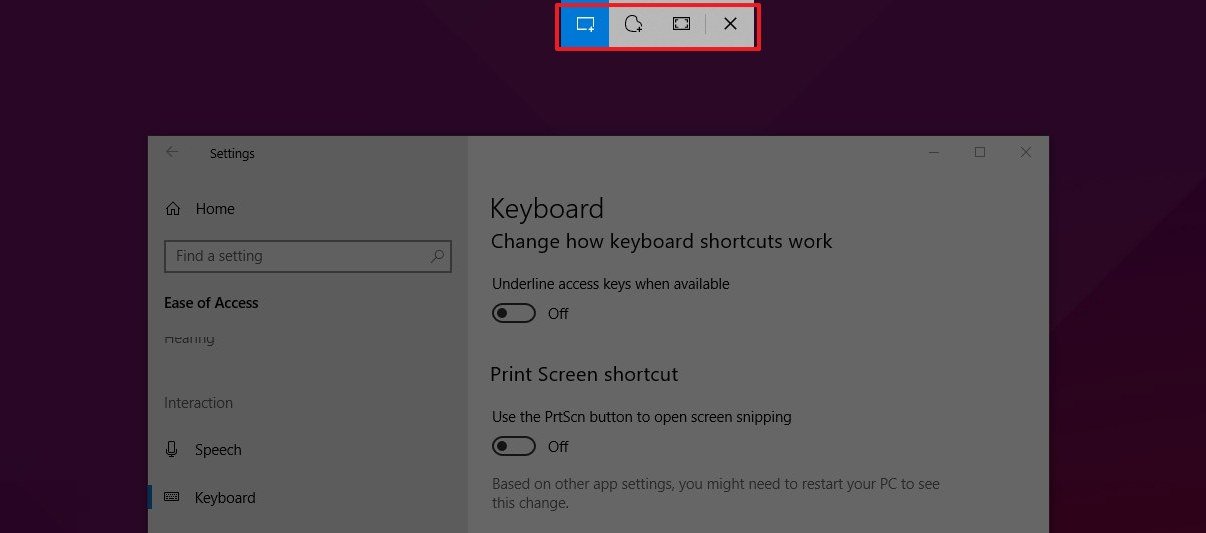
You can also annotate the screenshots using coloured pens or the highlighter. Start Menu features all the apps and their shortcuts. A case of a freestyle cut is underneath. With certain versions of Microsoft Windows there is a free tool called Snipping Tool. Take Screenshots Using Snipping Tool in Windows 10 Finally, lets us take a look at the steps to Take Screenshots Using Snipping Tool in Windows 10. However, a snipping tool allows you do more apart from capturing the screen.
5 Ways to Open Snipping Tool in Windows 10
I looked at the rights for SnippingTool. Step 1: Go to the Grab tool in Applications. I am such a computer illiterate or worse! But, you may have to download the third party app and go through a few steps for its setup. If you need a professional software for the purpose, you better try some third-party applications such as. I know it can be a little intimidating but after you play with it awhile you'll become an expert in no time. Windows bring this feature first to Windows Vista and all followed versions had it by default. I found your article while trying to repair the Snipping Tool.