Fl studio browser detached. Lhezzen beatstars 2019-04-12
Image

Tip 10: Master Pitch Change the entire pitch of your track by changing the master pitch knob next to the master volume knob near the hint panel. Tip 65: Quick Delete If you have the Draw tool selected, you can delete notes by right-clicking on them — without having to select the Delete tool. Tip 7: Spectrogram Change the Oscilloscope up the top into a Spectrogram by right-clicking and selecting it. . This data is also used for linking and the when '' is selected. If you are the legal owner of any submitted material and do not wish that the reference to him{it} was in our catalogue, contact us and we shall immediately remove her.
Lhezzen beatstars

Press Alt + E to generate cool rhythmic patterns and new chord progressions using the Riff Machine. Tip 8: Time Counter Change the Bar counter at the top into a Minute counter by right-clicking and selecting Minute : Second : Centisecond. Right-clicking here will open the preset menu for the plugin. Tip 30: Import Methods Right click on an audio file to open it straight into a Slicex, Fruity Granulizer, Sampler or Fruity Slicer. Auto map will assign the sidechained Mixer track with the lowest number to the first plugin input, and so on.
How to Import Sound Samples Onto FL Studio: 13 Steps

It offers more flexibility as you get to create and vary the length of each note or pattern to form bars. This can help to clean up sounds that might be overlapping and creating mud in your tracks. This is great to clean up any mess you may have. Tip 68: Scale Highlighting Not the best with music theory and songwriting? The current project section of the browser will show you the resources and history from the project that is currently open. As I mentioned in my , it can be a great tool. Press the currently selected number again to save the current state of the browser to that snapshot. The background will light up the notes in that scale.
The Complete Guide: How To Use Fl Studio For Beginners

Représentant plus de 20 ans de développement innovant, il contient tout ce dont vous avez besoin pour composer, arranger, enregistrer, monter, mixer et masteriser une musique de qualité professionnelle. Tip 61: Grid Color Not sure about that green, but maybe you are? Fl Studio has proven its worth within circles in the music industry based on its user-friendly interface and being equipped with the latest and most powerful technologies. In particular bridged plugins always steal keyboard focus if focussed. Now your grid can be blue, purple or any color. You can arrange clips in any order you like and overlay clips as well. The different functions perform differently depending on the material, so play around.
The Complete Guide: How To Use Fl Studio For Beginners

A few plugins can make use of this data to synchronize their processing. This helps in creating the final stereo sound that you want. Tip 79: Select All Similar Clips You can select all instances of a pattern in the Playlist by selecting the little piano icon of the pattern in the top left and selecting Select all similar clips. For example, if the plugin is routed to Mixer track 10 and a plugin input is set to -2 and a plugin output set to 10, then the plugin will receive audio-input from track 8 10 - 2 and output audio to track 20 10 + 10. Channel Rack Tips For a lot of producers, most creative work happens in the Channel Rack. A good use of this is to move less important elements to the bottom if they are taking up space. Just a big bunch of tips.
How to Import Sound Samples Onto FL Studio: 13 Steps
Your channels on the channel rack are bound to the mixer tracks. If you want to see the specific properties of each note, double click on it and it will bring up a window with all the controls on it, including length, colour, velocity and much more. Doing so can achieve a custom swing or human feel to the notes. This article was co-authored by our trained team of editors and researchers who validated it for accuracy and comprehensiveness. Tip 9: Time Elapsed in Project Observe the time spent in a particular project by pressing F11 or by navigating to the Options Menu and selecting Project Info.
The Complete Guide: How To Use Fl Studio For Beginners

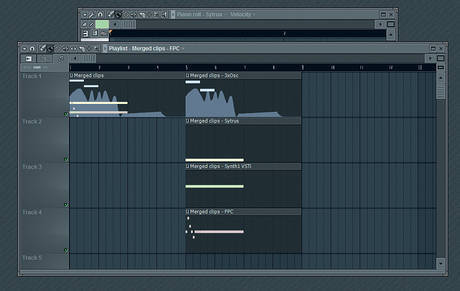
Tip 1: Detached Sick of the different windows being hidden by other ones? When you load up a sample into a sampler channel, up the top there is an envelope icon. It is also useful for creating simple percussion or drum loop patterns. The Playlist can feature Pattern Clips, Audio Clips, or Automation Clips. Tip 64: Stamps The Stamp list in the menu is a great way to quickly drag in full chords without having to tediously draw in every note each time. Once again, it requires a full tutorial to explain, so check out. Now a thick bar helps to indicate which tracks are related to each other e. Tip 85: Chop If you have drums or transient-heavy material in an audio clip, clicking on the top left and selecting Chop will bring up a variety of options to slice the material into different segments.
The Complete Guide: How To Use Fl Studio For Beginners
Press Cmd + T and you can use the computer keyboard to jam notes over two octaves. You can choose between a hi-hat, a tick default , a beep and a cowbell. This is a great way to visualise what plugins you have and makes it easy to select what you want to use. When you move the second hardware controller it will be auto-linked to the next parameter and so on, until the end of the parameter list is reached or the link dialog is closed. Tip 27: Zipped Loop Package Ever worked on a collab with your producer friends, but have experienced the insufferable headache of lost files? Click on a previous one to automatically undo all actions between them.
The Complete Guide: How To Use Fl Studio For Beginners

Tip 16: Plugin Picker Press Opt +F8 to bring up the plugin picker. This is the stage where you drag, drop, cut, trim, copy, paste, and nudge the various parts of a song to fit together such as the intro, verse, chorus, bridge and outro. Click the Auto map inputs button and the sidechained mixer tracks will be assigned to the multi-input plugin's available inputs. Tip 59: Riff Machine Stuck for creative ideas? Use the scale highlighting in the menu. Tip 24: Realign Windows A quick Shift + Cmd Ctrl + H will arrange your windows back to the default position.