Gm steering wheel position sensor calibration. Yaw rate sensor recalibration procedure 2019-04-06
Alignment Problems: Why Do You Need to "reset" the...

Due to the diversity in the systems, always review your service information for the correct procedures for the vehicle you are working on. When the traction control is engaged, this light does not come on, as it's typically a default position that must be manually turned off by the driver. However, like any other sensor, the due to multiple factors beyond the control of most vehicle owners. The high electrical resistance is a result of inadequate contact pressure of the electrical contactor in the sensor. Detach the plug from the sensor and the wiring block assembly will fall mostly out of the way. If the toe angle is adjusted on the vehicle and the steering angle is set at the wrong value, it can cause conflicts with the data from the yaw rate and lateral accelerometer sensors. I am going to have no choice but to take it back to the dealer and have it looked at again, I just hate doing that because they usually keep it 4 days min.
Steering Wheel Position Sensor?

Apply the parking brake, or set the transmission in the Park. You may have to push in on the tilt section. Self-Calibration Some newer vehicles can auto calibrate by having the wheel turned from lock to lock and then centered and cycling the key. Install the scan tool to the data link connector. Then the steering angle sensor balances out the steering and puts the driver in more control.
Stabilitrack and stabilitrack service light.
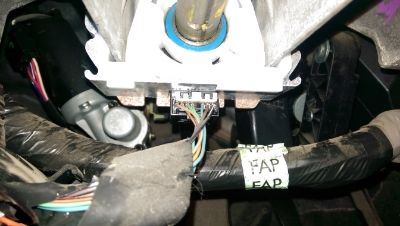
Notice: Use the correct fastener in the correct location. The cluster normally is compatible with more than one steering position sensor for confirming data. When the battery was replaced, the wheels were turned all the way to the left because it was in a tight parking space and had to be pushed out to access the battery. I'm getting a C0710 when the steering wheel is turned over a certain amount. This could be achieved via an adaptive drive or a factory or enhanced scan tool. Do not remove the pin until the sensor is seated. Remove the nut it's fairly tight Once removed insert the large flat head between the ends of the shafts and pry the lower shaft down, away from the upper shaft.
Opel Steering Angle Sensor (SAS) Calibration: Tech 2 or Opcom?

Secure the dash panel with the mounting screws. If installing a new sensor, it will come with a pin installed in the sensor. I unplugged mine and my service stabilitrak light is gone and I'm out of limp mode. Were you using a custom operating system or something??? Step 29: Reinstall the key tumbler into the steering column. The lower panel will then snap off with a small effort. Seat the adapter and bearing assembly into the steering column jacket. Once it broke free I grabbed the shaft and pushed it down manually.
Procedure to reset steering position sensor?
Step 2: Place wheel chocks around the tires. Most vehicles produce a positive voltage turning right, and a negative voltage turning left. I have run into this many times. Although not all systems require a manual calibration, there are many that will require the use of a scan tool or aligner-supplied device to fulfill proper calibration. Turn the key to the start position and use your straight dental pick to release the pin in the pin hole. Tighten Tighten the nut to 62 N·m 46 lb ft.
Steering Angle Sensor Diagnostics

Even before then I noticed that the starter sounded like it turned a bit slower if the vehicle sat for 2 or 3 days. Important: If reusing the existing sensor, you must align the marks on the raised rotor flange cuff before installation. Please replace the current information in the Service Manual with the following information. With the vehicle motionless, the Yaw rate sensor should read 2. Important: If reusing the existing sensor, you must align the marks on the flush rotor flange cuff before installation.
Procedure to reset steering position sensor?

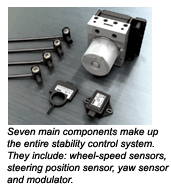
Toyotas use a reset procedure called a zero point calibration. C message comes on after a couple of miles of hiway driving, it never comes on in town just on the hiway, I took it to the dealer and they found a faulty steering wheel position sensor and replaced it. Any advise would be really appreciated, thanks. These sensors have been in use on certain vehicles since the early 1990s, but became commonplace by 1998. These systems are no longer exclusive to luxury or premium models since stability control on most vehicles was mandated for 2012 models. The battery is disconnected at the start of the procedure.
Traction Control & Stabilitrak Off Error Message Steering Wheel Position Sensor Repair

Step 5: Remove the mounting screws to the dash panel. Better to be safe than sorry. Step 35: Put the dash panel back onto the dashboard. If installing a new sensor, it will come with a pin installed in the sensor. Then remove 4 7mm screws holding the lower dash panel up.
How to Replace a Steering Angle Sensor

But, if you follow the correct procedure, you must perform a full system calibration. Disconnect the electrical harness from the switch. Read the service requirements carefully. Called tech support and they said to look in shopkey for procedure. I changed it and problem solved. It turned out to be the throttle body. Step 22: Install the tilt section back into the vehicle.
Steering Angle Sensor Diagnostics

If your engine will not start after replacing the steering angle sensor, then there may be further diagnosis of the steering angle sensor needed. Do this by removing 4 to 5 mounting screws on each side. It took a little effort but it wasn't hard. Step 32: Put the steering wheel on the steering shaft. Do not use paints, lubricants, or corrosion inhibitors on fasteners or fastener joint surfaces unless specified. If the new sensor did not come with a pin installed, you must reorder a new sensor.