Hdr merge lightroom 6. Creating HDR Photos Using Photo Merge in Adobe Photoshop Lightroom CC > Photo Merge DNGs 2019-02-21
How to Shoot Images and Use Merge to HDR in Lightroom 6
Lightroom can usually level me out with the Upright feature. Does your system take less time to complete? There are pros and cons of each method. Initially the image will show more detail than the original 3 images if auto tone is on. Photomatix gives you robust options and settings, but it does require additional software to purchase. The items listed below are organized according to their importance for me personally and dictated by the style of my photography workflow. I will be posting more videos and articles about my process shortly! Is the difference that apparent? Next step is to select the version we like the best. Before you can start with the tutorial you need to import demo images to Lightroom.
Creating HDR Photos Using Photo Merge in Adobe Photoshop Lightroom CC > Photo Merge DNGs
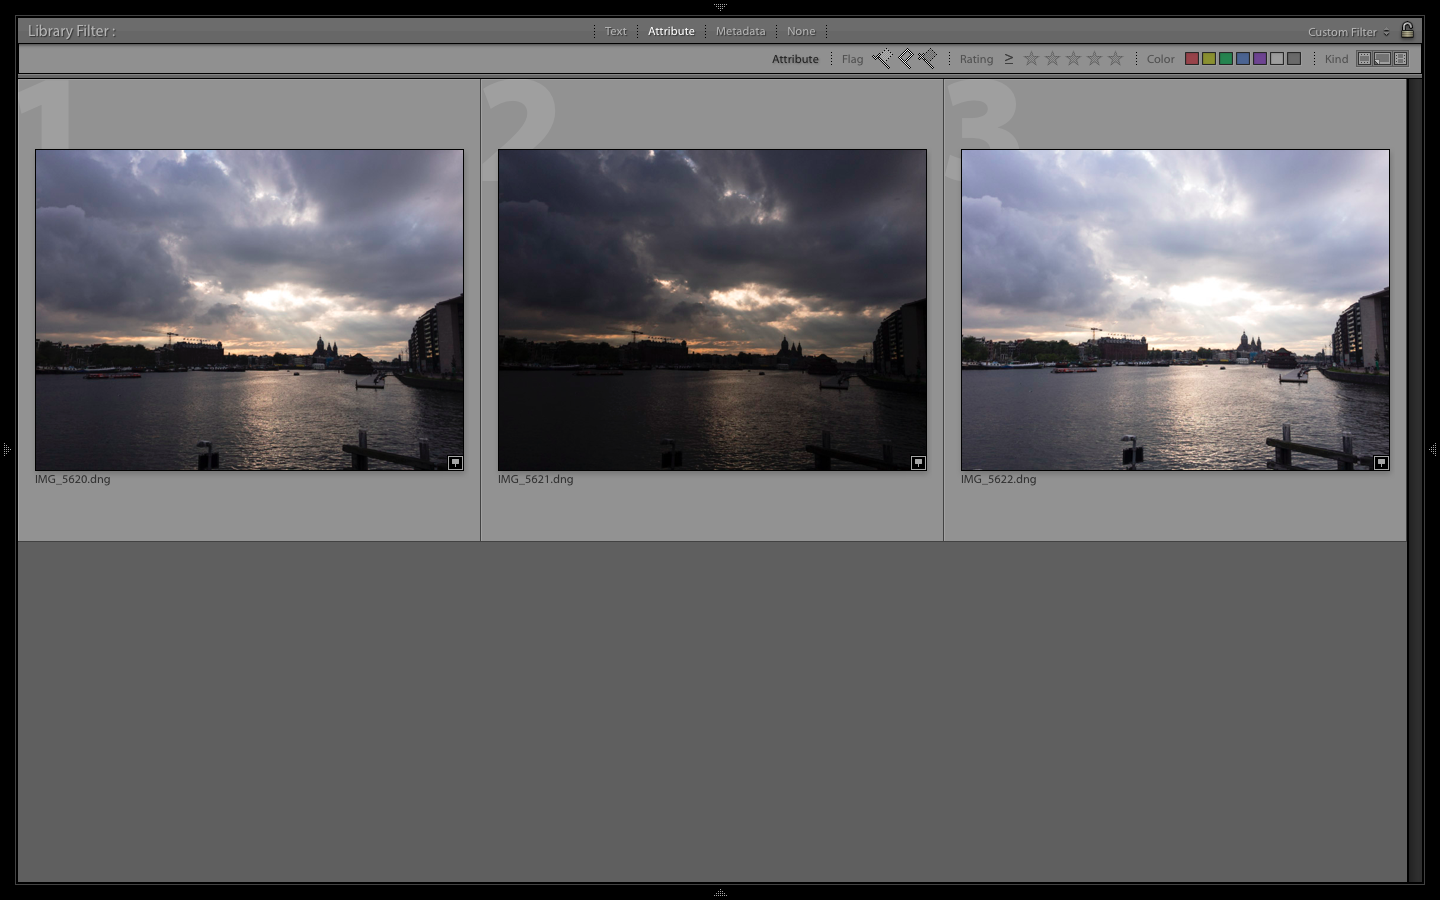
Ideally, you want to shoot the photos with the camera firmly mounted on a tripod. The deghosted area shown in red below covers all of the water — when I compare the three original images I can see that Lightroom has used the water from the first photo in the sequence, avoiding the ghosting that would be caused by merging three photos with a different level of water in each shot. All that has changed today! Auto Align is useful if the camera moved between exposures for example if you hand-held the camera and Auto Tone performs a similar function to the Auto Tone settings in the Basic Panel of the Develop module. Photomatix Merge to-32-bit Lightroom Plugin Hi! If there is subject movement between frames you can set Deghost Amount to Low, Medium, or High trial and error is the only way to see what works best, and is different for each set of images. See exposure sample below in Step 1. This is particularly helpful when using the Photo Merge feature in Panorama mode. If you have moment in the scene you may need to use a higher deghost setting.
HDR in Lightroom
If the photos were shot handheld, you will need to select the Auto Align option. Over a period of 12 months I accumulated thousands of new images. Let us know your thoughts and experiences in our comments below. He explains in depth why 16 bits floating point is more than enough. With this photo I have used our for some minor adjustments, and the finished photo is shown below. Auto Tone: Provides a good starting point for an evenly-toned merged image Auto Align: Useful if the images being merged have slight movement from shot to shot. The latest source of my frustration had nothing to do with the tools or features of Lightroom.
Lightroom 6 HDR merging vs Photoshop HDR merging.: Retouching Forum: Digital Photography Review

Please let us know in the comments below. Maybe 7 files is too much but hey whats up - this sucks. The good news is that all your development presets from Lightroom 4 and 5 will work in the latest version. This process requires you to place together with the bracketed images with. Is the difference that apparent? You can preview the effects of these settings right within the dialog box. Ghosting takes the form of lines, white patches, or other artefacts caused by subject movement taking place between frames such as trees blowing in the wind, clouds moving across the sky, or people walking through the scene. Its a way to get more shadow and highlight details in your photographs that comes closer to what the human eye sees.
Lightroom 6 HDR merging vs Photoshop HDR merging.: Retouching Forum: Digital Photography Review

The key things to remember are that the photographs need to be shot from the same position. However, it is important that the source files are all using Process 2012. If necessary, choose to view the deghost overlay. Enabling this option may not be necessary if the images were shot using a tripod. The processing technique used is not exactly the same. You will usually want to fine-tune these settings. The other option is the deghost amount.
Lightroom Tutorial

Rikk - This method you described: 1. The Auto Align and Auto Tone boxes are ticked, and the Deghost Amount is set to None, by default. The first step starts with your camera. It all started a long time ago with the , which I continue to update. You can see vast changes in the horizontal middle area. Tick the Show Deghost Overlay box, to reveal the areas in which Lightroom has detected and attempted to clean up ghosting it is shown in red.
Lightroom Tutorial

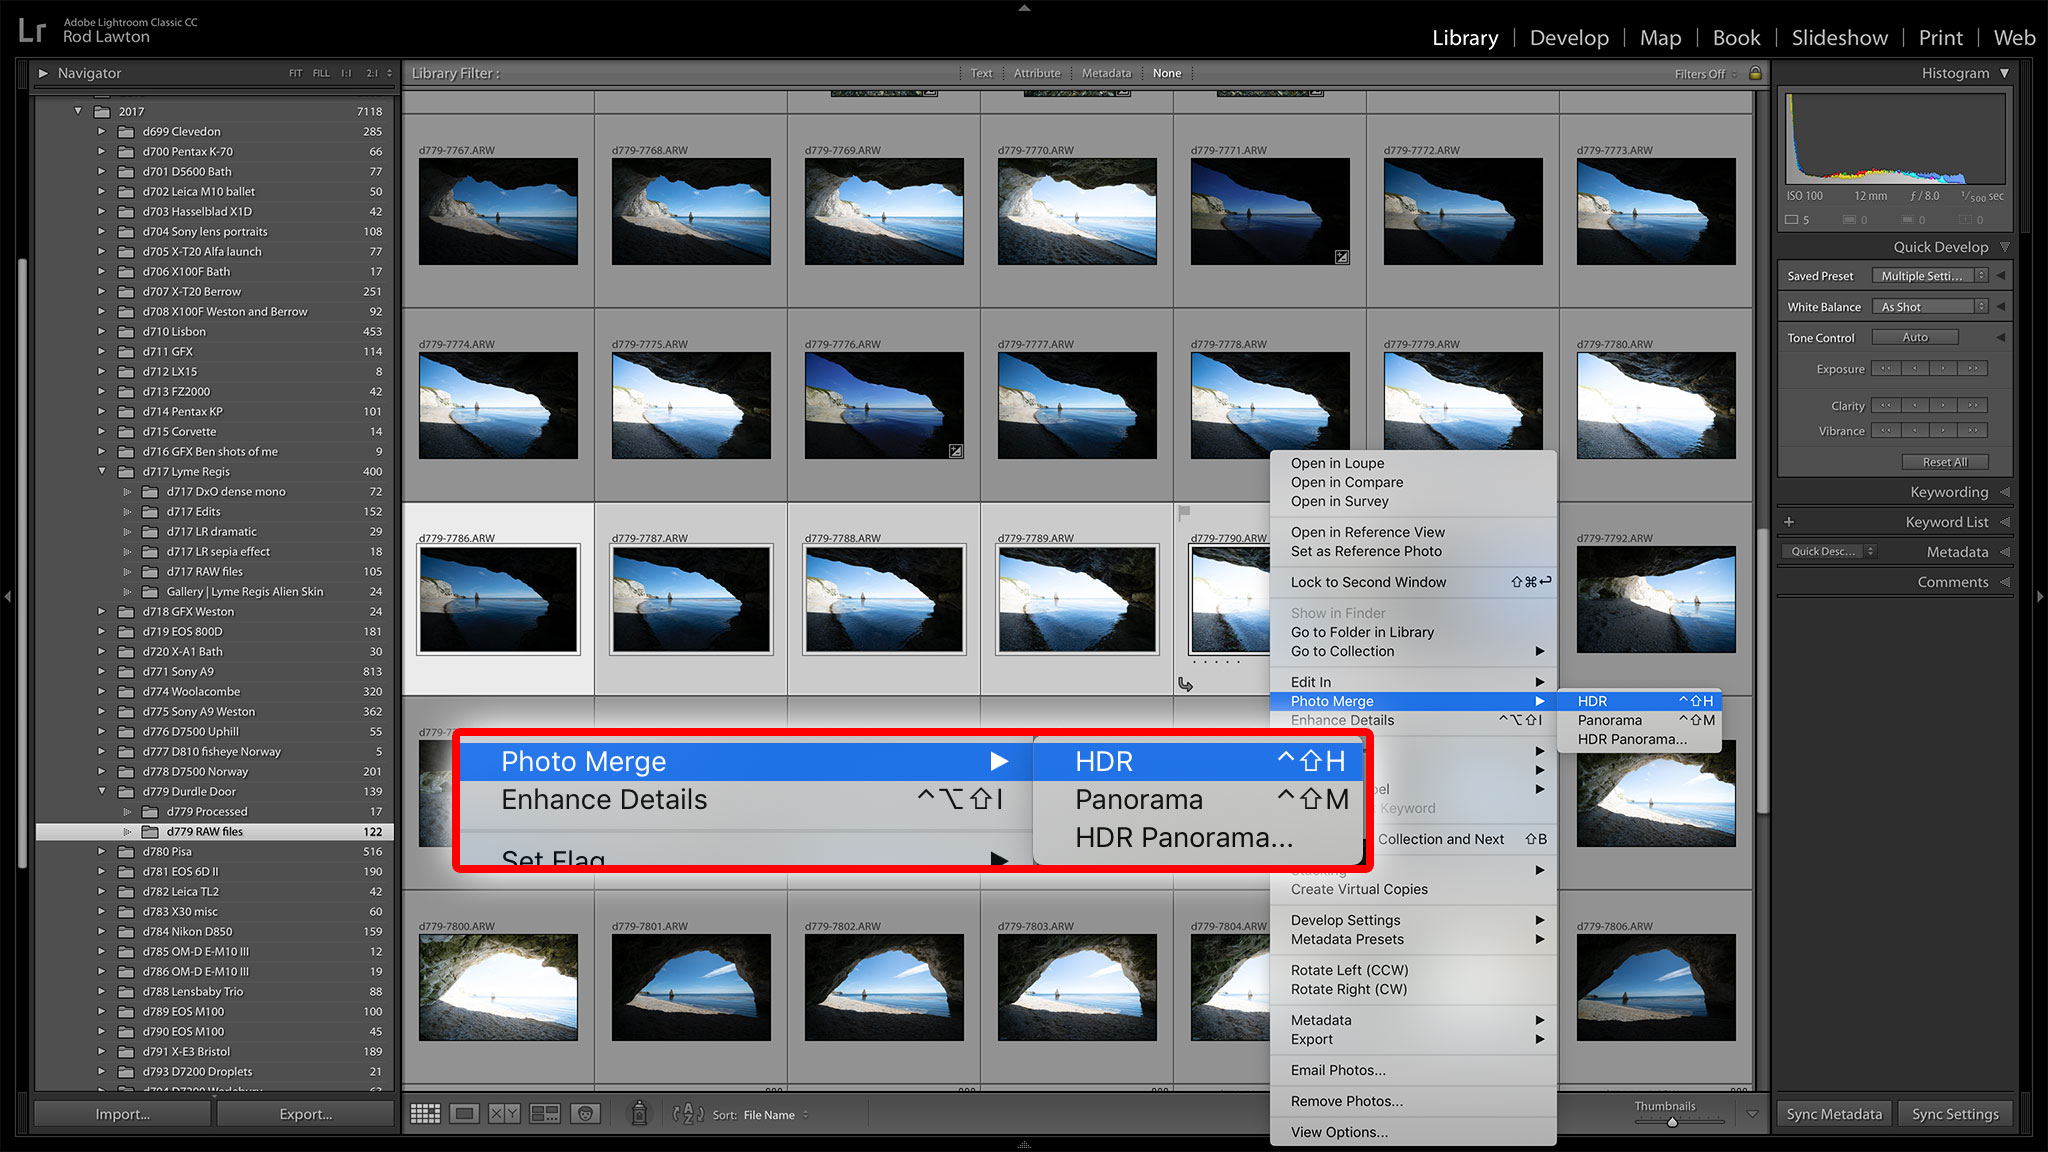
Basically bracketed shots are three different exposures of the same subject. Hopefully, in the future it will be possible to offer focus stacking as well. Panorama merge This is another bite from the Photoshop pie. Below is how it looks after editing in the Develop module. It will open as a 32 bits image in Photoshop, so you can save it for example in.
How to Use HDR Merge in Lightroom

In this case photo was too light, so I darkened it, made some tonal adjustments, and. You can set Deghost Amount to Low, Medium, or High if you see any ghosting double images in the image. This results in a much better looking photograph that can mimic what you saw when you took the photograph initially. FtMyersTraveler wrote: Is the biggest difference Photoshop converts the images into a 32 bit where as the Lightroom does not? Merges from photos taken with my D7000 are so much faster. The whole process of stitching panoramas becomes much simpler.
HDR in Lightroom
That was my very first trip with the new equipment after I. It can be argued that many raw images already do have a high dynamic range. To continue with this tutorial, all you need is Lightroom 6 or later. I highly recommend that you check out the where I also answer the most common questions in simple terms. In the Panorama Merge module, you have 3 options for stitching images: Auto, Spherical, Cylindrical, and Perspective. It allows you to mask a portion of the effect produced by the Graduate Filter and the Radial Filter.
HDR in Lightroom

This allows you to continue working while all the processing goes on in the background. Is the biggest difference Photoshop converts the images into a 32 bit where as the Lightroom does not? Step 5: Wait for Lightroom to Merge the Photos Depending on how many photos you are including in the merge, as well as the specs of your computer, it may take anywhere from a few seconds to a few minutes to complete the merge. I worked closely with them to include all of the features I felt was missing from Photomatix, Lightroom and other tools in my quiver. The water looks different in each version of the photo so I set Deghost to High. Lightroom has the ability to merge photographs together and tone map them all without ever leaving Lightroom.