Lightroom ios histogram. Adobe Lightroom (for iPad) Review & Rating 2019-03-18
Adobe Updates Camera Raw, Lightroom Classic CC, and Lightroom CC for February 2019

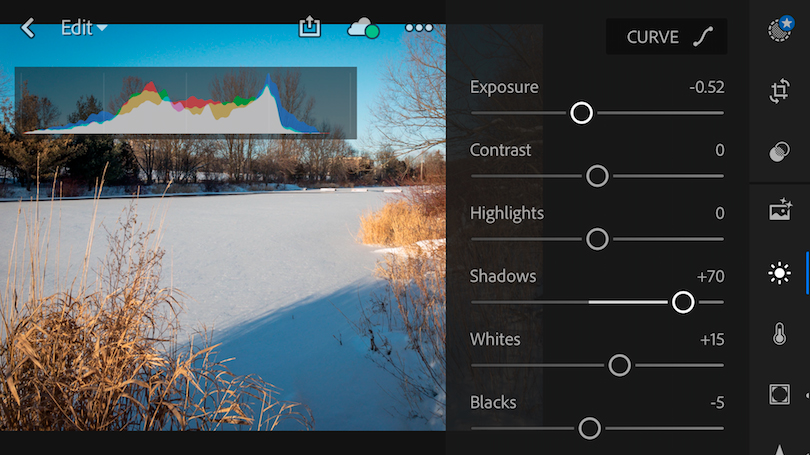
When viewing a histogram remember the X-axis of the graph the horizontal base of the histogram depicts image brightness, running from complete shadow on the left to blown highlights on the right. While modeling the real world data, it does not account for artistic needs in the least. This method also works on my 400D. So pay attention to your histogram, allow your histogram to be your guide as to where you start doing your adjustments, and I think you'll find that more often than not. Use the histogram as a tool and guidance, but do not let it rule your images. In this movie, I'd like to talk about how we can start integrating Lightroom's tools and use them together to help us do far more sophisticated and complete analysis leading to correction of images. Even when I move my exposure all the way 5 stops to the right there's still a small gap there.
What's New in Lightroom CC February 2019 release?

Anyone here use Lightroom with the R encounter this? Depending on the level of adjustment in camera, this processing can make using the on camera histogram a futile effort. With the ability to use star ratings, local adjustments, noise reduction, and lens-profile-based corrections, Lightroom has become a killer app for photographers. Nikon cameras now have the same speed and stability as Canon cameras after the. The histogram acted as a guide that told me exactly what was wrong with the image and helped me add the contrast back into the photo that it lacked. Anyone here use Lightroom with the R encounter this? After shooting this method for a while you will get the hang of the process and be able to do it with less chimping. This is similar to the luminance histogram on your camera.
How to edit histograms in Lightroom
A General section in this group also offers sharpening, punch, and medium contrast curves. Now many people when they move into light room they start doing adjustments they immediately go into exposure. The photo generating this histogram was underexposed by over a stop. It is never a waist off time, we can all learn from each other. No photos or edits are deleted.
Harnessing the Lightroom Histogram
While it is best to get the exposure right in the first place, you can fix this by moving the Exposure slider to the right. Simple Definition A histogram is just a graph of all the different tones in your image. The app's local adjustments offer de-fringing, but that isn't as effective as what the desktop version of Lightroom offers. I would say that 99% of the time, I need to tweak or adjust those edits. Choose an option from the People drop-down list to filter photos based on people. Changing any clipping: As always, we suggest you practice first with a picture.
Histograms and Lightroom

Read on to understand the importance of clipping to a picture: How to Recognize Clipping: Just as you pay a lot of attention to clipping with your camera, you must do the same with the histogram. Adobe Press Release February Lightroom Releases The new Enhance Details algorithm enables you to increase the resolution of both Bayer and X-Trans based photos by up to 30%. I may go to exposure a little bit, and or I may go to contrast, to increase or decrease the overall contrast in the image. Normally, you have two choices on how to adjust those parameters. One thing still missing is the ability to apply keyword tags to photos.
Lightroom mobile: Histogram not displayed in rate mote (star)
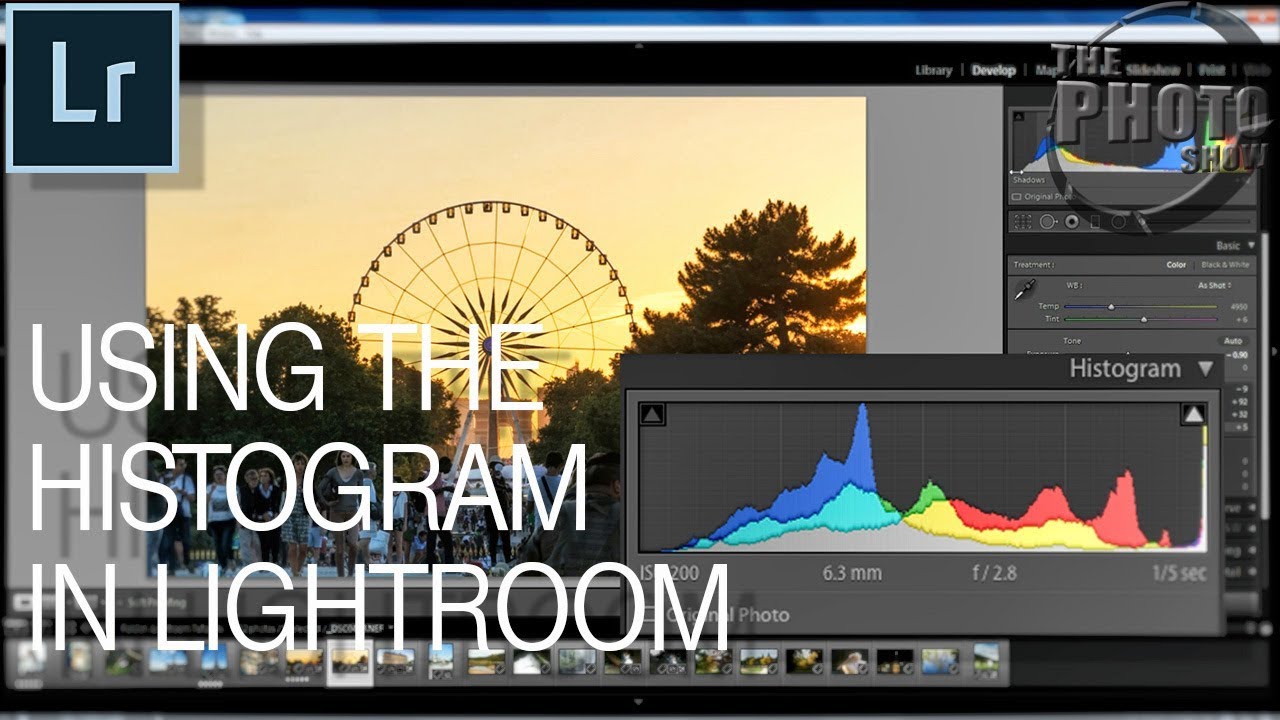
It is all fine and dandy to fix your Histogram in Lightroom, but as always it is much better to get it right in camera. If you click the icon, clipped highlights are displayed in red in the image. And let me show you why. Making the perfect image starts with the perfect exposure, but what does the perfect exposure look like in the camera? As you make changes here, the slider below will automatically adjust. You can then selectively turn on the clipping indicators individually by clicking on the either the left shadows clipping or right highlight clipping triangles. For organizing photos, you can use the Pick flag; a swipe up or down on a photo can pick or unpick it. These correspond to the red, green and blue channels of your image.
Perfect Exposures from Histogram through Lightroom
You may not always need to use this method of exposure, but it can help immensely with tricky exposure, especially high contrast situations. The range of tones in the photo you take will dictate what the histogram looks like. One of the most important things the full Lightroom desktop apps allows you to do is organize and manage big collections, and keywording is basic to this function. Now it is ready for further refinement. Learn how to use Lightroom for mobile with the step-by-step, interactive tutorials. Another indication of image qualities is that the graph makes one smooth hill towards the middles of the histogram. I use Lightroom for most of my editing and when I look at the histogram there's small a gap on both the far right and far left side of the histogram on all my images.
Perfect Exposures from Histogram through Lightroom

As you hover your cursor over the histogram, the affected area will be highlighted and the name of the slider you'll be adjusting will appear below the histogram. This is where we're going to be talking about, right here. And fact is if you make any tonal adjustments at all to an image, you can just double click on tone and return all of them to the original. And then you can fine tune. I looked up how it's supposed to work two finger tap - what I was trying with no luck , but nothing worked.
Lightroom mobile: Histogram not displayed in rate mote (star)

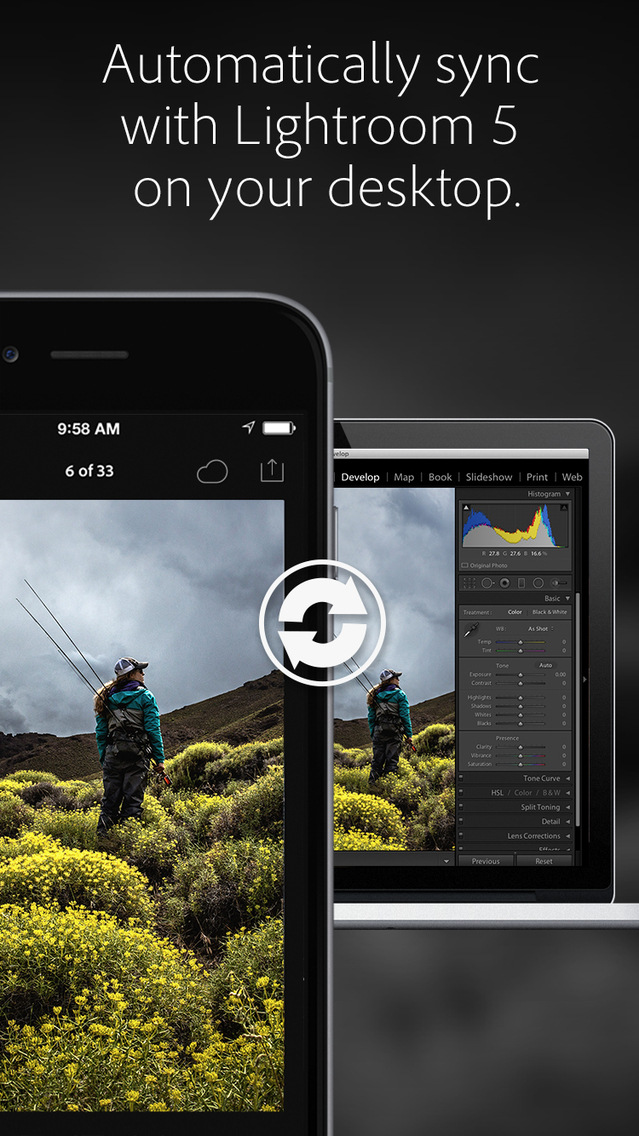
Fred Innamorato Finally I found a class focused on understanding and explaining Exposure. The trick is to check your histogram after shooting to ensure that the histogram is as far to the right as it can go without clipping. The problem seems to only be on my iPad Pro. I set the maximum possible value of +100. And, of course, you'll need an account to sync it with images on the desktop version of Lightroom. If I click on the mid tone in here, it, just like dragging the exposures slider. The spray coming from the sea reduced the contrast of the scene, resulting in a very flat image.