Make a usb bootable mac. How to create a bootable macOS Sierra installer drive 2019-04-02
How to quickly create a macOS bootable USB on Windows • Pureinfotech
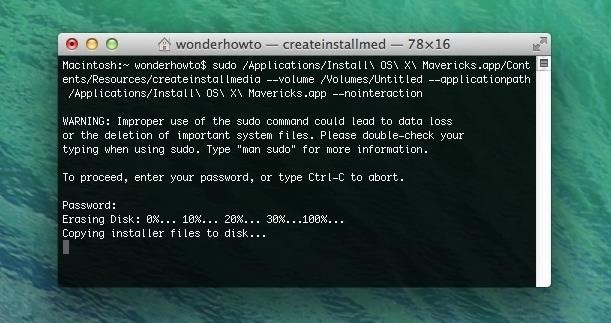
In order to download Unibeast, you should visit TonyMacx86 there while you are searching for Unibeast, after that you find that create an account for downloading. But If you have downloaded the Preactivated version then certainly you have to Install that. You want to do this before creating the bootable media because there is a good chance that the drive was formatted using a Windows device. In the Terminal command you will use, I use Untitled to represent your external drive. Also, ensure that you are using the correct volume name. You can use a , Windows 8.
How to Create a Bootable macOS Mojave USB Installation Disk

However, if you want to test them in Virtual Machines, I have written their post here inside IntoGuide. Click on the Download button, and your Mac will download the installer to your Applications folder. Please follow to read the complete disclaimer. Note: At this point please be patience this process requires 20 to 30 minutes depending on the speed of your computer to complete the process. If you have any queries regarding to this tutorial guides you can use the comment section below for more information and support. The second suggestion is more user friendly! Now connect an external flash drive with more than 16G free space.
How to Create a Bootable USB Installer for macOS Mojave and High Serria
The drive will be reformatted automatically as part of the process. The content of this website is not supplied or reviewed by Apple Inc. Well, the answer to this question is two ways. Select Erase from the confirmation box, if prompted to do so. Install TransMac If you have downloaded the portable version of TransMac, then their no need for you to Install that. Input the admin password when being prompted. This is your user password.
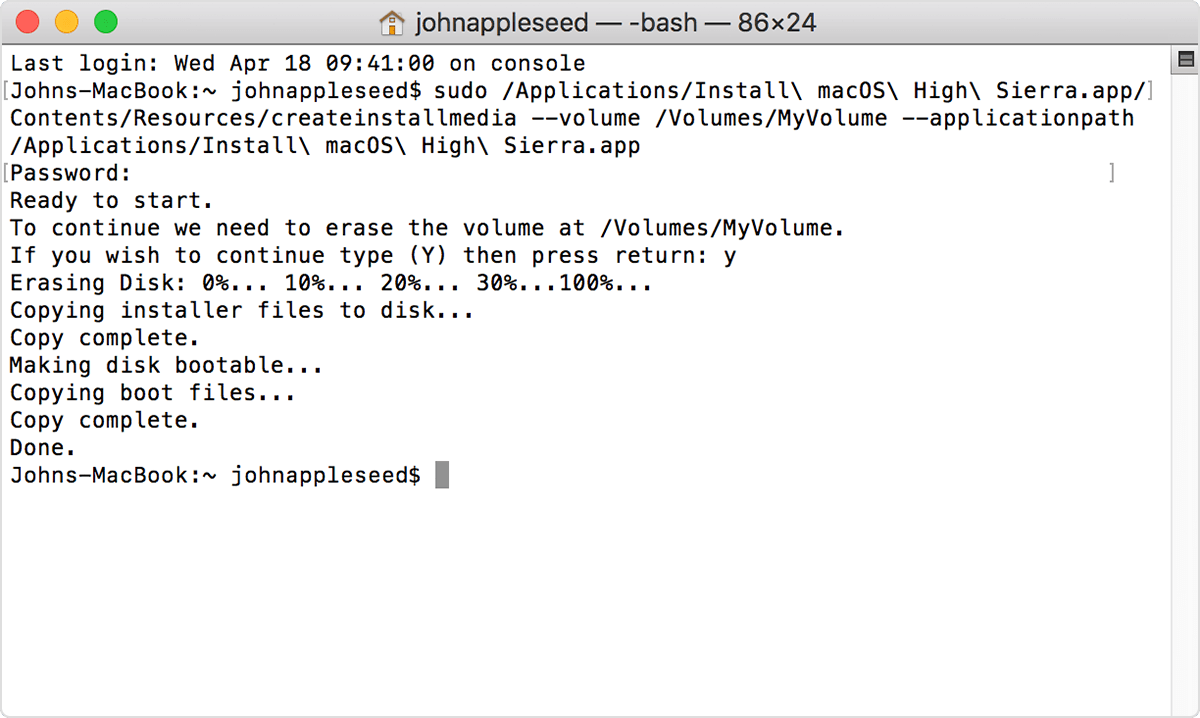
How to create a bootable macOS Sierra installer drive
It is a desktop utility supporting Windows and Mac. If your drive is named something else, you need to change Untitled to the name of your drive. The downloaded file will be located in Application folder. Right-click the file and select Show Package Contents. Apple uses its App Store to distribute its software, like new Mac operating systems. To boot your Mac using the Mojave installer disk, you will first have to switch it off and then press and hold the Option key whilst pressing the power button. We strives to write a comprehensive guides that is useful for sysadmins.
How to quickly create a macOS bootable USB on Windows • Pureinfotech
If it automatically launches after download, quit the installer. Click on the external drive and hit Return. In case you are getting an error like syntax not found, make sure to verify that the command above has been pasted properly. I am using the TransMac Portable Version which does not require any serial key, also I have a version which is preactivated. All articles, images, logos and trademarks in this site are property of their respective owners. Not so easy anymore is it? If this works for you and want to support the developer, you can purchase the full version. This software application has been created for novice users as well as experts.
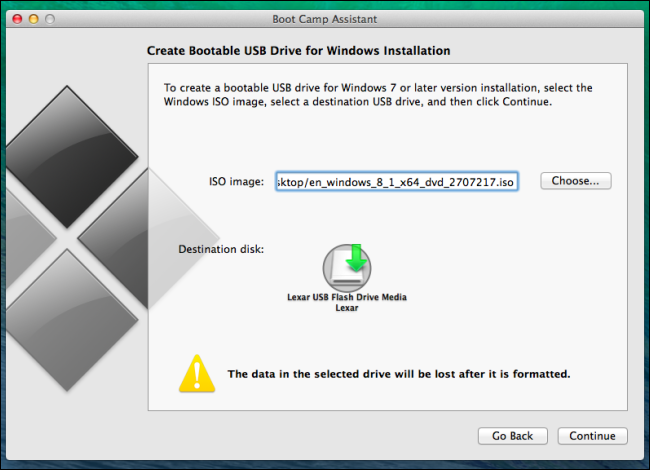
How to Make a Bootable USB on a Mac
This website is not owned by, is not licensed by nor is a subsidiary of Apple Inc. Remember, this being a writable drive offers some additional perks over read-only media with a few caveats as well. Note: you are not allowed to download Unibeast first you have to create or register your self on TonyMacx86. We are dedicated for providing production ready guides. We specialize in writing in-depth and easy to understand guides. Press down on the Option key while the Mac boots.
How to quickly make a Mac OS X bootable USB on Windows • Pureinfotech

If you have an idea for our site that you would like to see, please feel free to and for more info checkout our page. But before getting started you have to prepare the Required files. A missing, modified or corrupt file could result in an unreliable installation. Change the name of your drive to Untitled; you need to do this for the steps below. This will take a few minutes. Choose the highest read and write speeds for your particular application to minimize this bottleneck.
How to create a bootable USB to install OS X

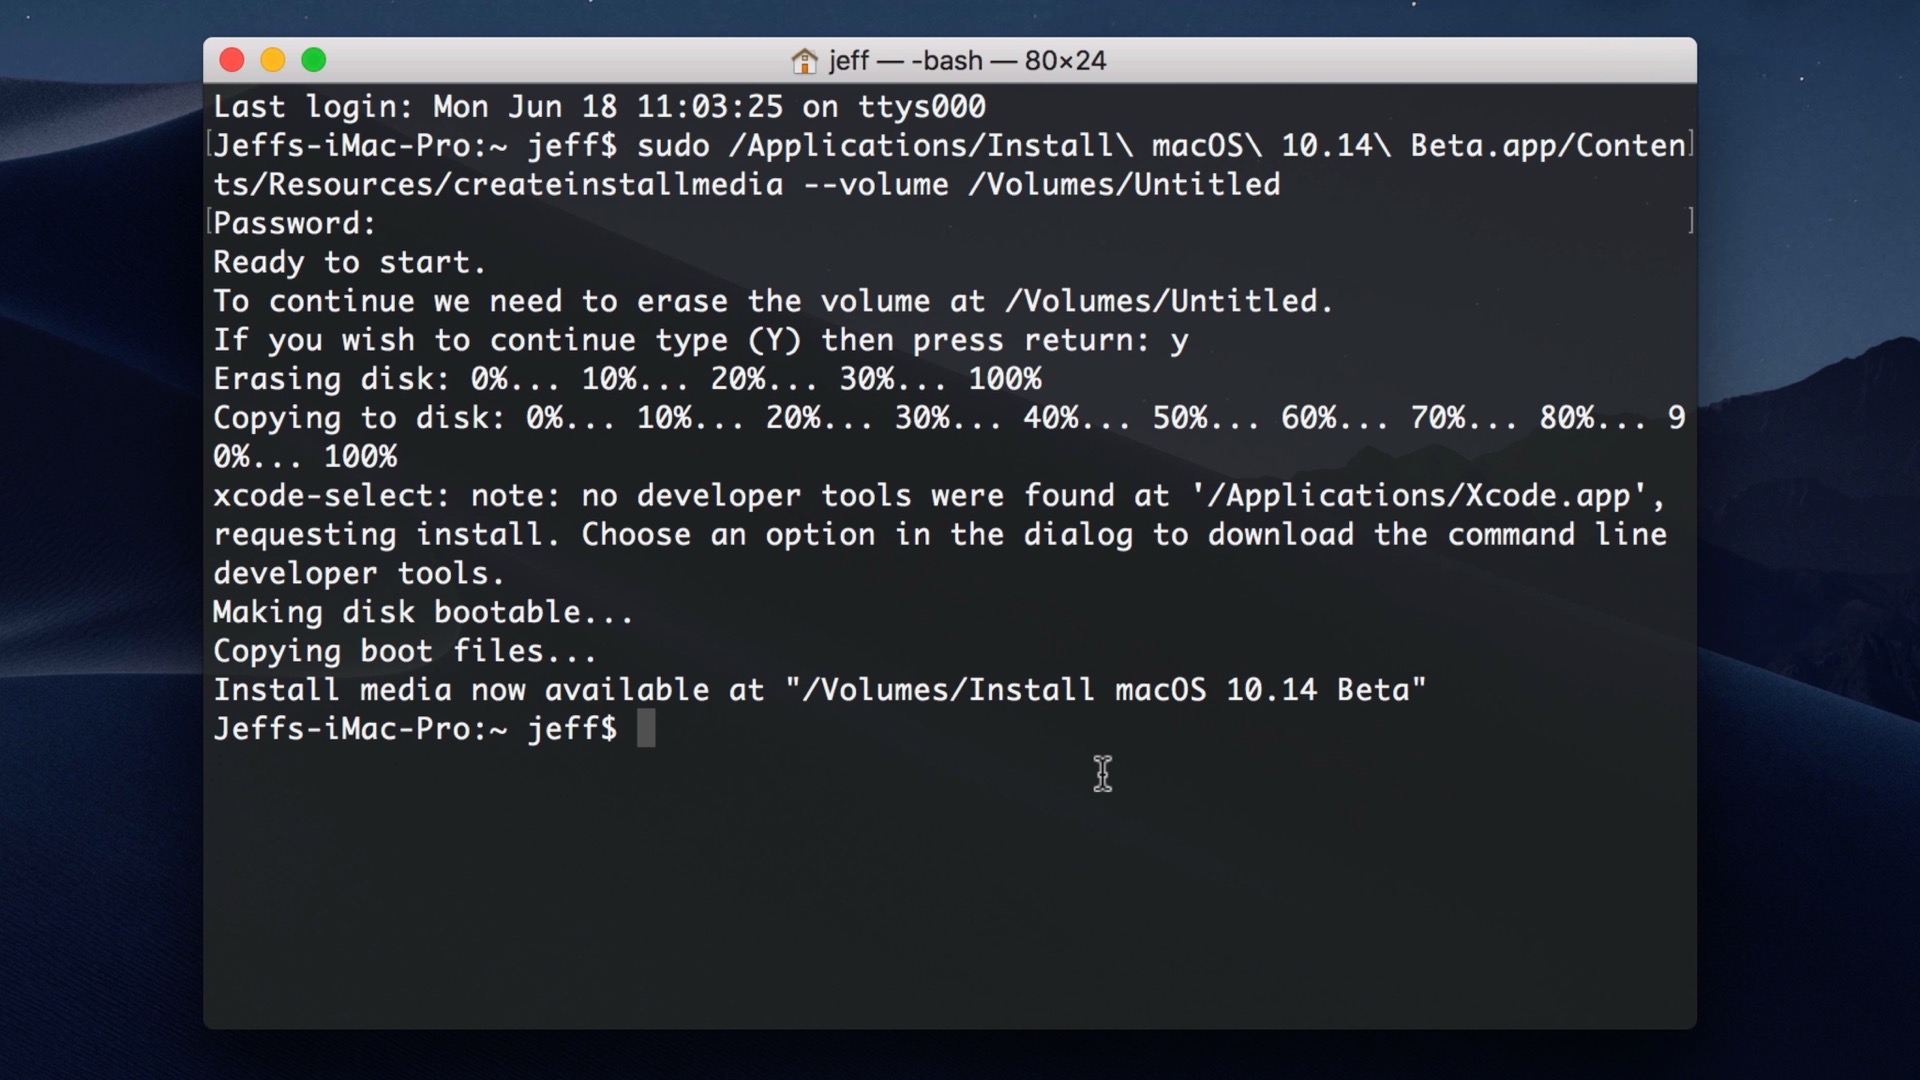
This is a paid software, but it gives you a 15-day trial, which is more than enough time. While thoughtful, if working with multiple partitions, each will have the same name making them indistinguishable from the others. Before that, insert a disk into the optical drive: isoburn. The quick and easy way The process detailed below involves the Terminal. You can find the steps on how to enroll in the public beta program and download the public beta on your Mac. It can also help in situations where the operating system is corrupted or installation from app store shows errors. When that part is done, your Mac may ask you if you want to use the drive for Time Machine.
How to quickly create a macOS bootable USB on Windows • Pureinfotech
. The process may indicate in excess of one hour, but in my experience the process takes significantly less time to complete. Just right click and open the TransMac. While you can always directly install Mojave on your Mac after downloading it from Apple, I will recommend a clean install as it also makes for a good excuse for cleaning all the junk files on your device. There aren't a lot of options out there because of the compatibility issues between Mac and Windows environments. Upon verifying that the fields are correct, click the Restore button and select Erase from the application, if prompted to do so. If it automatically launches after download, quit the installer.
How to create bootable usb for Mac OS Mojave on windows
Just make sure you follow the instructions below carefully. If you want a much simpler solution, then review the next method shown here. You might also be prompted to download Xcode during the process. When the download is completed, the installation windows opens automatically, just close the window and go to Application folder. You can quit Terminal and your drive is ready for use. Click the drop-down menu, selecting 1 partition.