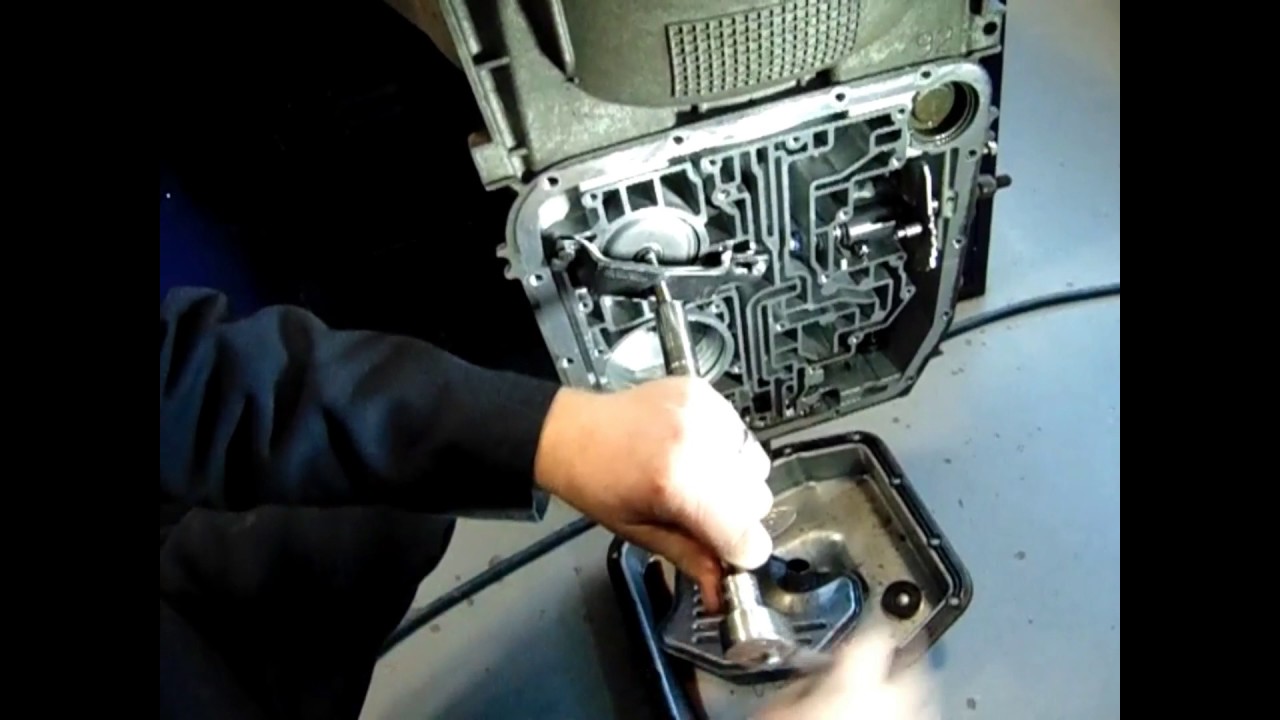
4r70e no overdrive. 4R70W 4R70E 4R75W 4R75E AODE TRANSMISSION SNAP RING FOR OVERDRIVE SERVO FORD F2VY 2019-04-28
4 Bad Habits That Will Kill the 4R70W Transmission in Your Work F150 Pickup

The 2-3 shift-point is also raised by a factor of 5. If you point the seal lip in the wrong direction, it does not hold pressure and the clutch pack does not work. Unplug the solenoid from the wire harness and hook the leads from the ohm meter, one each to the two wires coming of the solenoid. The spring is compressed to make way for the C-clip retainer. You also want to service the torque converter not shown with 2 quarts of transmission fluid, which helps prime the pump. Step 8: Install Intermediate Clutch Pressure Plate Check for proper spring alignment and positioning.
4 Bad Habits That Will Kill the 4R70W Transmission in Your Work F150 Pickup

Also a slipping clutch can make for a harsher shift when it does finally engage. The planataries and sun gears were replace a new band, torque convertor, and a kit were put in it. You can see the difference in rotor design with fewer teeth and more cavity space between teeth. Step 5: Install Anti-Clunk Spring The anti-clunk spring arrow , which prevents the center support from moving and clunking, acts as a shock absorber for the center support. Never reuse old bearings or seals.
Common Complaints With the Ford 4R75W Transmission

Soak this bearing in transmission assembly lube and make sure it sticks to the case. Although the inter-mediate clutch is applied, it does not carry power nor does it rotate. Step 8: Install Direct Clutch Discs and Plates Install the direct clutch discs and plates alternately. If this is not found to be your problem you may have failed shift solenoid, ripped servo seal, broken or wiped out 4th band or broken sun gear shell which will also give you no reverse Cause: This was a common problem with earlier models with the shift solenoids mechanically sticking or weak , will shift 3-4 and then neutral out, will sometimes have to stop vehicle completely to to get forward movement back. Use an abundance of transmission assembly lube. A seal lip pointed the wrong way is a guaranteed leaker.
Ford AODE/4R70W Guide: Calibration, Building, Troubleshooting

It can be a good idea to check by removing your transmission mount before you have a leak and clean any corrosion away with grinder etc to prevent the cracking and leaking. I beleive the code is for a 1-2 shift error. Cause: The Torrington bearings like to wipe out and then get into the gear train and cause catastrophic destruction of the planetary and rear section of the trans, can cause engine stalling and you may not be able to even push the vehicle forward or backwards and have to remove the drive shaft to roll. Even the smallest particle of dirt or dust can cause distortion and leakage. When you build, use new Torringtons if possible. Thanks Of course you'd get better info from the tranny specialists in the Transmission forum. Step 8: Replace Shaft Seal and Install Manual Shift Linkage Always replace the manual shift shaft seal while you have the transmission apart.
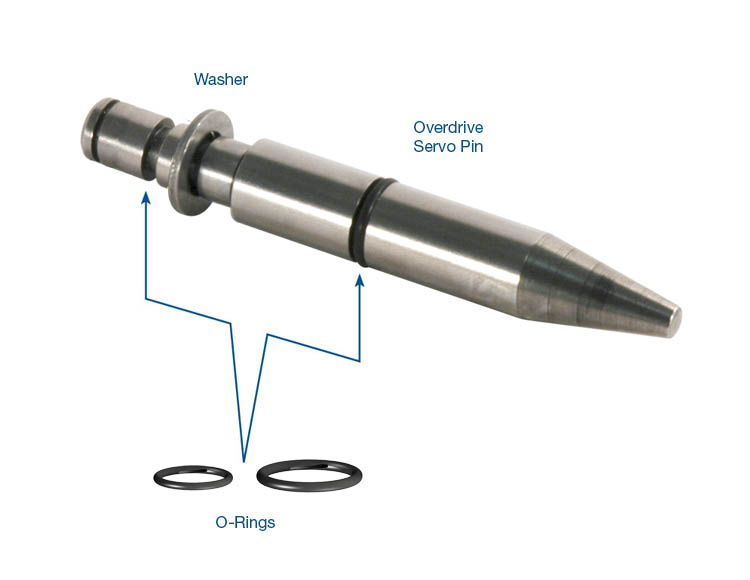
4R70W 4R70E 4R75W 4R75E TRANSMISSION OVERDRIVE SERVO REGULATOR VALVE KIT BY SONNAX FITS '01+ (76948

Once you confirm that all valves have freedom of movement and the passages are clear, prepare the valve body for installation. Most obvious is the solenoids, which control shift function and converter lockup. Th fault is internal to the tranny. If it is giving an improper signal it can cause the transmission to downshift. This is due to the fact that this is a car transmission that's being overloaded in a truck application and wipes out the bearings from the load. Work the sun gear drive shell back and forth to seat.
Sonnax Overdrive Servo Pin Kit

There should be nine springs in serviceable condition free of distortion. This center support carries the planet carrier. The most likely cause for this is a malfunctioning Transmission Range Sensor. Processor Outputs Electronically triggered solenoids are simple electromagnets. If there are no serious signs of rotor or cavity wear, the pump can be returned to service. Does it happen in one gear range or in all? Step 8: Install Extension Housing Output Shaft Seal After you add liberal lubrication to the output shaft seal, press it in.
4R70E transmission troubleshooting help, 4R70E rebuilding tips, 4R70E technical service bulletins, and 4R70E diagnostics from TRNW

Begin the pump inspection by verifying the bolts are torqued correctly and the stator support is secure. Pay close attention to the seal status. I say that not necessarily expecting that is the problem. Lubricate the bolt threads and check the bolt travel. Do I have to buy something else to resolve my snag?? Use plenty of lubrication on the center support bushing.
Ford 4R70W Transmssions
Direct Clutch Assembly Step 1: Install Direct Clutch Piston Seals When removing the old direct clutch piston seals, observe the seal installation and lip direction. Although these transmissions have a great deal in common, they are also very different, with limits in interchangeability. Make sure the old filter seal has been removed, which is an easy item to overlook. Excessive heat is the number one killer of all automatic transmissions, regardless of the make or model. They should rattle when you shake the clutch and shaft assembly. The 1-2 shift valve remains as is. Torque the gasket bolts to 107 to 132 in-lbs, not ft-lbs.
Ford AODE/4R70W Guide: Calibration, Building, Troubleshooting

Begin with the simplest, most commonsense issues. Step 3: Install Reverse Clutch Piston Install the reverse clutch piston seals using generous amounts of transmission assembly lube. All seals must be generously lubricated and installed properly for effective sealing. Step 7: Install Output Shaft Extension Housing Bushing The extension housing received a new bushing. The only inter-changeable components are geartrain related.
Common Complaints With the Ford 4R75W Transmission
The planetary one-way clutch overruns. If this cannot be achieved, go with the appropriate retaining ring:. The planet carrier splines inside the ring gear with gentle back-and-forth twisting to achieve proper engagement. When there is no power, the shift valves are closed. When the brake is pressed the computer will momentarily disengage the converter clutch. Do a leak check with compressed air.