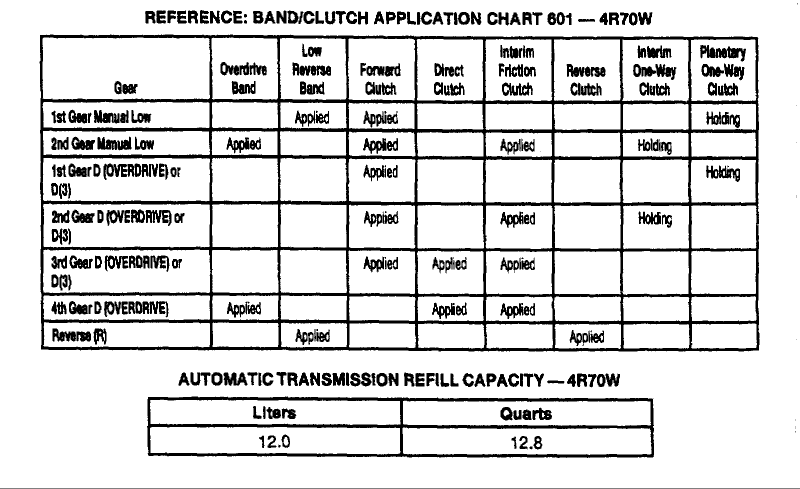
4r70w apply chart. Ford AODE/4R70W Guide: Calibration, Building, Troubleshooting 2019-05-11
TRANSMISSION APPLICATION CHART
It electronically controls line pressure based on throttle position, manifold vacuum, and vehicle speed. If it is brown or otherwise dark in color that is a clue. Park is the last manual detent when the linkage is full forward. As the 4R70W evolved to the 4R75W, an input shaft sensor was added. Step 8: Install Forward Clutch Discs Install the forward clutch frictions alternately between the steels. Rock these assemblies back and forth until the forward clutch is completely seated in the reverse clutch drum.
Troubleshooting the AODE and 4R70W Transmission
The low-reverse band is applied, which holds the planet carrier. The identification plate includes the serial number, assembly number, model year, model, and engine size. Reverse Gear and Neutral The reverse clutch is applied, connecting the input shaft to the reverse sun gear. Do a leak check with compressed air. Step 15: Install Thrust Washer Use assembly lube as an adhesive to install the thrust washer.
4 Bad Habits That Will Kill the 4R70W Transmission in Your Work F150 Pickup

Another possibility is a leaking 1-2 accumulator cover or piston seal. Unfortunately this would have to be a mechanical problem. Servo apply pressure is controlled by the low servo modulator valve. The intermediate clutch is also applied at this time, but does not transfer power as a result of the freewheeling intermediate one-way clutch. Once the nut and roll pin have been removed the shifter lever will slide out. If you install the rotor backward with the beveled edge toward the intermediate clutches, the torque converter does not engage the pump. It has three alignment holes slots.
TRNW: Transmission Rebuilders Network Worldwide. Transmission rebuilding tips, technical service bulletins, sprag rotations, checkball locations, pressure testing

In final drive, however, power passes through the unit differently. Step 3: Lubricate Seals Important! Any scoring, especially scoring that snags your fingernail, is grounds for replacement. Step 4: Install Torrington Needle Bearing Install the number-7 thrust needle bearing, also known as a Torrington bearing, along with the number-7 bearing support, which is a washer and not a bearing. Step 7: Install Reverse Clutch Plates Lay the clutch discs and plates into the reverse clutch drum. Generally a 1-2 shift error code would mean that the computer didn't see the engine rpm drop when it expected it to.
TRNW: Transmission Rebuilders Network Worldwide. Transmission rebuilding tips, technical service bulletins, sprag rotations, checkball locations, pressure testing
Did the problem arise after transmission service or part replacement? The only inter-changeable components are geartrain related. Step 2: Install Direct Clutch Piston Special Tool Carefully install the direct clutch piston using a seal installation tool to protect the seal lip. The 2-3 shift-point is also raised by a factor of 5. Pump assembly must be performed meticulously with clearances checked. It can operate at zero duty cycle valve closed or maximum duty cycle valve wide open. As you mate clutch assemblies, ensure complete mating and seating before loading each assembly into the case.
4 Bad Habits That Will Kill the 4R70W Transmission in Your Work F150 Pickup

This sensor could cause erratic shifting. I beleive the code is for a 1-2 shift error. Use plenty of lubrication as a pre-lube and for adhesion. It can cause the bands and clutches to slip. Generously lubricate the seal lip with assembly lube. Did it come on all at once or did it arrive gradually? Ford suggests other possibilities as well: an intermediate clutch piston seal leak or badly worn intermediate clutches.
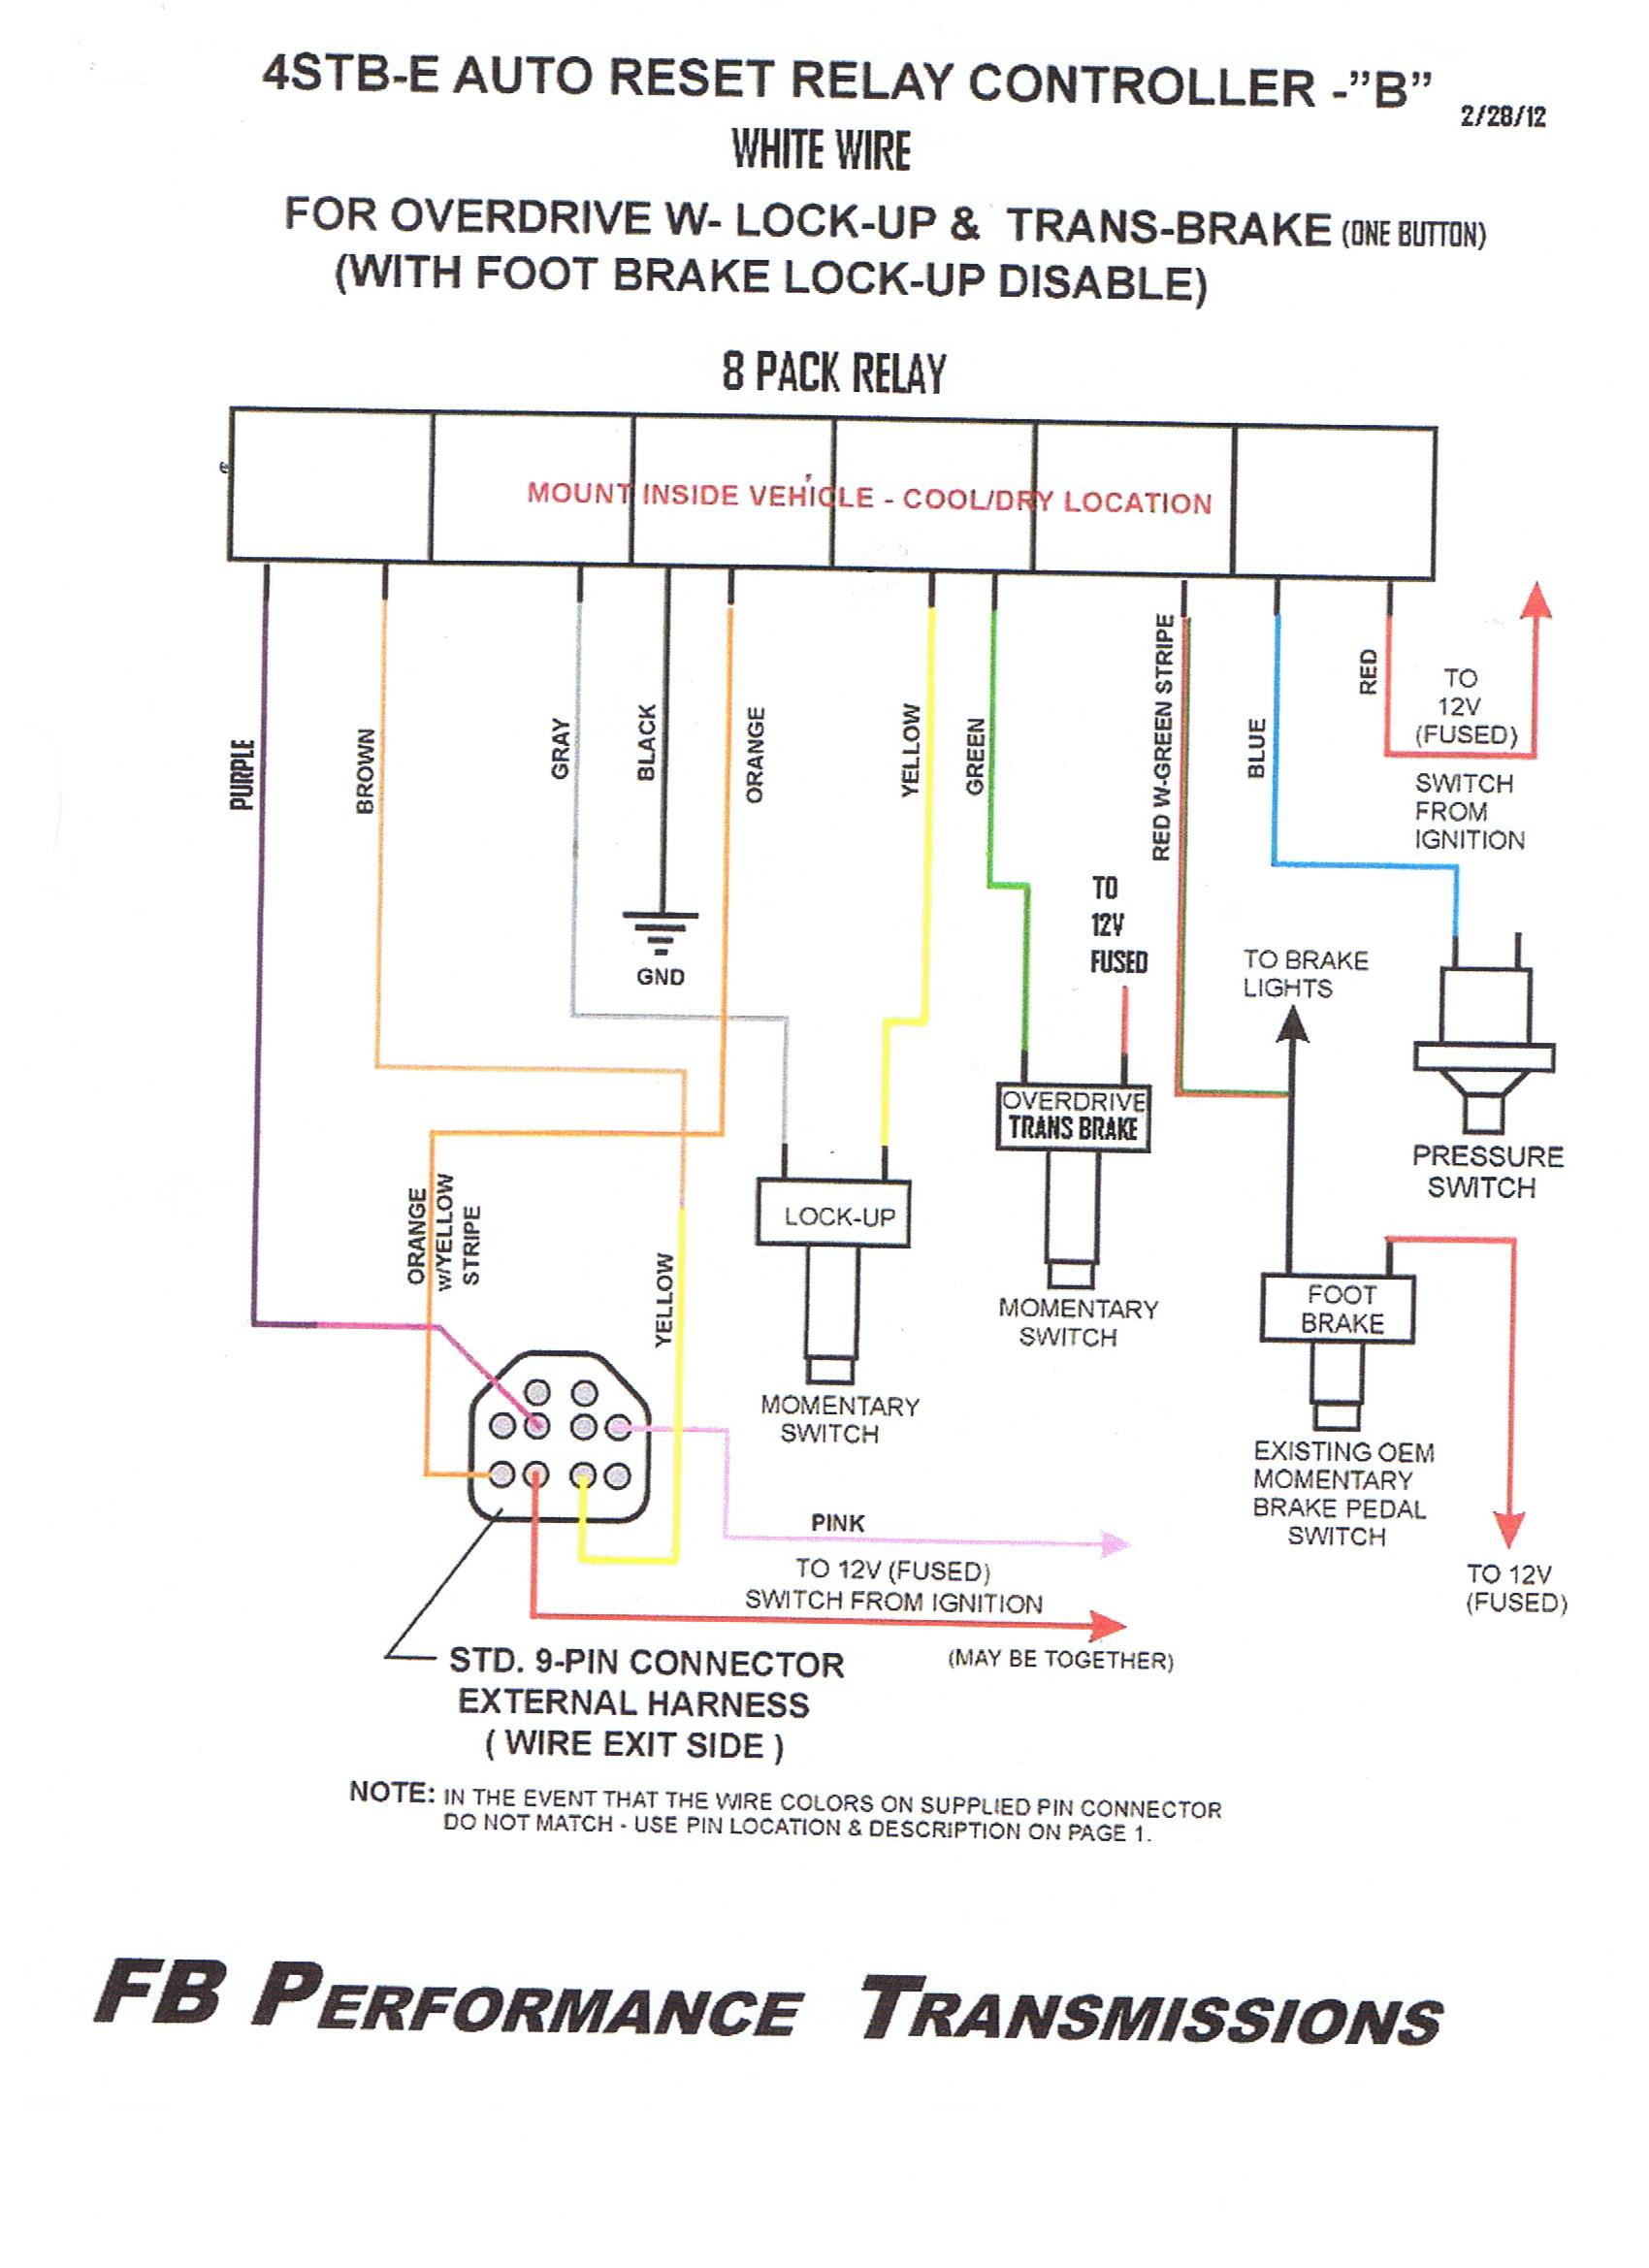
Performance Automatic

Third Gear in Drive In third gear in the drive range, the forward clutch is applied, connecting the input shaft to the forward sun gear. If the seal lip is pointed away from the bore, it does not hold pressure and the servo piston does not function. The transmission must be removed to check torque converter function. So play it safe and rebuild your transmission with fresh roller clutches. Wet frictions allow for more accurate clearances during assembly.
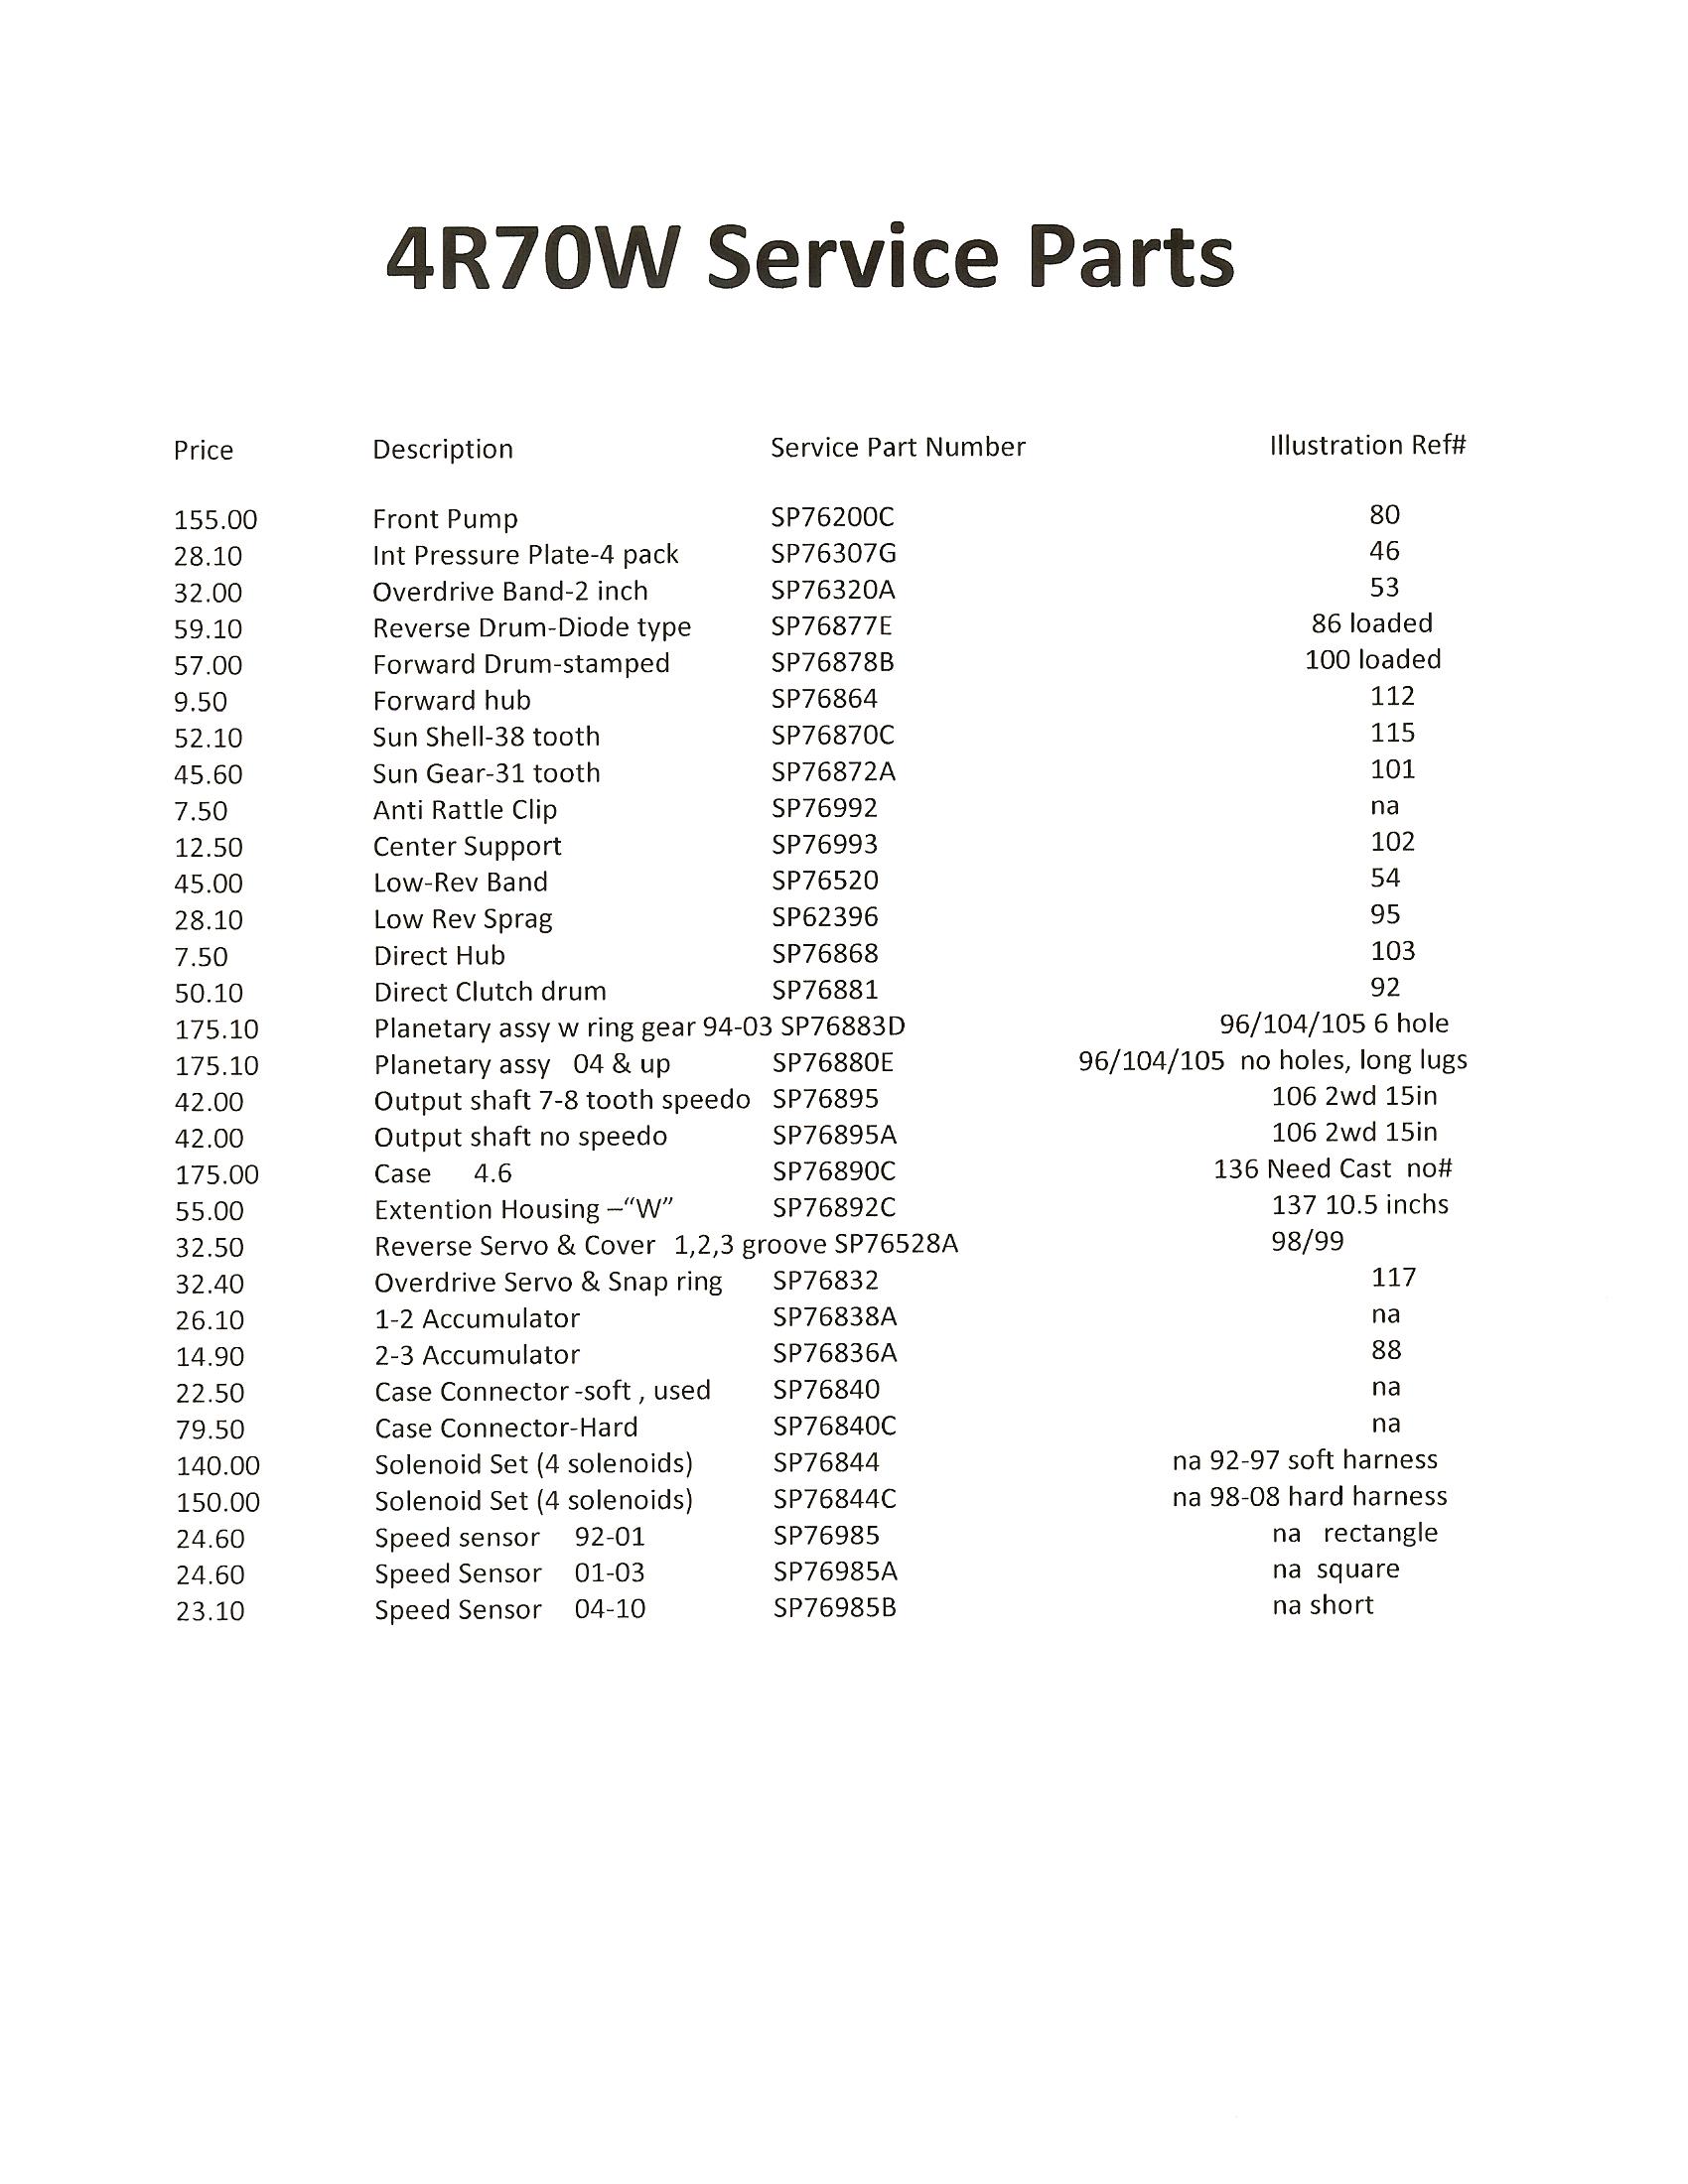
SOLENOID MASTER KIT, AODE/4R70W

A bad output shaft speed sensor could also cause erratic shifting, but these rarely fail. Excessive heat is the number one killer of all automatic transmissions, regardless of the make or model. Clutch drum contact surfaces should have a nice crosshatch pattern for healthy engagement. When the solenoids are energized, the valves are open. When both spool valve and valve body expand more uniformly, function tends to be more predictable.
4 Bad Habits That Will Kill the 4R70W Transmission in Your Work F150 Pickup
This could be a small or large problem. Step 3: Install Intermediate One-Way Clutch This is the intermediate one-way clutch installed. All bearing surfaces should have been lubricated. It goes in the larger of the two holes at the rear of the worm trail in the case. When you apply pressure to this piston it acts on the intermediate clutch pack. Step 9: Install Reverse Clutch Rear Pressure Plate Install the reverse clutch pressure plate rear or outer while checking all clutches and plates for freedom of movement.
Performance Automatic

It was a mess in there. Leaving the 1-2 accumulator retainer off would result in no second gear. Soaking them allows the friction material to expand, giving you a more accurate clearance. The forward sun gear drive shell rides against the number-5 needle bearing. Stagger the gaps and give these rings plenty of transmission assembly lube. Step 7: Install Direct Clutch Hub The direct clutch hub goes up against the number-7 thrust bearing.