Lightworks cut out video. A Simple Trick To Help Remove Background Noise In Videos 2019-04-20
Review: Lightworks video editor

To begin exporting, click on the Sequence thumbnail in your Sequences bin to select it. Now, at this point, the effect has been applied to the entire clip, and the effect is set to just 50%, so if you click Play over in the Viewer, the clip will start out looking normal, then very slowly fade to a sort of half-dark look. Join the edit and use the W key to add frames to the beginning of the next clip. And this time your heart drops. However, just because it lacks the of other programs doesn't mean you should reject it out of hand. Sometimes we learn more about a character by watching how he reacts to his partner.
Shotcut
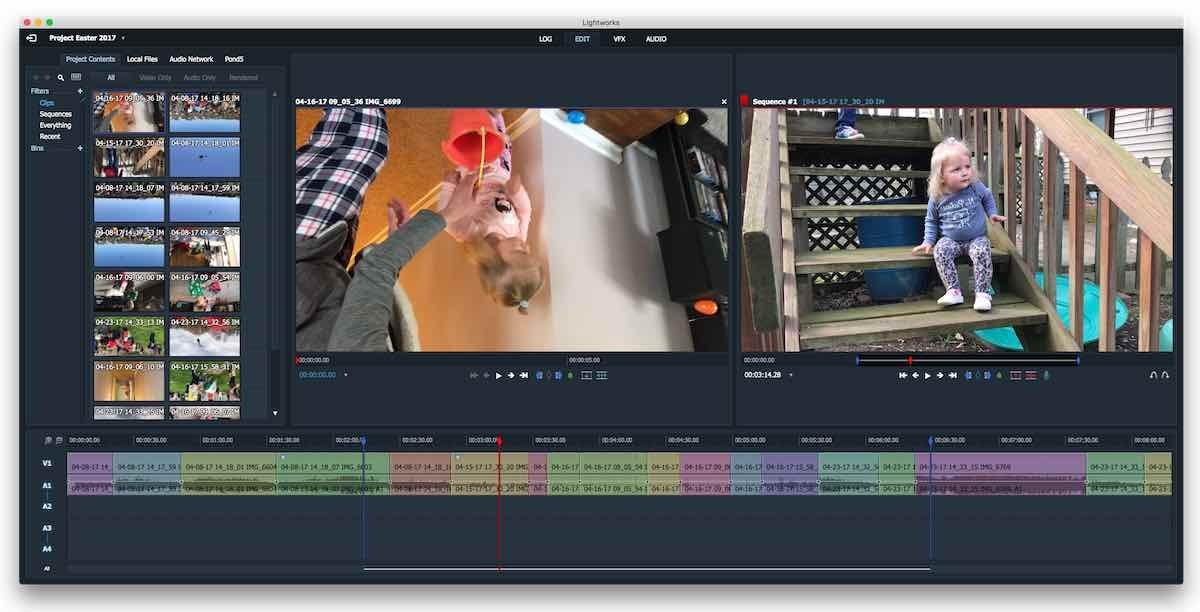
Hum from lights is white noise. Remember, almost everyone will be listening to your video through tiny speakers on a computer or mobile device. Checking out Tom's Guide for more and. The printed image can then be placed near the keyboard as a reference. Simply drag the line up to raise the volume, and drag it down to lower the volume. By giving each sequence its own Timeline, Lightworks 14 allows users to keep various sequences separate from one another, so that they can work on just one piece at a time. If hum or hiss is your issue, from the sidebar menu choose Remove noise or hiss 4a.
Lightworks problems importing, editing, and exporting using Canon EOS Rebel T3i

To make an empty cut, do the following. Export the fixed audio file from Audacity as a. We hear the audio and subconsciously prepare ourselves for the cut. Because you notice annoying background noise in the video. No title tool at this time, might arrive in the next Beta or might not arrive until the release version.
10 Lightworks Tutorials for Video Editors

A sequence can be a single scene or a completed video of connected scenes. Movavi Video Editor gives you an easy and fast way to cut down video length and also lets you edit movies in many different ways. Basically any noise where the frequency never changes is white noise. Other than that you have an Audio Mixer and you can move audio and adjust the dB via the Timeline. To that end, I think EditShare ought to take note of the way a program like Avast! Sleek, Intuitive Interface Multiple dockable and undockable panels, including detailed media properties, recent files with search, playlist with thumbnail view, filter panel, history view, encoding panel, jobs queue, and melted server and playlist. Because we are artificially increasing this pause, we have pulled in unwanted audio. Last time we cut footage onto our timeline, we used a replace edit, so lets try something new.
Lightworks 12.6 Review

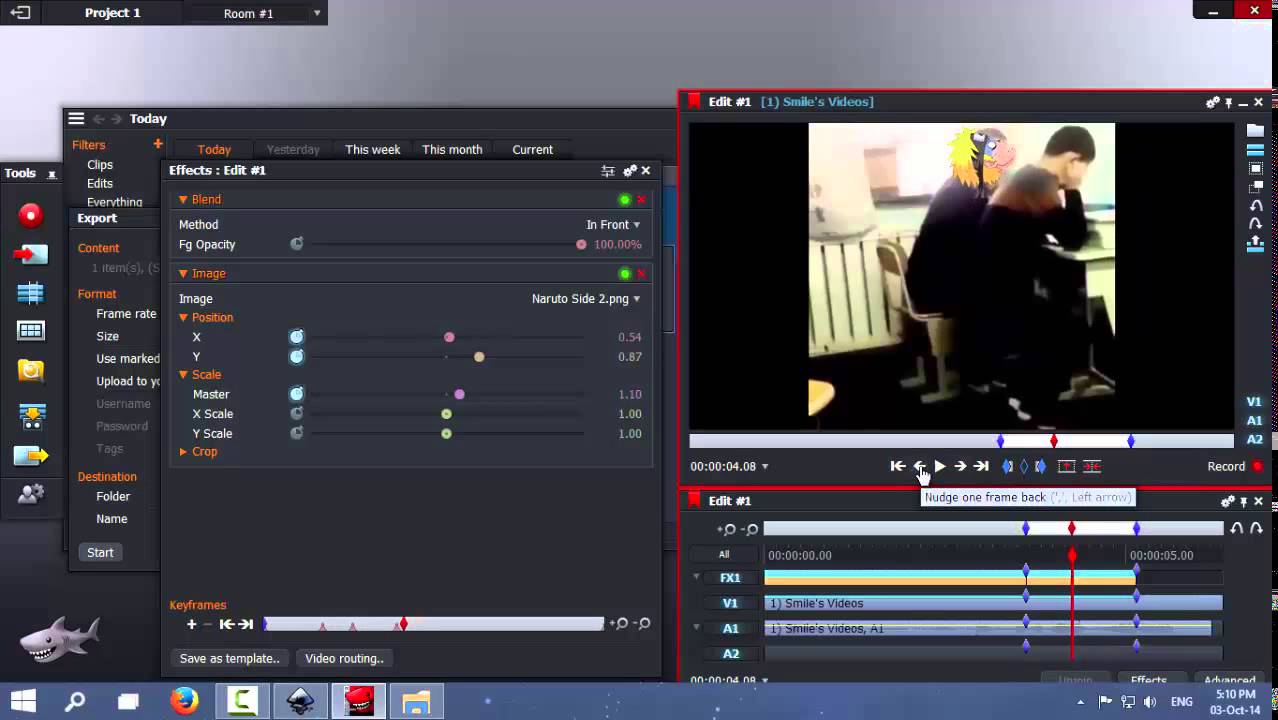
Speaking of which, there are a two options to get our freshly marked piece of footage onto our main timeline: insert and replace edits. Many popular editing softwares—including Adobe Premiere, Final Cut, Sony Vegas, and even iMovie or Windows Movie Maker—utilize a click-based, drag-and-drop timeline editing interface. The Log tab features a Project Contents bin on the left half of your window. The video monitor will expand to show you the last frame of the clip to the left and the first frame of the clip to the right. Lightworks Pro offers additional features, format support and inclusion in the Lightworks Pro Community. We can very easily remove it from our timeline with the mark and park technique.
Tahir Hassan's Blog: Lightworks: Cut out sections of a video
This is why audio recordings are done with multiple tracks rather than recording everything to one output. Lightworks seems to really excel in project sharing capabilities with the ability to share media, bins and edits with controlled permissions. To use Audacity to remove background noise from your videos, do following: 1. Join super friends Adelie the penguin and Aramis the gnu on surreal adventures in the file tree. Open it up in your video editing software and replace your original audio track with the new, fixed one.
Lightworks for Windows: Your Next Video Editing App?

You only have one destination monitor, which is attached to a timeline. Whatever the case, you set out to find how to remove it. All of the keyboard shortcuts for trimming are located between the letters Q and U. Open it up in your video editing software and replace your original audio track with the new, fixed one. This is actually somewhat useful for those occasions where you have roughly marked an in and out but want to go back and fine tune them before cutting to your edit timeline. If you go above 100%, that makes the clip play faster, and below 100% slows it down.
Review: Lightworks video editor

For the record it has been this way since I started using Lightworks or at least since I remember. Now me i actually used light works a long time ago around maybe 1994 or 1995 but i switched over to Avid because all the editors in the production office were working with Avid so i closed my chapter with Lightworks. With the video and audio tracks enabled, place the playhead on the video cut and press the W key. Instead, you have to already know where to click on the clip to get it to react in the way you want. Now this segment has been completely separated from the rest of your video, so you can simply remove it by hitting Delete. Install the Video Cutter Open the installation file and install the program following the onscreen instructions.
Keyboard Shortcuts

To use WavePad to remove background noise from your videos, do following: 1. Hi, I'm pretty bad at tech and stuff so if you could help me out that would be great. I think This is a good idea. Check out two of the Lightworks video tutorials below Creating a Project and Getting Started orto view them all. This also makes sense if you are following the general editing rule to only cut when new information is presented.
Shotcut

To cut an unwanted segment from the video, place the red marker at the beginning of the unwanted section and click the Split icon. Export the fixed audio file from WavePad as a. These realtime collaboration features work with any network storage, and make Lightworks a good solution for larger post production environments. The footage is recording a single man voice in a very silent environnment. Audio Fade You can also make audio clips fade in and out using just one simple action.