Neon srt4 oil pressure sensor. Where is the oil pressure sensor in a 2005 Dodge Neon 2019-01-14
2005 Dodge Neon Oil Pressure Switch/Sender
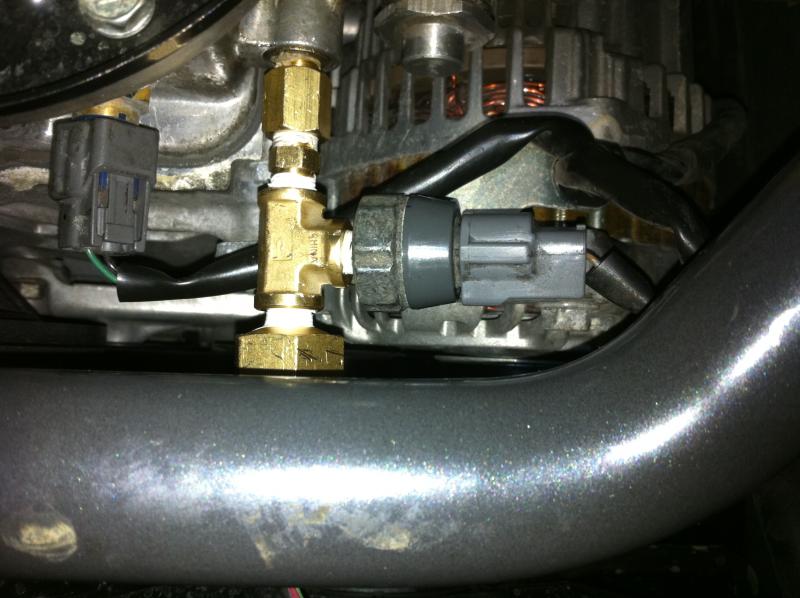
Take a good quality penetrating oil and spray the throttle pressure lever the top of the shifter lever , see attached pic, let it sit for a few moments, at this point I find it easier to clamp a small set of vice grips onto the stud where the throttle pressure lever was attached, then you will have to work the vice-grips back and forth, it will be stiff. Pull the valve cover, being careful to note the extra bolts located in the center, I think eight fasteners total. You can see that there is a T threaded into the factory oil pressure sensor fitting. The difference should be 2. It comes with the pressure sensor, gauge, and gauge retaining nuts.
2005 Dodge Neon Oil Pressure Switch/Sender
On 2001-2004 vehicles with the 2. All bolts are 15 mm. I tried many different oil filters and called many repair shops including the dealership. This will not cause premature lockup, but it will wear-in your rear shoes for the rest of the night, possibly into the next day. Get some 10 or 12 gauge wire and four alligator clips. You can really feel if one side is off, and you never want an imbalance in the brakes. On the other side, is the electrical pressure sensor that came with the electrical pressure gauge.
03

Stick the new gaskets into the valve cover and apply a small dab of sealer to the corners of the valve cover gasket. If your Neon door is squeaking, spray white grease into the door in front of and behind the middle hinge this is the bar that attaches with two bolts onto the body of the car - it is used to prevent the door from opening too far, and to stiffen up the detents. Clean them up, scrape mating surfaces with a knife to make shinny and then reconnect. It may take a few minutes but it will come free. When the wheel spins less than one full rotation after you try to spin it, your brakes should be nice and tight. You have to have a load to separate the adhesive so the corrosion can start to begin with.
Plymouth / Dodge Neon repairs and problems

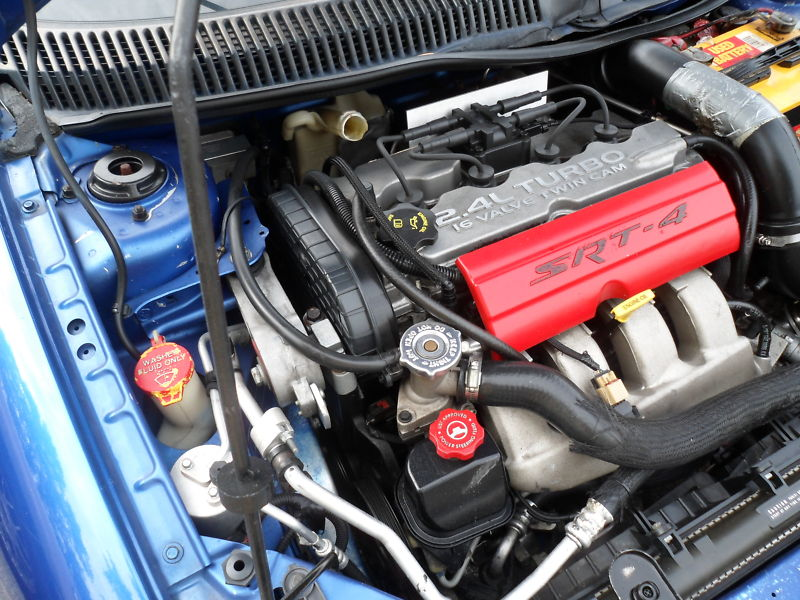
This way you keep the factory oil pressure sensor in place, and you can also hook up either your mechanical or electrical gauge on the other side. Then remove the center bolt which connects the engine to the center of the mount. When you can easily move the lever all the way back and forth you are ready to re-install the lever and cables once the cables are installed, work the throttle pressure lever all the way and let it go, it should snap back on its own , then the battery tray and battery. Sneak it out between the corner of the valve cover and the wiring harness, being very careful because there are some bits that stick out and tend to catch wires. This gauge displays 0-100 psi and is available with a black or white face.
Oil Pressure Gauge Install Dodge Neon
Examine the vacuum lines in the engine compartment. You can prevent automatic transmission failure by installing a cheap transmission fluid cooler -. Money Making - 2003 Dodge Neon Oil Pressure Switch Replacement How To Change, Replace, Install - howto-make. Place the valve cover back and resecure. This way you keep the factory oil pressure sensor in place, and you can also hook up either your mechanical or electrical gauge on the other side. These are easy to replace or repair.
Where is the oil pressure sensor in a 2005 Dodge Neon

To remove the sensor, loosen just a quarter turn or so each of the lug nuts on the wheel whose sensor you want to replace. The front mount is easily replaced - remove the three bolts holding it in first watch out for a big, heavy steel bar which will drop down when the middle bolt is removed. If someone can clarify the correct size for me that would be awesome. Remove all of these gaskets, dry the mating surfaces on the head and the valve cover and clean off any gasket sealer. Remove the spark plugs and note which tube or tubes were bathed in oil.
Mopar Electric Oil Pressure Gauge (0
You simply run a single wire from your sensor on the block to the gauge. The old mount will come out easily, the new one bolts in start with the center bolt, then do the rest and torque appropriately. Next up: the rear mount, which looks like a shock absorber. Then, the factory oil pressure sensor is threaded into it. This can be removed from the driver's side - the nut on the other side is welded onto the car itself. Replacing the front wheel speed sensor Matt Hurley The wheel speed sensor and cables are absolutely critical; make sure they are installed properly! Then you'll need wiring to go between the sensor and the gauge, and wiring for the gauge to light up. My speedometer has worked flawlessly since! The rear of the control arm then drops down and rests on the crossmember resulting in a 'clatter' over bumps.
How to install oil pressure gauge on your Neon/SRT4/Caliber/Cobalt.

Be careful not to overtighten the brakes. Next, remove the speed sensor cable assembly grommets from the retaining bracket. Installation of the new sensor is, well, the reverse. Well, its easy, with an oil pressure gauge! You can see that there is a T threaded into the factory oil pressure sensor fitting. Carefully reach the tool inside the window and down just a bit, until you can feel it against the teeth of the gear that tightens the shoes against the drum. An analog type multimeter with an undamped needle is more useful here than a digital one. A set of homemade jumper wires are also useful.