2004 honda crv wiring diagram. 2004 2019-03-19
2004 Honda Cr V Wiring Diagram
Once I put power on the harness, it rose smoothly and well. Simply sit in front of your beloved computer or laptop that is connected to the Internet, you will get numerous helpful unique ideas and you can apply it for your purposes. If everything is reinstalled we'll go ahead and try out the four bolt connector. Without a specific problem being stated it is difficult to recommend a specific type of repair. Then we'll go ahead and test a brown wire for a running light circuit. If equipped, connect sensor wire harness mounting clips to engine or body. I should also mention that the car has a 2 way remote start unit that was installed about 5 years ago by a shop here in town.
Driver Window stuck down, rain coming, need wiring diagram

Be sure to do a good job with the solder gun, you don't want an intermittent connection for this important sensor. The gear light came back on and the car continued to run. The AutoGuide network operates more than 100 automotive forums where our users consult peers for shopping information and advice, and share opinions as a community. Once you let the magic smoke out they will cease to operate. If equipped, disconnect sensor wire harness mounting clips from engine or body. First off we'll go ahead and show you how to use it.
Honda Crv Car Alarm Wiring Information

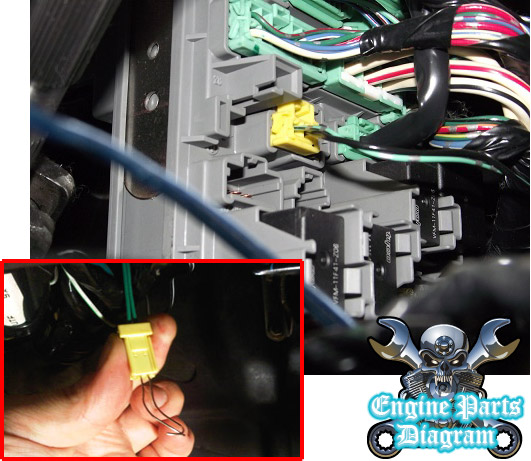
The factory alarm plug is a green plug to the left of the steering column. Three easy ways: 1st you local library may have a manual that includes the diagramsyou need. . I don't want to do the plastic thing or have rain in my car. If you run across any guides on it, I'd like a copy of one. Hope thats help remember comment and rated this. Before I could look into that we noticed there was the tell tale smell of wires getting hot.
Car Alarm Wiring Diagram and Car Wire Schematics

The factory alarm plug is a green plug to the left of the steering column. If you like this article you can bookmark or share it to your social media account, I thank you quite due to the fact that you have actually seen this web site. You'll have to splice the stock sensor wire connector located near the engine lift loop near the firewall onto the replacement O2 sensor. I am hoping you will like it. Free Wiring Diagrams regarding 2004 Cr V Radio Wiring Diagram by admin 2003 Honda Crv Wiring Diagram regarding 2004 Cr V Radio Wiring Diagram by admin 2001 Honda Crv Radio Wiring Diagram — Schematics And Wiring with regard to 2004 Cr V Radio Wiring Diagram by admin How To Honda Crv Stereo Wiring Diagram — My Pro Street within 2004 Cr V Radio Wiring Diagram by admin. We have collected lots of pictures, ideally this picture serves for you, and also assist you in locating the answer you are seeking. To gain access behind it we need to remove the fasteners securing the drivers side quarter panel.
Wiring Diagram For 2004 Honda Crv
Vehicle was pulled over, and the consumer stopped the engine. I would like to have this same schematic but for the passenger front window. I can usually get everything I needfor a parti … cular problem in 10 pages. We'll go ahead and unwrap the tape and plug in our new plug and tow connector. Next we'll go ahead and remove a threshold behind it.
2004 Honda Cr V Wiring Diagram
Connect O2S sensor wire connector to main wiring harness. Once the smoke cleared consumer could see that the wires in the engine compartment were melted. Wiring Diagram For 2004 Honda Crv — Readingrat within 2004 Cr V Radio Wiring Diagram by admin Through the thousands of images on the internet in relation to 2004 Cr V Radio Wiring Diagram, we all choices the very best selections using ideal image resolution exclusively for you, and now this pictures is usually one of photos collections in this ideal graphics gallery about 2004 Cr V Radio Wiring Diagram. Our connector is going to be inside of the vehicle so we're going to open up the back door. Tachometer Wire: Blue Tachometer Wire Location: Tachometer Test Connector. Hopefully someone will have a wiring guide and can tell me which wire to connect to what to make the window go up? The oil had sprayed all over the underside of my vehicle and started to burn.
multiplex control unit

Use both wires and diode isolate each. You can also find other images like wiring diagram, sensor location, fuel pump location, starter location, control module location, parts diagram, replacement parts, electrical diagram, repair manuals, engine diagram, engine scheme, wiring harness, fuse box, vacuum diagram, timing belt, timing chain, brakes diagram, transmission diagram, and engine problems. Next we'll take a moment to secure the converter box with a zip tie to existing wiring inside of the vehicle. Are there any modules or anything that these lights run through under the dash? The factory alarm plug is a green plug to the left of the steering column. Hold at a steady state speed of 55 mph for three minutes.
2004
The test tachometer connector is a two pin connector behind the battery. It started as an intermittent problem with the high beam indicator staying on even though the high beams were not on and the switch is in the low beam position. Now we'll go ahead and try it out. I was told to drive it over the weekend and see if the problem persisted. When I called my boyfriend to come help me 15 quarts of oil later and 2 filters later, it was finally noticed the original O ring had melted to the block.