96 ford ranger transmission pump. Seven Common Problems With The Ford 4R55E Transmission 2019-03-13
The definative '96
Tighten the lug nuts to specification. Slide the clamps over the replacement hose, then slide the hose ends over the connections into position. Use a valve spring compressor tool to relieve the spring tension from the retainer. On models with the front locking differential, add 2 oz. Remove the bottom half of the shroud by pulling the shroud down and toward the rear of the vehicle. Install the distributor into the engine.
FORD RANGER MAINTAINCE AND REPAIR MANUAL Pdf Download.

The resultant wiring would hold the correct firing order, but could change the relative placement of the plug towers in relation to the engine. So I decided to get in it and run it about 90 mph for about five miles to see if it would do it, and sure enough it did, so I went back home and got my grandfather to hold the digital camera while I drove the truck. Tighten the retaining bolts to specifications. The bump helps send a bit more fuel to the engine to account for the slow acceleration, due to density, of the liquid fuel. Install the radiator in the reverse order of removal.
Ranger Water Pumps

Ensure that the rear mounting bracket is engaged on the mounting track in the panel. Install the wheel and tire assembly. For premium starter motor function, the resistance in the starting system must be kept to an absolute minimum. Remove the mounting brackets, retainers and stabilizer bars. Remove the auxiliary shaft cover and thrust plate.
FORD RANGER MAINTAINCE AND REPAIR MANUAL Pdf Download.

Attempt to lightly blow air, once again, through the solenoid. Sodium based grease is not compatible with lithium based grease. Install the air conditioning compressor. Using a wire feeler gauge, check and adjust the spark plug gap. If the spacers were installed under the center bearing be sure to reinstall them. A faulty bearing or leak in the water pump can cause serious damage to your Ranger's engine. Next check the free length and squareness of each spring.
1996 Ford Ranger TSBs
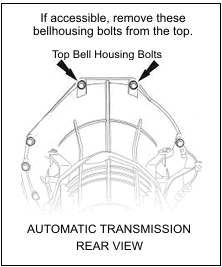
If the bushing needs to be replaced, you need to make sure the replacement bushing will fit in the center of the bellhousing. Position the thermostat in the housing making sure that the air release valve is in the up 12 o'clock position. For 2 wheel drive vehicles, see Section 8. It also had a computer controlled torque converter lock-up. Install the tensioner with the clip in place to keep it retracted. When I bought it it had been setting for a few years because of a bad transmission. Disconnect the negative battery cable.
96 1996 Ford Ranger Water Pump

The 5R55E, though mechanically identical to the 4-speed 4R55E, was a five-speed transmission, the first produced by an American maker. If it wasn't for that I could just poke around on it and it would be fine all day long. Remove the manifold attaching bolts. Well they called back the next day and told me that the senser was bent and that the timing belt was 3 teeth off. Always use a new gasket coated with sealer.
Seven Common Problems With The Ford 4R55E Transmission

However, it is not necessarily the best, and in some cases, a knurled valve guide will not stand up for more than a short time. Markings on the heads of most bolts will help determine the proper strength of the fastener. Use a suitable solvent to clean these areas. I drove it without overdrive until the trans went out and I payed 1700 to but another one in which was 2 years ago, it had 107,000 on it when it was put in. Seven Common Problems With The Ford 4R55E Transmission Posted by on Friday, March 15th, 2013 The 4R55E is a four speed automatic transmission made by the Ford Corporation and was used in vehicles made between 1995 and 2001.
96 Ford Ranger Transmission
Start the engine and check for leaks, then roadtest the vehicle for proper operation. Depress the shaft release button and remove the knob and shaft assembly. Clean and lightly oil all fastener threads. Competent and accurate machine shop services will ensure maximum performance, reliability and engine life. Install the remainder of the locking hub assemblies.
The definative '96

On 1992 and later vehicles, there are two styles of thumb wheel adjusters. Also, I've had the front calibers, upper and lower ball joints replaced and the back brakes as well. Make sure that the timing marks are still aligned. Remove the jack and jackstands and lower vehicle. The rear cooler line is the cooler return line.
Seven Common Problems With The Ford 4R55E Transmission
Assemble a puller to the damper and remove it. Install the engine into the vehicle. Most areas require extra marker lights for overwide trailers. All other engines use a timing chain, and no periodic inspection is required. Maybe the best location to discover cars available for sale goes to your neighborhood supplier.