Fast user switching windows 10. How To Disable Fast User Switching In Windows 10 2019-03-27
How to Disable Fast User Switching in windows 10, Easy Method

Then close the registry editor. There are two options you can choose to close the feature — Fast User Switching, namely, from the group policy and registry editor. It is usually a good idea to run system restore automatically so you always have a recent version to rebuild your computer should anything happen. Have a look at the screenshot below. You need to use Local policy editor to enable or disable fast user switching windows 10. These are the three methods to disable fast user switching windows 10.
How do I re
Before proceeding, ensure that your user account has. Firstly, press Windows + R to launch the Run dialog box. The Windows registry editor is a critical tool which must be used carefully as the overall operation of the system depends on it. Solution 2: Use Registry Editor to Disable Fast User Switching It is also feasible for you to turn on or off the Fast User Switching from the registry editor. Method 2: Editing the Registry Value We do not recommend using this method, as you will be messing around with the registries a little bit. By now, you are done with all the settings. Now, follow the instructions below.
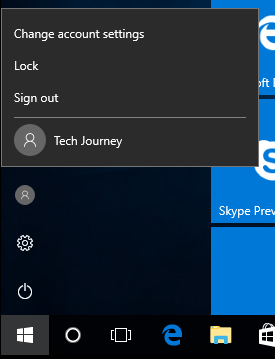
Switch User in Windows 10
If you are facing any issues while following the above-mentioned steps, tell us in the comment section below. Windows 10 Fast user switching is a feature with which a user can log into the Windows 10 computer even when other users are logged in with their applications running in the background. The process is exactly the same. Most of them reported it as working perfectly without any problems. Method 2: Disable Fast User Switching Windows 10 via Group Policy The above method to disable fast user switching windows 10 is specifically dedicated to Windows 10 home users. So this is how you can disable fast user switching option on your Windows computer.
Disable Fast User Switching in Windows 10

These are the only two most accurate methods which can be used to fast user switching in Windows 10 operating system. You need not to close the files that you were working on. If you have any further queries regarding the methods mentioned above or regarding the Fast User Switch Option in Windows, you can drop us a comment below and we will do our best to get back to you with a relevant answer. This post shows enabling or disabling Fast User Switching using two methods. You may need to enable to disable Fast User Switching on Windows 10.
Switch User in Windows 10

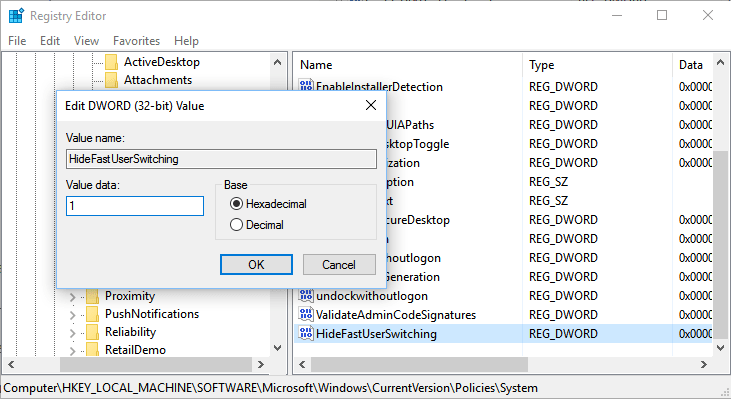
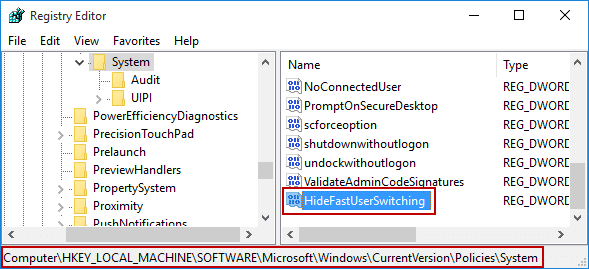
Here you can see the value data at first is 0, change it to 1 to disable the Fast User Switching. In this , we walk you through the steps to disable Fast User Switching. It will scan your system files and to repair missing or corrupted system files in Windows. Multiple Users cannot be logged in simultaneously and the option will no longer be available on the Start Menu. So, keep it in your mind, it is an advanced way to disable the fast user switching features, not a toy for the child. Once you set the value data to 1, Fast User Switching feature would be disabled. On reaching to the System, you will see the following window.
How to Disable Fast User Switching on Windows 10
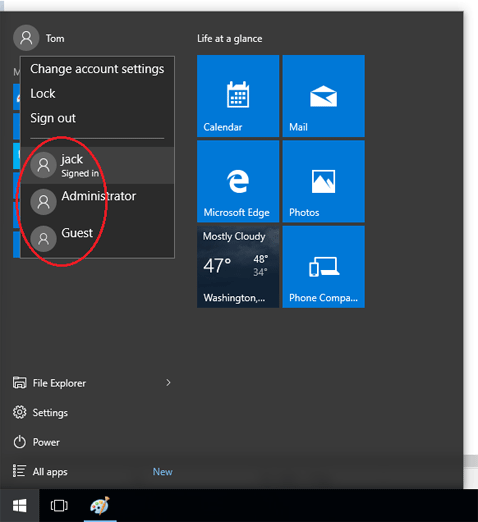
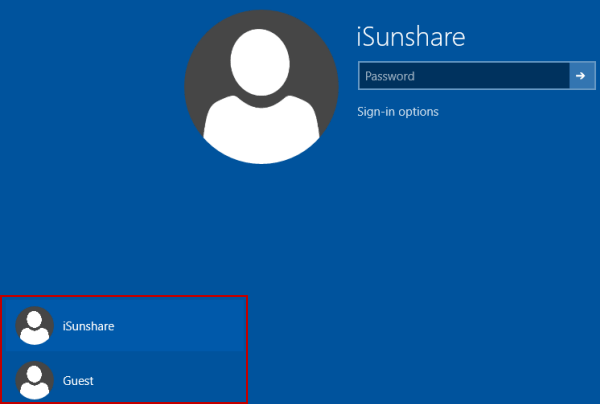
This will simply hide disable fast user switch feature. In the above screenshot, you can see two partitions of the windows. As a result, when you have signed out of an account, there would be no place to click-to-switch to other logged in users. If you have multiple user accounts, they are all listed when you click your user name on the Start menu! This feature was developed to save time as well as the trouble of rebooting the system. Now Double click this option to open the Hide entry points for Fast User Switching Properties window which looks like the below screenshot. Double click this file and you will see options like below image. Alternatively, you can simply right-click HideFastSwitching and select Delete to remove the item.
How to Disable Fast User Switching in Windows 10
Instead, it will hide all buttons or places that you can click on to use it such as the Task Manager, the Start menu, Ctrl+ Alt+ Del or sign-in screen. Warning:- The Registry Editor is a very effective and powerful tool. In the Registry window, you will see some options in the left pane. As sooner the Local Group Policy Editor window is opened, you will see Computer Configuration option in the left pane, just click on this option to see Administrative Templates. The same stands for the case of Windows Registry. Head over to the following path.
How to Disable Fast User Switching Windows 10 [3 Ways]
If more users will be signed in on the same computer, obviously more resources will be used that causes slower system performance. Else, wrong registry settings can damage your computer even more and make it unstable at times instead of resolving the disable fast user switching windows 10 error. The actual purpose of this feature to allow the people to signed in with numbers of the user account. Press Windows + R to wake up the Run box. Now, you can disable Fast User Switching in Windows 10 Professional or Enterprise edition. You will need to reboot again for the change to take effect.
2 Ways to Enable/Disable Fast User Switching Windows 10
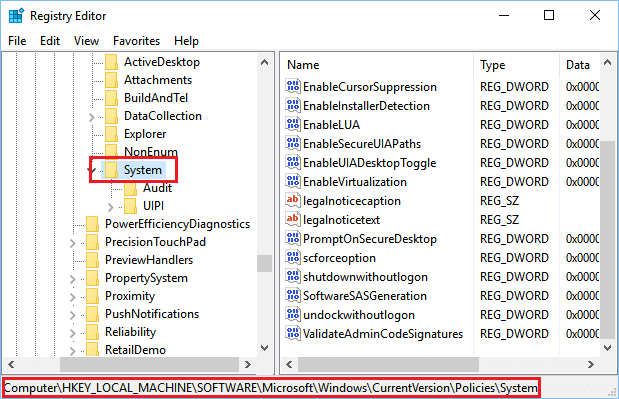
You are to change the settings in these two programs so as to enable or disable the quick user switching feature on Windows 10. If your colleagues or family are conscientious and always close everything down before logging out and always save their work, all is good in the world. In fact, there are two ways of doing that. And definitely, it is not the way you want it. Out of them, you need to click on the System to explore further options.
How to Disable Fast User Switching on Windows 10
Even though this article is directed at Windows 10 Users, the instructions should work with versions going back to the ancient system, as well. Disable Fast User Switching in Windows 10 Using Group Policy There are two ways you can do this; the first one is using the Group Policy editor. The user will stay logged in, and all running applications will keep running even if the new user is working on the same computer. You no need to follow the detailed instructions given in the Method 1 to disable fast user switching windows 10 if you download and run that tool. However, users won't have access to it forcing them to save their work and sign out before another person can sign in. The first and foremost step is to click on the start menu and type in gpedit.