Lexus rx330 service manual pdf. Lexus RX350 / RX330 / RX300 PDF Manual Download 2019-04-11
2004 Lexus RX330
Disconnect the inlet radiator hose. Remove the left and right tie rod ends. Tension the belt to 170-180 lbs. In normal cruising, the vehicle will start in first gear and automatically shift up to the most suitable gear. Intake air surge tank mounting 8.
Lexus RX300 PDF Manuals online Download Links at Lexus Manuals

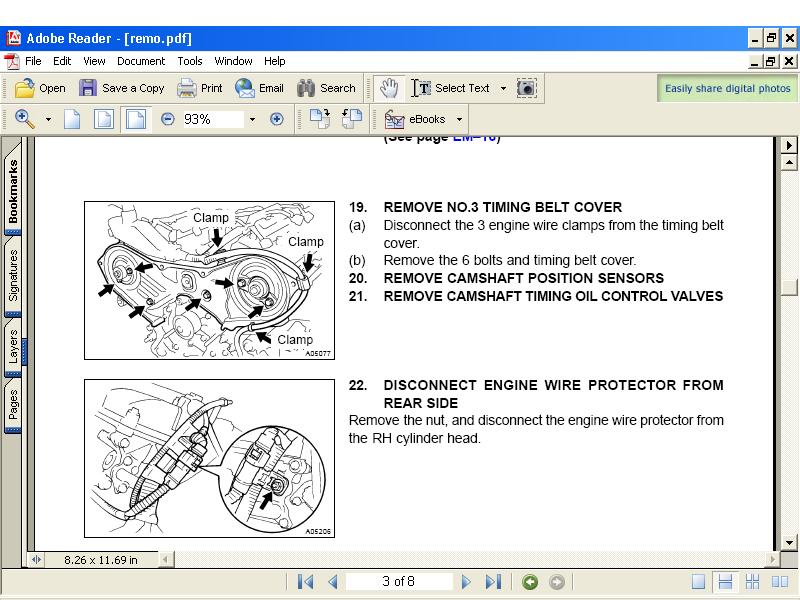
Using a small thin flat bladed tool, turn the valve lifter so that the notches are perpendicular to the camshaft. Raise the engine, transaxle and front suspension member as an assembly into the vehicle. Install or connect the following: Exhaust manifold to the engine, using a new gasket. The amount of lumbar support will change while the switch is pushed. Install or connect the following: Battery tray and battery Battery cables Heater air duct Left and right ventilator louvers Window washer hoses from the ventilator louvers Top cowl seal and panel Wiper and blade assembly Hood New oil filter 9. Two Hours Before Derivery H. Check valve clearance and replace the shims as necessary.
Lexus RX 330 Workshop & Owners Manual

Install or connect the following: Moving control rod. Before servicing the vehicle, refer to the precautions section. Install or connect the following: Negative battery cable Heater air duct Left and right ventilator louvers Window washer hoses from the ventilator louvers Top cowl seal and panel Wiper and blade assembly 12. Disconnect the power steering hoses. Contact your Lexus dealer as soon as possible.
2001 Lexus RX300 Owners Manual Pdf
This is not surprising, because the original purpose of creating the company Lexus and was the production of prestigious cars, expensive, luxurious, beautiful. Position the jack at the jack points as shown. Apply a light coat of clean engine oil to the bolt threads and under the bolt head. Tighten the 5 bolts to 74 inch lbs. Secure the exhaust camshaft sub-gear to the main gear using a service bolt.
Lexus RX330 AWD Service Manual
Bleed the air from the cooling system. Make sure the shoulder belt past the slot of the guide as shown above. D Do not place the shoulder belt under your arm. Uniformly tighten the bolts and nuts in several passes. Engine undercovers Negative battery cable Rear Manifold 1. Install the belt on each pulley. See page 292 for details.
LEXUS RX330 2005 OWNER'S MANUAL Pdf Download.
Apply a force of 22 lbs. To turn it off, push the switch again. Remove the 2 bolts and No. Doing this may properly, contact your Lexus dealer. Place the head on wood blocks in a clean work area. The remainder of installation is the reverse of removal. Remove the engine roll control rod.
LEXUS RX330 2005 OWNER'S MANUAL Pdf Download.

Fully extend the shoulder belt to put it in the lock mode. Remove the exhaust and intake camshafts from the right side cylinder head, as follows: A. Before servicing the vehicle, refer to the precautions section. When reinstalling, remember that the camshafts must be handled carefully and kept straight and level to avoid damage. Remove the 8 bearing cap bolts and remove the caps. Remove or disconnect the following: Wiper and blade assembly Top cowl seal and panel Page 21 Window washer hoses from the ventilator louvers Left and right ventilator louvers Heater air duct 3.
Lexus RX330 Workshop Manual PDF

Check and adjust the valve clearance. Remove the 9 bolts and cylinder head cover. Replace the head restraint and lift it up to the uppermost lock position. Record the measurements on valves No. The purpose of these labels is to reduce the incidence of vehicle thefts by facilitating the tracing and recovery of parts from stolen vehicles.
2001 Lexus RX300 Owners Manual Pdf

Using an 8 mm hexagon wrench, install a new gasket and the air intake chamber assembly with the 2 bolts and 2 nuts. Remove the bearing caps, keeping them in order, remove the oil seal, then lift out the intake camshaft. Remove the battery and battery tray. Lexus recommends that D Used engine oil contains potentially harmful the oil level be checked every time you refuel the vehicle. The mark should be at the 3 o-clock position. Tighten the bolt to 41 ft.
Lexus RX 330 Workshop & Owners Manual
Expensive rotor damage can result if the pads are not replaced when needed. Apply sealant to the cylinder heads where the camshaft supports meet the cylinder heads. Tighten the nuts to 36 ft. Utility vehicles have a significantly higher rollover rate than other types of vehicles. Oil and other fluids may Lexus Warranty statement for details and suggestions. Apply liquid sealant to the oil pan and engine block. Remove or disconnect the following: 3 oil strainer nuts and gasket 7.